I wasn't really sure what to call this post--it's not a simple review, but rather a recipe where I modified a the method a bit to *finally* make what I was hoping for: perfect seitan "turkey". I'd made several recipes around Thanksgiving and just couldn't get it "right"--the texture was always somehow off (a little or a lot).
The flavor also always had a very subtle underlying yeast-like taste (that sounds gross, but think of it like bread; which makes sense, considering a main ingredient is vital wheat gluten). It didn't taste BAD, and I actually found it pretty good--it just wasn't what I was going for.
I didn't want to give up on seitan, though--it's such a great vegan food! It has a very surprising nutrition profile, similar to meat (only without the saturated fat and cholesterol). Here is the info for this particular recipe (one serving, which is one-eighth of the "loaf"--a pretty large portion!):
The recipe I used for this was called
Vegan Deli Slices (Smoked Seitan Turkey) and is meant to resemble the slices of smoked deli turkey--you know, the kind you put on sandwiches. Jerry loves sandwiches, and they are convenient for him to bring to work, so I thought I'd give this recipe a try.
It's from It Doesn't Taste Like Chicken, so I was skeptical; I'd tried her Thanksgiving turkey recipe and it didn't turn out very well. It wasn't terrible, but it was actually my least favorite of the ones I'd tried. The flavor was good but the texture was kind of spongy (and it had that yeasty undertone).
After playing around with more recipes, I learned that certain cooking methods worked better than others--and after putting some tips together with others, I *finally* perfected it! (The way my family likes it, anyway.)
The flavor is perfect: it's subtle, like with deli turkey, but you could certainly add more seasoning to give it a stronger flavor or even change the flavor profile altogether. There is zero yeast-like taste or smell. It's not spongy. And my favorite part is that it develops a slightly chewier outside "skin" on it, just like deli meat--you know, how the edge of each slice has a very thin skin? Yes, this seitan even has that!
We like to slice this and eat it cold (I don't make sandwiches or anything--I just eat slices of it because it's delicious!) Jerry likes it both on sandwiches and just plain. Noah will eat it plain. (Eli won't eat it because it's "weird" vegan food.)
The first time I made this recipe it was way too dry and I had to add a lot of water. I realized that was my fault because I'd pressed the tofu first and the recipe said just to drain it. Anyway, I'm getting ahead of myself. Here is (what I think is) the best seitan yet!
Here are the ingredients:
Firm tofu, white miso paste, apple cider vinegar, liquid smoke, salt, sage, onion powder, garlic powder, water, nutritional yeast, vital wheat gluten, and (which I forgot to picture) vegan bouillon powder or cube or paste. (I use a Not Chick'n cube. Usually when something calls for vegan bouillon, I use the homemade powder that I always rave about. But that gave this "turkey" loaf a yellow-tint, and it wasn't as appealing-looking.)
Note: This uses firm tofu and not the extra firm tofu that I usually buy. Also, I used rubbed sage even though the recipe calls for ground sage. I just use 1/2 tsp instead of a 1/4 tsp to make up the difference.
First, you just drain the tofu straight from the package. I don't freeze the tofu first and then thaw before using, like I usually do; for this, I just buy it refrigerated and from the refrigerator, I drain it--no squeezing or pressing. The liquid it holds is needed.
From here, I'm describing how I make it. Some of it varies from the original recipe in order to make this to my family's preferences.
So, after you drain the tofu, you just measure everything EXCEPT FOR the vital wheat gluten into a food processor or blender. I use this Ninja blender because it also has a dough blade/cycle, which is helpful later. You can use whatever tools you have that will 1) blend all of the ingredients--except the gluten--into a very, very smooth purée; and 2) be able to mix in the gluten.
The gluten thickens the dough very very quickly and it's not as easy to work with as bread dough or pizza dough. It's TOUGH. And that's why I like to use the dough blade on the Ninja. I haven't tried it, but I imagine the dough hook on a stand mixer might work, too. Otherwise, you can use a very sturdy utensil and some serious elbow grease to mix it together by hand.
Okay, so everything is measured into the food processor (except for the gluten). You'll have to break the tofu into pieces to get it to fit.
Then just let it rip. To get it completely smooth, I have to stop every 30 seconds or so and scrape down the sides to make sure everything gets mixed in. This is the part I dislike the most! I just use a small spatula to push it all down to the bottom, then blend again. Finally, I'll be satisfied when it looks like this:
It's basically the consistency of hummus. From there, I switch to the dough blade (it looks like the stacked blades that I use for blending, but the blades are made of plastic instead of steel).
Next, you dump in the vital wheat gluten:
I set it on the dough cycle, which is one minute long. It will come together quickly into a ball and the blender basically kneads it for about 15 seconds in the end. The original recipe says not to knead it, because it will turn the seitan tough and rubbery--but I've found that when you don't knead it, it has a spongey texture. I think kneading it is key for this.
(Or, if you're mixing by hand, scrape all of the wet mixture into a large bowl and add the gluten--then stir it all together until you can't stir anymore, and begin to knead by hand.)
After the dough cycle, it'll look like this:
At that point, it will feel a little sticky, but it will hold together and won't stick to your hands.
I lay out a long piece of foil--about 24 inches!--and put the ball on that.
From there, I knead the dough the best I can to get it to look uniform. It's really hard to make it smooth because the wheat gluten makes it springy. It wants to hold its shape. So I basically pinch closed all of the crevices I can, then try to smooth it all out the best that I can. There will likely be some crevices that you miss on the inside, which you'll see in the photos after it cooks, but it won't affect the taste or texture. There may just be a few holes in the slices.
Try your best to form it into a log shape. You don't want it to be too long because you want the there to be a few inches of foil on each side of the ends of the loaf.
There is no need to grease the foil. The original recipe says to roll it loosely in the foil to allow it to expand, but I've found that the texture is MUCH better when you roll it as tightly as possible. That's why I use such a long piece of foil--it won't come apart or break while it's cooking.
So I place the log at one end of the foil and, as tightly as I can, I roll it into the entire length of the foil so it looks like this:
Then, to make it even tighter and to seal the ends, I twist each end very tightly, while being careful not to rip the foil.
It will feel very tight and you'll be tempted to play with it--toss it around, bounce it, squeeze it--or maybe that's just me, who knows.
Anyway, prep a steamer basket--I use this silicone one that I bought on Amazon, but I don't love it, so I personally wouldn't recommend it; but it works, so I still use it. I put it in a large pan filled with water that stops just underneath the basket (you don't want to submerge the foil--it should be above the water).
I the foil-rolled log into the basket and put a lid on it; then turn the heat on high until it starts to boil. Then I reduce the heat to medium-low (a "3" on a 1-10 gas stove) and set the timer for 60 minutes.
I *always* keep a large (quart-sized) measuring cup full of water next to the stove to add a little water to the bottom of the pan once in a while. I've made the mistake of forgetting to add water and when it burned dry, the smoke alarm went off for a while before I figured out what the issue was!
After 60 minutes, I turn off the heat and remove the foil wrapped log. It will feel extremely tight and kind of bouncy, like it's going to burst. For some reason, I love the way it feels, haha. But it'll be very hot, obviously--set it on a plate and let it cool off for a while. Don't unwrap it!
Then, when it's cooled down a bit (I give it a couple of hours), put it in the refrigerator--still in the foil--and leave it there all night long. Do not open it until the next day! If you do, the texture will be a bit spongey. But if you're patient, the following day it will be completely chilled and it'll feel a lot looser inside the foil.
Unwrap the foil and it will look like this:
Kinda neat-looking, right?
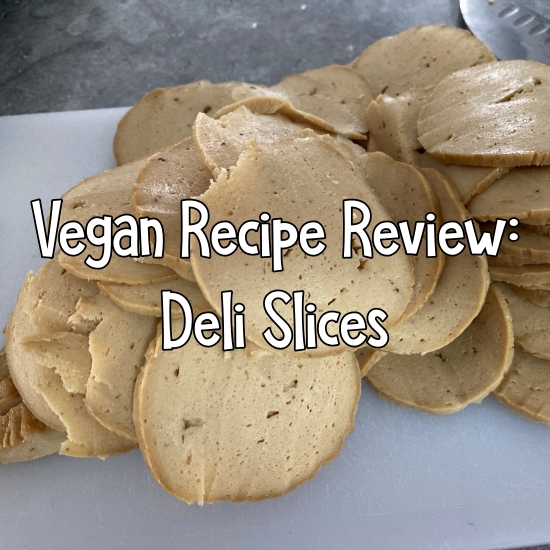
You can slice it thin for sandwiches (use a very sharp knife, or even a bread knife):
Or, what I like to do, is slice some of it thin for sandwiches and then slice bigger chunks into thick stick-like pieces for snacking:
Beware that this seitan is super addicting! Before becoming vegan, I was never a huge fan of deli meat--I could eat a little of it and then I would be grossed out at the thought of it. And when there were fatty striations in it (like in ham) I couldn't eat it at all. I *love* that there is no risk of biting into a piece of fat or something in this! I could eat this all day long and never get grossed out by it.
I haven't tried warming this up yet--we've always just eaten it cold--but I may start playing around with the recipe now that I've perfected the cooking method and texture.
It may look like a lot of work, but it honestly isn't bad. The prep work is little--just measure and blend everything. The hardest part is kneading in the gluten, but after that, you just let it steam and you don't have to do any more work. I make two loaves at a time (prepping one while the other is steaming) because we go through it pretty quickly.
I store it in an airtight container in the fridge. I don't know how long it keeps, because I think the longest it's lasted in our house is three days! But I've read that seitan freezes really well. You'll have to do your own research on that.
I totally understand that seitan is a "weird" vegan food and why people wouldn't even want to bother with it. Before becoming vegan, I wouldn't have even read this post, let alone consider making the seitan! Haha. But if you're an adventurous eater, I'd give it a try. I'm so glad I didn't give up on it, because it's one of my favorite foods now!


I would definitely want to bounce it around! Ha. So glad you found one you like. You keep almost making me want to cook, but no. I still enjoy reading the recipes and your vegan lifestyle. So inspiring and great storytelling.
ReplyDeleteI'm so glad you wrote this! I've tried my hand at seitan and its always so spongey. And man have I DESTROYED a pan forgetting the water. now I want to try this again because my other attempts were gross. I did make Sam's chicken the she washed/braided etc... it was UNREAL. Really amazing, try that one too
ReplyDeleteI really want to try this! I made seitan for the first time a few months ago....way easier than I thought and love everything you can do with it, plus the calories and protein. Now it is a staple and I make it every week, but want to try this recipe!
ReplyDeleteOk, tried it. Love it, and it was really easy to make in my food processor. Thank you, Katie!
ReplyDeleteI will probably try this recipe! I'm open to a lot of vegan products, but they can be so expensive at the store.
ReplyDelete