Showing posts with label recipe. Show all posts

August 05, 2023

Comfort Food: Jerry's Beans & Greens Recipe

Even if you aren't interested in my recipe posts, please still watch the video in this post. It's kind of perfect for this ;)  I'm definitely feeling better today than yesterday! My dad came over for help with a woodworking project and it was nice to talk to him for a while. Since I've been talking about Jerry's Beans & Greens lately, I wanted to share the story behind my comfort food and his recipe for this.


When people think of comfort food, I imagine them thinking of foods like macaroni and cheese, Mom's chicken paprikash, Grandma's meat pie, etc. Before becoming vegan, my favorite comfort food was "Jerry's Chicken Casserole Surprise"--I guess he thought that the name of the casserole had to have "surprise" in it because that's what we grew up hearing ;)  (Spoiler: There was no surprise.)

(You MUST watch this wholesome 11-second video clip at this point. Please.)


When I was very early in my pregnancy with Noah, I had some spotting and I was sure I was going to have a miscarriage. Being my first pregnancy, I had no idea what to expect. It was also the weekend, so my doctor's office was closed. I wasn't hemorrhaging, so I just spent the evening feeling sad and worried. Jerry said he would make dinner.

I think he took one of the heritage recipe books (remember the series I did on those in 2021?) and made a creamy chicken and noodle dish. (Everything turned out to be just fine when I saw the doctor on Monday.)

[Side note/funny story about that: The doctor did an ultrasound and he pointed out the gestational sac on the monitor (the sac just looked like a black spot the size of a grape). Jerry said with so much excitement, "Oh look! There's its eye! It's blinking!" I'm sure my doctor was dying inside, but he hid it well with a hint of a smile. I, however, burst out laughing. And now it's a story that makes us laugh. I'm sure my gynecologist shares that story when appropriate, haha.]

Anyway, Jerry's Chicken Casserole Surprise turned into a comfort food for me. I can remember everything about that evening: sitting at the dining room table, eyes red and sore from crying, the delicious aroma from the oven, the ambient lighting, and just a general warm feeling in our new home. (We had just moved in.) Even though the circumstances weren't good, I took comfort in those moments--and the food was a big part of it.

And thus, it became my comfort food.
Jerry and I watched that over and over and laughed and laughed. So sad and funny at the same time. (By the way, American Housewife--where I got the clip above--is the best sitcom of all time!)

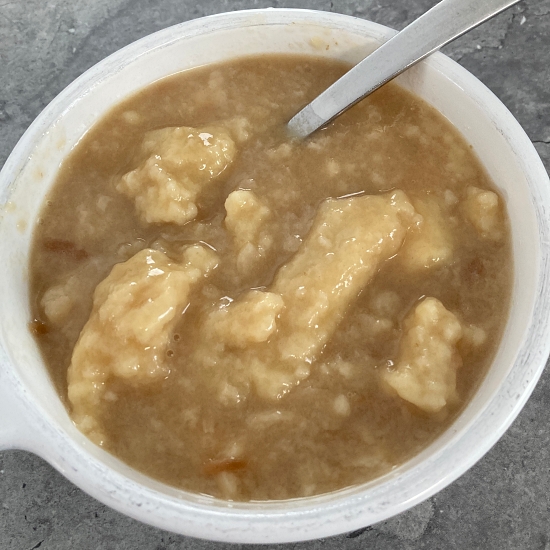
Now, being vegan, I have new comfort food (that I like even more than the casserole)--Jerry's Beans & Greens. He was visiting a friend in NYC a couple of years ago and ordered it at a restaurant (I thought it was such an odd thing for him to order; I never would have guessed he'd pick that). He texted me to tell me just how delicious it was and he wanted to try to recreate it when he got home.

I'm not a "greens" person--I don't like salad and the only time I ever really ate greens was when I stirred spinach into a hot meal (even then, I would use about half the amount called for). Jerry found a recipe online and tried it--it tasted pretty good, but I definitely didn't like the greens (I think maybe it was kale?). I suggested trying collard greens, because I'd wanted to try them after going to a soul food restaurant in Detroit one time (they were popular). He switched out some other things and tried a second time.

The Beans & Greens were absolutely DELICIOUS. I never, in a million years, would have guessed that this dish would become one of my very favorite foods, let alone a comfort food. And now, when I have a bad day, he likes to make this. He loves that he has a dinner that he can make and I love. He's tweaked it here and there, but it only gets better each time.

I didn't do progress photos as he cooked, but I wanted to share his recipe. 

I put the recipe in a printable format, which you can find here!

Jerry's Beans & Greens

Ingredients:
2 Tbsp. olive oil
1 onion, diced
2 carrots (diced small, because Katie doesn't like the texture of undercooked carrots)
2 celery stalks (also diced small, because Katie doesn't like celery if she can feel the strings or crunch)
3 cloves of garlic, minced (or more, because everything can use more garlic)
2 dried bay leaves
1/2 tsp. sea salt (plus more if needed after tasting at the end)
1/2 tsp. dried thyme
3 cans of great northern beans, drained and rinsed
2 Tbsp. white miso paste (found in the Asian food section of the grocery store in a little tub--even my Kroger has it, and they don't have much variety of anything!)
4 cups vegetable broth* (see note below)
1 small bunch of collard greens**
1/2 tsp. lemon juice, to finish

*Note about vegetable broth: We make our own vegetable broth powder ("chickenless bouillon powder") and we LOVE it. We use it any time something calls for chicken broth or vegetable broth. The recipe we use can be found at Plant Power Couple. The only "weird" vegan ingredient in it is nutritional yeast (thankfully, it can be found at most grocery stores now--even my Kroger--but I can't recall what section it is usually in. I *think* it's with the baking stuff, like cocoa powder, baking powder, etc.You probably already have the other ingredients for it.

We use so much of it that I buy it in bulk on Amazon. I do leave out the turmeric when making the powder, only because of the color--we use the powder when making seitan, and we don't want the seitan to be yellow). To use this for broth, like called for in the Beans & Greens recipe, use one tablespoon of powder for each cup of water. (So, you'd use 4 Tbsp. of powder + 4 cups of water in this recipe.) I wouldn't substitute this broth, because it's part of what makes it so good!

**Note about collard greens: I buy them in a bundle (not chopped in a bag) because I like to remove the the thick stem in the middle. It takes a little longer, but I cut each leaf in half, removing the entire stem that runs down the center. Then I stack all the leaves and chop them on the small side--about the size of a quarter--because they fit on the spoon easier when you're eating.

Directions:

In a large sauce pan over medium heat, heat the oil. Then add the onions, carrots, and celery and cook until they are soft, about five minutes (lower the heat if needed so they don't burn). Add the garlic and cook another minute or two (don't burn the garlic), stirring frequently.

Add the rest of the ingredients and bring to a slow boil over medium heat, then reduce the heat to a simmer. Let it cook on low for about 10 minutes, stirring occasionally, until the collard greens are the texture you like. (If you like your collard greens on the firmer side, don't add them until after about five minutes.) Remove the bay leaves (it takes some searching sometimes, with the collard greens in there!).

Add the lemon juice and stir, then taste and add more salt if needed.

I really hope that you love this as much as I do! It makes me feel loved, and that's the best comfort food there is.

October 09, 2022

Meal Compromises to Please Everybody


I just posted a ton of food ideas last week (you can find that post here), but I don't think this is redundant. When I started working on a questions and answers post about my recent weight loss (I promise to get it done soon), there were several responses I wrote that referred to meal prepping and planning and executing--I realized it could probably be a post of its own.

When I became vegan in January, I was kind of clueless how I was going to be able to do it while still making meals for my (meat- and dairy-eating) family. I didn't want to force my lifestyle on them, so I tried to find compromises that would make cooking dinner more convenient.

As time went on, I tweaked things here and there to make it simpler and more stream-lined. I feel like we have a pretty good system down now, so I thought I'd share some ideas that have really helped us.

First, a little background on why I hate meal planning so much:

Eli (meat-eating) - Extremely picky and wants to live on practically nothing but junk food. Also eats at work frequently (he works at Qdoba). A lot of his shifts are last-minute, so it's hard to count on whether he'll be here for dinner.


Jerry (meat-eating until August, now entirely plant-based) - Will eat anything I make and even if he's not crazy about it, he never complains. He's honest about his thoughts on a new recipe, which is helpful. He'll eat vegetables, but only if they are there in front of him; he never requests them and I know he doesn't love them. He takes leftovers to work for his lunch, so I try to plan meals based on his schedule as well.


Noah (meat-eating, but very open to plant-based meals) - Willing to try anything I make, but rarely cooks for himself. He doesn't like cereal or sandwiches or other no-cook things for breakfast and lunch, so he makes a lot of ramen. He likes junk food, but is very good about eating only a little at a time. The big issues? He doesn't like Mexican or Indian spices and he is grossed out at the thought of reheating leftovers. (There are a couple of Mexican-inspired things he will eat, though)

My first time experimenting with making vegan cheese. My nachos with vegan nacho cheese versus Noah's very, very sad nachos with cheddar. I think vegan wins on this one, haha.

Me (vegan) - Willing to try anything and everything that doesn't contain animal products. Even if I tried it before, I'll try it over and over again to see if I like it. There are foods I love and foods that are just "eh". I'm definitely not a salad eater, though! I'm not anti-salad, and I'm always willing to try it, but I really don't like it.


My kids are 16 and 18, and Jerry is obviously an adult, so I don't really *have* to try to please the whole family. But I want to! I want to make meals that everybody will like. And unfortunately, I overthink everything--which just causes me to get frustrated when trying to plan dinner.

Here are some go-to meals that are easy to please a wide variety of tastes. These are things I make frequently because all four of us can tailor them how we want. And they are so versatile! 

Personal Homemade Pizzas

Whole wheat crust, tomato paste, vegan mozzarella, peppers, broccoli, olives

This is the most convenient, easiest-to-please dinner ever! I make a batch of whole wheat pizza dough (my recipe is here). It takes next to zero times. I divide it into four portions (we like thin crust, but if you like thicker crust or you're making more than four, I'd multiply the recipe). You could even just use pita bread if you don't want to make crust.

I have some mini pizza pans, so I just spray those with some non-stick spray and dust with flour, then press the dough out to the edges of each one. I pre-bake the crusts at 450 F for about 6-8 minutes and then I can put them in the fridge for each of us to prep our own pizzas when we want to eat (if we're not eating together).

We each use whatever toppings we like (vegan or meat-eating): Italian-style tomato paste (I like this much better than pizza sauce), mozzarella or homemade vegan mozzarella, pepperoni, Bac'n Buds (the Kroger brand is vegan, and I think several other brands are, too; Jerry loves them), whatever vegetables I have on hand, caramelized onions, roasted garlic, etc.

Then we just bake them until they are done--at 450 F for about another 10 minutes. This is super easy to prep ahead of time (keeping a bunch of crusts in the fridge or freezer) and easy for "kids"--even if they are grown--to make whenever they want.


Burritos/Burrito Bowls


This is my go-to when I want to please a crowd of people. It takes quite a bit of prep work, but it's easy to do a little at a time rather than cooking everything at once. I prepare all of the ingredients/items/toppings and put them into separate bowls, then everyone can simply make up a bowl with what they like.

My usual set-up (when serving a crowd; I cut back when it's just my family):

-cilantro-lime rice (I just cook rice, then add salt, lime juice, and chopped cilantro to taste after it's cooked)
-black beans (from a can, drained and rinsed)
-pinto beans (same)
-corn (from a can, drained)
-chipotle chicken (I make the marinade and freeze it, then take it out when I'm ready to marinate the chicken--about 24 hours ahead of time. You could also make the chipotle chicken and freeze it, as well.)
-taco-seasoned ground meat
-vegan taco "meat"
-shredded lettuce
-salsa or fresh pico de gallo
-sour cream
-guacamole
-tortilla chips and/or tortillas if making burritos
-pickled jalapeño slices
-cheese

For my vegan bowl, I love the rice, black beans, pinto beans, corn, lettuce, pico de gallo, crushed tortilla chips, guacamole, and pickled jalapeño slices. Yum!

This is a great meal when cooking for a crowd of people, too. Who doesn't love a burrito bowl? Here are my recipes for the chicken marinade and pico de gallo:

Chipotle Chicken Marinade

2 tsp. minced garlic
2 Tbsp. flavorless oil
2 Tbsp. adobo sauce from a can of chipotle peppers
1 Tbsp. chili powder
1 tsp. cumin
1/2 tsp. oregano
1 tsp. salt
1/2 tsp. black pepper

Add all ingredients to a gallon-sized Ziploc bag and seal it. Then mash it around with your fingers to combine (it saves having to use a bowl to mix it, haha). The marinade will be thick, like a paste. Pound out about 1.5-2 pounds of chicken breasts very thin, and then put them in the bag with the marinade. You'll have to use your hands to mix it all together and make sure the chicken is coated well. I marinate them for about 24 hours. To cook, I like to grill them on the stove top (they cook quickly), then chop into strips or bite-sized pieces.

Pico de Gallo

1/2 cup red onion, chopped
1 cup roma tomatoes, diced (the roma tomatoes are perfect for this because it's easy to remove the seeds and the tomatoes hold their shape well)
1 bunch cilantro (just the tops), chopped
1 jalapeño, minced
juice of one lime
salt and pepper to taste

Just mix together in a bowl! (I make this right before serving, because if it sits too long, it gets very watery.)

Here is a document with the burrito bowl recipes and ideas.


Stir-Fry, General Tso's Chicken/Tofu, Sweet & Sour Chicken/Tofu, and other Asian-inspired dishes


Asian food is so versatile! Thankfully, everybody in my family likes the basic flavor profile. I make a lot of dishes that consist of a protein (chicken for meat, tofu for vegan), vegetables, and a sauce (basic stir-fry sauce, peanut sauce, orange sauce, sweet and sour sauce, General Tso's, etc.). All of the sauces can be made ahead of time and stored in the fridge until cooking the stir-fry. I like to put the sauce ingredients in a mason jar with a lid, shake it up, and put it in the fridge for that evening's dinner. The sauces that I make are all vegan (not on purpose--they just happen to be vegan).

When making stir-fry, I cook the meat (usually chicken), as well as the tofu, separately. Eli likes chicken, Jerry and I like tofu, and Noah can go either way. The sauces that I make are super fast to throw together. I just put the ingredients into a mason jar with a lid, then shake it until I'm ready to pour it in. I like to make the sauce early in the day so I don't have to measure things out while cooking, since stir-fry cooks so quickly.

I put some basmati rice in the rice cooker and while that's cooking, I heat a little oil on the stove. I add whatever veggies we like (sometimes I just use frozen medleys) and cook until the desired texture. Then I pour in the sauce and cook another minute or so until the sauce thickens and coats the vegetables. I separate the stir-fry into two batches, then add the tofu to one and chicken to the other.

When the rice (or any other grain) is done, we just help ourselves to rice, then top with the tofu or chicken variations. 

Since I was the only one eating vegan at first and I was kind of clueless how to do it with my family still eating meat, I made a bunch of sauces and poured them into these cupcake molds--then put them in the freezer.

When I made dinner for the family and I didn't want to adapt it to a vegan version for me, I could simply take one of these out of the freezer and put it in a small pot on the stove, add half a can of chickpeas and some broccoli, and cook until thickened. Then pour it all over barley or rice or other grain. So easy! It took a few hours to do all of the sauces, but I was able to use them for a long time out of the freezer. It's just as convenient as a frozen dinner.

Here are my go-to sauce recipes (you may want to double the recipe, depending on how saucy you want it):

General Tso's

1/2 cup water
1/2 tsp. salt
1-1/2 Tbsp. corn starch
2 Tbsp. sugar
2 Tbsp. soy sauce
1 Tbsp. rice vinegar
1/4 tsp. ground ginger
2 tsp. minced garlic
1/2 tsp. crushed red pepper flakes (use less if you don't want it to be as spicy)


Spicy Peanut Sauce

4 Tbsp. soy sauce
1 Tbsp. rice vinegar
2 Tbsp. sesame oil
3 Tbsp. peanut butter
1-1/2 Tbsp. maple syrup
2-4 tsp. sriracha (less if you don't like it spicy)
2 tsp. minced garlic
1/8-1/4 tsp. crushed red pepper (less if you don't like it spicy)
1 Tbsp. sesame seeds

Sesame Sauce

2 Tbsp. soy sauce
1 Tbsp. water
1/2 Tbsp. sesame oil
1-1/2 Tbsp. brown sugar
1-1/2 Tbsp. rice vinegar
1/4 tsp. ground ginger
1 tsp. minced garlic
2 Tbsp. sesame seeds
1-1/2 Tbsp. corn starch


Simple Stir-Fry Sauce

2 tsp. minced garlic
1/4 tsp. ground ginger
1 tsp. sesame oil
2 Tbsp. rice vinegar
1/4 cup soy sauce
1/4 cup water
1/4 tsp. salt
1 Tbsp. sriracha
2 Tbsp. sugar
1 Tbsp. cornstarch


Sweet & Sour Sauce

1 tsp. minced garlic
1/4 tsp. ground ginger
1 can (about 15 oz.) pineapple tidbits, with juice
2 Tbsp. rice vinegar
1 Tbsp. soy sauce
1 Tbsp. packed brown sugar
2 Tbsp. cornstarch
2 Tbsp cold water

Here is a printable document with the sauce recipes!


Chili

While making an entirely plant-based chili to please everyone is definitely feasible, I've made it several times for feeding a group of people who are vegetarian/vegan as well as meat-eating. I basically make a big batch of vegan chili, and then separate it into separate pots. To the vegan chili, I usually add a couple of extra cans of beans or textured vegetable protein (like in the photo below).

And for the meat-eaters chili, I can cook up some ground meat to add to it. Toppings are always helpful when making food to please everybody, too--for the chili, I like to offer cheese, chopped onions, sour cream, jalapeño slices). That way, I'm not cooking entirely separate dishes but everybody is happy!

I've used lots of different chili recipes, but a very simple starter recipe (that is easy to adjust and add things) is here on my blog. This makes four servings, so you'll want to double it if making a larger batch.

Vegan on the left, and meat on the right:


Spaghetti Sauce

I do the same for spaghetti sauce as I do for the chili. I prepare one sauce, then divide into two pots. To one pot, I add ground meat; and to the other, I will either leave it as a marinara or add TVP (textured vegetable protein). The TVP requires no prep--just a little extra liquid to rehydrate it. Since I'm the only one in my family that likes mushrooms, I usually pan fry some mushrooms on the side to top my sauce.

I don't have a particular recipe for spaghetti sauce. If I come across San Marzano tomatoes--the "real" ones, that are DOP certified--I'll buy 3-4 cans and save them for a good marinara (just onions, garlic, tomatoes, salt, and a little sugar if needed). Otherwise, I use any canned crushed tomatoes + diced tomatoes, or even a vegan jarred spaghetti sauce.


Well, those are some of our favorites! I hate all things having to do with cooking (except tasting, of course) so I always try to keep prep work minimal or something I can do in stages (like prepping the sauce or cutting the vegetables in the morning, marinating overnight, etc.). I've also found that meals where people can put together their own (like the burrito bowls and pizza) are perfect for when everybody has different tastes or has to eat at different times.

It took a little while to get the hang of being vegan in a meat-eating family, but once Jerry started trying all of the vegan recipes I made, he decided to eat challenge himself to eat entirely plant-based for a month. At the end of the month, he liked it so much and said it was much easier than he ever thought, so he's continued the lifestyle as well! I'm not going to push my kids (or anyone else) to make the switch, but of course I would love it if they even started eating less meat and more veggies--they don't have to go all in.

If you have ideas for eating with dietary restrictions in a family who doesn't have those restrictions, please share!

March 07, 2022

RECIPE: Sesame Chickpeas (or Sesame Chicken)


After posting about increasing my fiber yesterday, someone asked for the Sesame Chickpeas recipe. I didn't realize I never posted it before, so I figured I'd share it today. It's SO good! I always made this with chicken breasts until recently, so I'll write it out for both chickpeas and chicken, and that way you can make it how you like.

When making sauces like this (or General Tso's or Sweet & Sour, etc.) I like to use a mason jar. I put all of the ingredients inside, screw on the lid, and then shake it so everything mixes well. A lot of times, I'll prep the sauce in the morning and then when I want to cook, I don't have to take out all the ingredients; the sauce is ready.

If you like to have a lot of sauce so you can mix it into your rice, then you may want to double this sauce recipe.

Here is a printer-friendly version!

Sesame Chickpeas (or Chicken)

For the sauce:

2 Tbsp. soy sauce (I like tamari, but either is fine)
1 Tbsp. water
1-1/2 tsp. sesame oil
1-1/2 Tbsp. brown sugar
1-1/2 Tbsp. rice vinegar
1/2 tsp. fresh ginger (I buy this in a squeeze tube to keep in the fridge)
2 cloves garlic, minced
2 Tbsp. sesame seeds
1 Tbsp. cornstarch

Other ingredients:

2 (15 oz) cans chickpeas OR 1 pound chicken breasts, cut into bite-size pieces
2 tsp. cooking oil if using chicken
cooked rice or other grain for serving
4-5 green onions, sliced, for topping

Mix together all of the ingredients for the sauce and set aside.

If using chickpeas: Drain and rinse the chickpeas. Pour the chickpeas and sauce into a medium-size pot and heat over high heat just until it comes to a boil and thickens (there is no need to cook canned chickpeas--they will heat through with the sauce). Remove from heat and serve over rice; garnish with green onions.

If using chicken: Heat oil in a skillet over medium-high heat and add the chicken. Sauté until the chicken is browned and cooked through. Add the sauce and bring just to a boil so that the sauce thickens. Remove from heat and serve over rice; garnish with green onions.


Variations:

Steam some broccoli or other vegetables on the side and stir them into the chickpeas or chicken with sauce.

Use another sort of grain for serving. My favorite is barley, but I've also used quinoa.

If you like a light breading on the chicken (I haven't tried this on the chickpeas, so I'm not sure if that would work), put an egg and 2 Tbsp. cornstarch in a Ziploc bag and seal. Mash the egg and cornstarch together. Then add the chicken and and shake to coat. Then add to skillet as above.

February 19, 2022

RECIPE: Cookie Dough Dip

vegan raw cookie dough dip

In other words: Peanut Butter Oatmeal Chocolate Chip Cookie Dough Dip. *YUM*

Since I wrote last week that I won't likely being doing many heritage recipes anymore now that I'm eating a vegan diet (to hopefully help with my chronic pain!), I had the idea to try out some vegan recipes and write about those--yes, even the "eww, weird!" ones, haha.

I'm still unsure how to structure these posts; I can't post someone else's copyrighted recipe, but I'd like to try the recipe exactly as written, which is how I was doing the heritage recipes.

So, I was thinking that in the case of copyrighted recipes, I could just list the ingredients here, and then link to the original page with the instructions; that way, people would still have to visit their site to prepare the recipe. If anyone else can think of a better way of doing it, please let me know! (Or if you have your own recipes that you don't mind me posting here--giving you credit, of course--please email them to me and I may try them and post about them.)

This first recipe in this new series was sent to me by a reader (she sent me the link) and interestingly, I already had an almost identical recipe on my blog already--from 2011! The only difference to it is the  addition of oats.

I have to tell you, this sounds like such a WEIRD combination of ingredients and I wouldn't blame you for skipping past this post. However, you will be missing out. Vegan or not, this recipe is amazing! Even Eli loves it, and he likes pretty much nothing but junk food.

As far as junk food goes, this is actually the healthiest "junk food" I've ever made. While it's technically considered a dip (for apples, graham crackers, or whatnot), I prefer to eat it as is--straight from a little bowl. It's like eating raw cookie dough--peanut butter, oatmeal, and chocolate chip cookie dough. 

vegan raw cookie dough dip hummus

For this recipe, I'm going to combine the two--the one on my blog from 2011 (I redirected that link here to update it) and this one that a reader sent me the link to. That way, I can share the whole recipe (since we prepare the surprise ingredient in different ways). The one that I write out here will be the one that I made yesterday (pictured above) and definitely the one you should try ;)

Since I've started eating a lot of fiber, and now that I'm eating vegan, I've not been eating many sweets at ALL. My options are so limited and it's inconvenient; also, the fiber keeps me full and satisfied. However, I had a mad craving yesterday for something sweet and I decided to take the time to make this Cookie Dough Dip (or, as I called it back in 2011, Cookie Dough Hummus).

The "secret ingredient" in this cookie dough dip is actually chick peas! (Garbanzo beans)

I swear on my life you cannot taste them. 

A note on prepping the chick peas... in the recipe from Tidbits (the one that was linked above, with the oats), she uses a pressure cooker to prepare her chick peas from dried ones. I've never done that, so I can't attest to whether it's worth it; however, the reader who sent me the link to the recipe said it's absolutely worth cooking your own rather than using canned.

I don't have a pressure cooker, so I just used canned chick peas. The Tidbits recipe skips this next step, but I do it because it really does make a difference in the final texture of the dip: I peel the chick peas.

WAIT! Before you click away, it's really not that hard. Just hold a chick pea with your finger tips and then use the fingertips from your other hand to grab the chick pea and give it a gentle squeeze--the skin will come right off. It took me about 10 minutes (where I just sat and watched a TV show while peeling) to peel the whole can.

So, drain and peel the chick peas. Then, here is the recipe for the (vegan) Cookie Dough Dip:

Ingredients

1 can of chick peas, drained, peeled, and rinsed
1/4 cup of natural peanut butter (I LOVE Smucker's natural, but any kind will do)
6 Tbsp. pure maple syrup (you can try using less of this, but I used 6 Tbsp. and it was perfect)
1-1/2 tsp. vanilla
a pinch of salt (roughly 1/8 of a tsp.)
1/4 cup vegan mini chocolate chips (I have the "Enjoy Life" brand and they are great!)
1/3 cup of quick-cooking oats (NOT instant oats, like the flavored packets--but the plain, quick-cooking ones)

Directions

Drain, peel, and rinse your chick peas. This is the most tedious part, I promise.

In a food processor, add the chick peas, peanut butter, maple syrup, vanilla, and salt. Purée until very smooth--you'll have to stop and scrape down the sides of the bowl a couple of times to make sure you don't have chunks of chick peas in it.

Once it's puréed very smooth (it will have a thin consistency), move it to a bowl and put it in the fridge for about 10 minutes. Lick the spoon so you can see how tasty it is! Then remove it from the fridge and add the oats and chocolate chips. Fold those in well until it's all mixed together. Place it back in the fridge to thicken up. (If it's too thick, just add a little almond milk or soy milk or other non-dairy milk and stir well.)

From here, you can use this as a dip for fruit, graham crackers, pretzels, or even spread on toast; however, I really like to just eat it out of a small bowl. It's like eating raw cookie dough! It tastes like peanut butter-oatmeal-chocolate chip cookie dough.

You can divide it up how you like, but here is the nutritional info for the entire recipe:

Calories: 1294
Protein: 33 g.
Carbs: 177 g.
Fat: 57 g.
Fiber: 19 g.
Iron: 9 g. 

(I was especially interested in the fiber and iron--that's a lot of fiber for a "cookie dough" treat!) If using this as a dip, I would guess it would make 6-8 servings. If you're just eating it as a treat from a bowl, I would say 4 servings. The total recipe made 455 grams--which makes it easy for you to divide accordingly.)

Here is a printer-friendly version of the recipe!

Overall thoughts: This vegan treat is a BIG winner! I hadn't made it in probably 10 years, so I'm really glad that a reader shared a similar recipe with me to remind me of it. I love the addition of the oats--they give it great texture.

The only problem with it is not eating the entire recipe in one sitting ;)

February 12, 2022

HERITAGE RECIPE : Old-Fashioned Pineapple Bars


While going through the heritage book to make something today, I was actually looking for something specific--something vegan. Yes, vegan! I'm not vegan, but I've recently started experimenting with a plant-based diet for a couple of reasons--I'll write about this tomorrow. For now, the reason I chose this was because 1) It sounded good, and 2) It doesn't contain any animal products.

This recipe was submitted to the Rockwood, Michigan Area Historical Society by Margaret Charlesworth. Margaret was born in 1924 and passed away at age 91 in 2016. She worked at the Rockwood Post Office until she married Robert in 1950 and became a "farm wife"--she cared for the cows, germinated seeds, and made sure Robert always knew the weather so he could predict how it would affect the crops. When they had children, she was a full-time homemaker and mother.

Margaret loved to sew and bake. She was actually known as "The Cookie Lady" in her town and was featured in the Monroe Evening News for her baking talent.

Her maiden name was Gay, and I knew I remembered writing about a couple (from a heritage recipe) who lived on a family farm with the last name Gay. After a search of my blog, I discovered that I shared a recipe for Devil's Food Cake from Betty Gay, who happened to be married to Margaret's brother, Samuel. So this recipe was submitted by Margaret, the sister-in-law of the woman who submitted the Devil's Food Cake recipe. (Like I said, Rockwood is a small town!)

I had high hopes for these pineapples bars, considering that they came from "The Cookie Lady!"

As always, I am writing this recipe here exactly as written in the cookbook; the "printer-friendly" version is rewritten by me to include any notes that may need to be in there for clarity. I always make these recipes exactly as they were submitted to the cookbook--no alterations or substitutions. Make sure you check my notes after the recipe.

Here is a printer-friendly version!


Old-Fashioned Pineapple Bars

Mix in Bowl:
1 c. flour
1/2 tsp. salt
1/2 tsp. soda
1/2 c. brown sugar

Add:
1/2 c. Crisco
1 c. oatmeal
2/3 drained crushed pineapple
1 T. pineapple juice

Mix by hand until well blended. Spread in greased 7x11-inch pan. Bake at 350F for 25 minutes. Cool 20 minutes. Frost with 1 cup powdered sugar, 1 tablespoon of pineapple juice. Cut into squares.

My Notes:

The ingredients are very straight forward. Nothing to mention there.

I mixed the first four ingredients (by hand) in the bowl first, then added the rest. It was kind of hard to mix in (it was thick and and there were big clumps of Crisco). I kept mixing though until the clumps of Crisco were gone. I actually thought it resembled canned tuna fish! (The stringiness of the pineapple and the color of the oats made it look that way.


It was kind of hard to spread around the pan because it was very sticky. It felt like a very sticky cookie dough. You may want to oil your hands a bit first to keep it from sticking to your hands while you spread it around the bottom of the pan.


Don't forget to reserve the juice (a minimum of 2 Tbsp.) when you drain the pineapple! I wasn't really sure how well to drain the pineapple--with something like tuna, I squeeze it very hard to get as much liquid out as possible. With this, I didn't want to go overboard, but I didn't want it to be very watery, either, so I just lightly pressed on the pineapple in the strainer before measuring out 2/3 cup of the fruit for the recipe.

I baked it for exactly 25 minutes, as specified, and it looked great when it came out of the oven!


While it was in the oven, I made the frosting. I just added a tablespoon of the pineapple juice to the powdered sugar to make a glaze-like frosting. At first, I couldn't get all of the powdered sugar mixed in with such little liquid. I added about 1/2 tsp more and it worked. This is the texture it made--thicker than I thought (it wasn't pourable--it was thick and needed to be spread around)


I set the timer for 20 minutes when I pulled it out of the oven, and after 20 minutes, I spread the frosting all over it. It was actually the perfect amount of frosting/glaze!

I started to cut into it but it was really sticking to my knife, Then I realized I should probably wait until it was completely cool. So I set it into the fridge to allow it to cool quickly.

A couple of hours later, it cut MUCH more easily. I cut it into 12 squares.


At first, I wasn't sure how I felt about them. I thought they were a bit bland--I didn't get a pineapple flavor at all. The texture was pretty dry and somewhat crumbly. I only took one bite and just left it alone after that. However, a few hours later, I took another bite, this time at room temperature--and I really liked it that time. The flavor is very subtle-and definitely not too sweet--so if you're looking for a light dessert, this may be a good choice. The texture is kind of a cross between cake and oatmeal cookies.

My family reported the same thing when they ate them; they the bars weren't anything to rave about, but they were okay. I don't think I'd make them again. But for an unintentionally vegan recipe, I was surprised at how well they turned out!

If you're curious about the nutrition info: one square has 144 calories, 1 gram protein, 15.5 grams carbs, and 9 grams of fat.

I'm going to look through the book and see if there are any of her cookie recipes!

February 05, 2022

RECIPE : Tapenade & Hummus Pizza

Tapenade and Hummus Pizza

I completely forgot about making a heritage recipe today! Like I said yesterday, this week feels all messed up because the kids were off of school Wednesday through Friday. It feels like today should be a Monday.

Anyway, I did have a DELICIOUS dinner and figured I'd share that instead.

I've been craving olive tapenade for months and months--it just seemed like whenever I was in the mood to make it, I didn't have one or more of the ingredients (I never have fresh parsley on hand).

I was excited when I saw that Sabra came out with a hummus that has a dollop of tapenade on top. I bought that several times to eat with pretzels. It just made me crave tapenade even more.

Today for dinner, I decided to make whole wheat pizza crusts so we could each make our own mini pizzas. When I was looking in the fridge to make sure we had cheese, I realized that I had fresh parsley in there--I forgot that I bought it the last time I went grocery shopping (with the sole purpose of making tapenade). So, I had the idea to make the tapenade and put it on my pizza.

olive tapenade

We didn't have cheese, so Jerry headed to the store. I asked him to get hummus while he was there so that I could basically make a tapenade hummus pizza on whole wheat crust for dinner. It was SO good. The crust was soft and bread-like, so it reminded me of warm pita bread with the hummus on there; and then the tapenade was heavenly.

Tapenade and Hummus Pizza


To make the pizza, I just used three items: pizza crust, hummus, and tapenade. I made the pizza crust and tapenade, but I used store bought hummus (just the regular flavor).

So, here is my tapenade recipe... the tapenade tastes great on crostini (mini toasts), crackers, pretzels, etc. I usually use it as a dip, but I'm sure it would be a good condiment, too--I bet it would be awesome on a toasted Italian sandwich.

Here is a printer-friendly version of the Tapenade recipe!

Tapenade

6 oz. pitted green olives (this is the drained weight of one jar)
7 oz. pitted kalamata olives (the drained weight of one jar)
1/4 cup drained capers
1/4 cup lemon juice
1/4 cup chopped fresh parsley
5 cloves garlic, chopped
1/4 cup olive oil (I use the extra light tasting--flavorless--olive oil)

Drain the olives. Put all the ingredients into a food processor and pulse a few times. Scrape down the sides of the bowl and pulse some more until it's the consistency you like it. (Don't add salt; the olives make it very salty.)

tapenade


This recipe makes a good-size amount--probably about 2.5 cups. You could cut the recipe in half, but I don't like having half-empty jars of olives and capers in my fridge. The tapenade will store for about two weeks in the fridge (I'll eat it long before that, though!)

Here is a printer-friendly version of the Whole Wheat Pizza Crust recipe!

Whole Wheat Pizza Crust

1-3/4 to 2 cups whole wheat flour (enough to form into a ball)
1 cup hot water
1 Tbsp. olive oil
3/4 tsp. salt
2 tsp. yeast (one packet)

Directions:

Preheat oven to 450 F. Combine all ingredients in a bowl until a ball forms and cover with plastic wrap. Let the dough rise for at least 15-20 minutes. Divide dough into four portions and press them into circles. Lay them out on a baking sheet (you may need to add a little more flour to keep them from sticking). Bake at 450 F for about 10 minutes, until crust is just baked through.

Remove crusts to a plate. Spread about 1/4 cup of hummus on each crust; top with about 1/4 cup tapenade and spread to edges.

This was super filling and a nice change from the regular pizza!

Tapenade and Hummus Pizza

January 29, 2022

HERITAGE RECIPE : Perfect Dumplings


This is another of those recipes that does not look pretty at all--but I'll spoil the ending and say that this was delicious! SO much better than it looks.

I've been wanting to make this recipe for a while because the person who submitted it happens to be my elementary school bus driver. And let me say, the fact that I came from a very small town means that the bus driver could as much of a mom or grandma as could be before and after school.

This recipe was submitted to the Rockwood, Michigan Area Historical Society by Joyce Laura in memory of Elza Raymond. I was a little confused at first while googling, because Joyce's maiden name was Raymond; and she married Raymond Laura. Once I sorted that, it made sense ;) I'm assuming that Elza was Joyce's mom.

You know how you go through life and there are certain random people tucked into the back of you mind that bring a nostalgic smile to your face when you think of them? I don't mean the people that do these spectacular well-known things, but rather the everyday people that you encounter for one reason or another.

Joyce Laura is one of those people who is tucked into the back of my mind. I honestly can't say I remember much about her! She was my school bus driver all through elementary school, and all of us kids absolutely loved her. I do remember her giving us treats once in a while (cookies or something). But she treated us like her own grandchildren (of which she had many--she was born in 1927 and when she passed away in 2016, she had 14 grandchildren and 15 great-grandchildren.

The same kids would ride the bus together every year; we all lived in the same neighborhood, played together all summer, and even though there were certain kids we didn't like, we were a sort of family in a way. And I think Joyce thought of us like that, too. She liked seeing us grow each year and she took some pictures of us in front of or inside of the bus. (She actually did have a grandson who rode the bus with us!) She made each of us feel special in our own way.


I could still tell you all of their names and I am still friends with some of them today. I asked some of my childhood friends today what they remember about her, and they all said the same thing: "She was just so NICE. Even with some of the morons on the bus, she was so NICE to everyone."

I remember one specific incident when we were pulled over by the police. Apparently, a boy named Eric, who was known for being a troublemaker, threw his hat out the window at a cop car. So we were pulled over and the cop came on the bus to talk to him. Joyce was as calm as could be; I learned later in middle school, that most bus drivers are NOT like that!

Joyce submitted this recipe in memory of Elza Raymond--because Elza was her maiden name, I'm assuming that Elza was her mother, but I can't be sure. I cannot find that simple piece of info online!

Anyway, even though this recipe is simple, I just couldn't help but make it in memory of Joyce. An elementary school bus driver that sticks in the minds of kids 35 years later is a special bus driver indeed.

As always, I am typing out the recipe here exactly as it is in the book; the "printer-friendly version" was re-written by me to include any notes or clarifications. I did not make any modifications or substitutions while preparing this recipe.

Here is a printer-friendly version!


Perfect Dumplings

1-1/4 c. flour
3 tsp. baking powder
1 tsp. salt
1 tsp. sugar
1 well-beaten egg
1 c. milk

Mix well. Drop by spoonful into boiling liquid. Keep boiling continuously. Steam 15 minutes.

My Notes:

This recipe is super straight-forward. The only thing I wasn't sure about was the steaming. Steaming usually involves covering the pot to hold in the steam. So, here is how I read into it: I dropped the dumplings in as the liquid boiled continuously. Once all the dumplings were dropped in, I covered the pot and lowered the temp to medium, and let them steam for 15 minutes.

It says to cook in liquid, so I imagine you could use whatever liquid you like. I made them in French onion soup (just the powdered mix with water). 

These were definitely NOT pretty. The batter looked very thin when I was ready to drop it into the soup. Still, I took about a teaspoon or a little more at a time and dropped it in. I could see they were coming apart when they hit the boiling water. Look how bad they looked in the pot! (I probably should have used a wider pot as well.)

This was after steaming

I imagine that I was probably supposed to drop bigger spoonfuls. Or maybe if I lower the water to a simmer rather than a boil. I know they would stick better with more flour (a thicker dough) but I didn't want to alter the recipe at all. There are several things I could adjust a little to keep them from coming apart.

HOWEVER... despite how not-pretty this recipe is, it was absolutely delicious!! The onion broth was a great choice. And while my favorite part was the large dumplings, the smaller pieces really thickened up the broth. Next time, I think I'll try lowering the water to a simmer and trying everything else the same. If that doesn't work, I'll make bigger spoonfuls. As a last resort, I'll add more flour. Really, the flavor and texture of these dumplings is truly "perfect"!

January 22, 2022

HERITAGE RECIPE : Sweetheart Coffee Cake


When looking for a heritage recipe this week, I found one that was called "Sweetheart Coffee Cake"--and since Valentine's Day is coming up, I thought this would be a great recipe to try!

Now, I am the first to admit that I did a terrible job with the presentation! Hahaha, it's not nearly as pretty as I hoped it would be. But hey, if it tastes good, that's what matters most.

You'll see there are two different versions that I made, and I'll explain that in my notes after the recipe.

This recipe was submitted to the Rockwood, Michigan Area Historical Society by Peggy Laginess in memory of her mother-in-law, Helen Laginess.

Now, when I googled Peggy and Helen, I discovered something very interesting. I read Peggy's obituary which named one of my uncles (my mom's older brother) as a surviving relative. This is confusing, but here is what I learned:

Peggy (who submitted this recipe) was married to Robert (who has passed away).
Robert had a sister named Lorraine.
Lorraine is married to Dan--and Dan happens to be my mom's brother (my uncle).

I'm not sure how that makes me a relative to Peggy (through marriage), but I found that interesting! Anyway, Peggy submitted this recipe for Sweetheart Coffee Cake in memory of her husband Robert's mother, Helen. Helen was born in 1912 and passed away in 1997 at age 85.

As always, I'm copying the recipe here exactly as-written in the heritage book and I made it without modifying or substituting anything. If anything was unclear, I made my best judgment and I wrote about it in my notes. (The "printer-friendly" version below is re-written by me with my notes included.)

Here is a printer-friendly version!

Sweetheart Coffee Cake

3-1/2 to 4 c. flour
1/3 c. sugar
2 pkg. RapidRise yeast
2 tsp. salt
1/3 c. butter
2/3 c. milk
1/2 c. water
2 eggs

Set aside 1 cup flour. Mix flour, sugar, yeast and salt. Heat together water, butter and milk until hot to touch. Stir hot liquid into dry mixture. Mix in eggs. Mix in enough reserved flour as necessary to make a stiff batter. Knead on floured surface until smooth, about 5 minutes. Place in greased bowl and cover; rest 10 minutes. Divide dough in half and roll out 1 portion to 15 x 10-inch. Brush with 1/4 cup melted butter. Combine filling and sprinkle 1/2 of it over dough. Roll up as jellyroll from long side. Place on greased baking sheet. Fold half of roll on top other half; seal ends together. Starting at folded end, cut lengthwise down center of roll with scissors to within 1-inch of sealed end. Turn cut halves outward, cut side up, to form a heart. Repeat with remaining dough for second loaf Cover and let rise until light and doubled in size, about 45 minutes. Bake at 350 F for 20 to 25 minutes; remove from baking sheet.

My Notes:

Okay, lots of notes here! The biggest issue I had with this recipe, which almost kept me from trying it, was the fact that there isn't any specification of what the "filling" should be. The recipe just states, "Combine filling and sprinkle 1/2 of it over dough..." but there is nothing anywhere stating what the filling is.

From what I know of coffee cake, the filling is usually a cinnamon + sugar mixture. So, I decided to go with that. However, since there were two loaves, I thought it might be fun to make one red (for Valentine's Day) by using strawberry jam for a filling. Jerry thought it was a good idea, until I prepped the loaf and he said it looked like I was making a vagina--hahaha!


In total, I probably ended up using 4 cups of flour (including the flour I spread on the counter to roll the dough).

I heated the water, butter, and milk in the microwave; I probably should have used the stove, considering this is such an old recipe, but I made sure to stir it often and make sure it didn't get boiling hot.

Rolling out the dough was very easy once I had enough flour mixed in. I made it as rectangular as I could.


It took a lot more jam than I thought it would--probably about 3/4 cup to 1 cup? (It looks like ketchup, I know!)


For the one with the cinnamon + sugar mixture, I melted 1/4 cup of butter as specified in the recipe, and then liberally sprinkled with a combination of the cinnamon and sugar. (I keep cinnamon and sugar mixed together in a shaker jar--probably a 4:1 sugar to cinnamon ratio?). I made sure to spread the butter and the cinnamon mixture all the way to all the edges.


To roll it, first, you start at the long edge. You roll it up tightly (which is kind of hard because it's slippery with the filling). 


Then I put the seam-side up, took one end of the roll and folded the roll in half (with the seam sandwiched in the middle) and I pinched the two short ends together. 


Then, starting at the fold, you use scissors to cut through both layers of the roll. The sides will just kind of fall into position, but it basically looks heart-shaped when you're done.


The recipe specified to cut to about an inch from the short (pinched) edge, and after taking the photo above, I ended up cutting it a little farther because it didn't seem like it was cut far enough.


I baked the one with jam for 22 minutes before deciding it was done, and then set the timer for 22 minutes for the cinnamon + sugar one. I think I baked that one too long--I should have only done 20 minutes. It didn't burn though.


I was very surprised to discover that I liked the one with jam better. I'm usually not a jam person, but I liked that it was more moist and I thought it had more flavor. The cinnamon + sugar one was pretty dry. It definitely needed some frosting! ;)


Overall, I wasn't crazy about these Sweetheart Coffee Cakes. I wouldn't make them again. (And I actually wasn't even tempted to eat more than a couple of bites to taste-test.) Maybe I'm just missing out on an amazing filling that I don't know about--I'm super bummed it wasn't in the book!--but everyone in the family thought they were just okay. And definitely not pretty enough for Instagram or Pinterest photos!

If you happen to make this and have better luck with the filling and/or the presentation, please email me a photo! I'd love to see.

January 15, 2022

HERITAGE RECIPE : Scottish Shortbread


First, I have to admit that this is a total cop-out of a recipe. There are only four simple ingredients and not much work at all.

However, I am in a terrible mood today and I just don't feel like getting into a big mess with a recipe right now. 

I would like to thank Kroger Pharmacy for filling my prescriptions two days late; when you're on mood stabilizers and anti-anxiety meds and suddenly cut off from them, things can become a shit show after just one day. Just ask Jerry. I think he was excited to go to work today just to get away from me.


I understand that everything is slower right now, but I get the same meds every month and these were sent in with plenty of notice. Cutting someone off cold-turkey isn't cool.

Anyway, I feel terrible that this is how I am starting this heritage recipe! Heritage recipes are supposed to be light and fun. This recipe was submitted by Sharon Laura to the Rockwood, Michigan Area Historical Society. I promise that I will do her justice by finding another of her recipes and making up for it.

To make me feel even worse, Sharon is the daughter-in-law of my school bus driver that I had (and loved) all through elementary school! I would love to write a little about her, and I will do that in another post (she has submitted recipes as well, so I'll pick one of hers).

For today, though, I picked (what I thought was) a simple recipe. I almost managed to screw this up, though, because it started to crumble apart when I tried removing it from the pan (turns out I had to let it cool first)

As always, I made the recipe exactly as-written. I didn't make any substitutions or alterations. The "printer-friendly" version below is rewritten by me with any notes to clarify things.


Scottish Shortbread

1-1/4 c. flour
3 T. cornstarch
1/3 c. granulated sugar, divided
1/2 c. butter

Combine 1/4 cup sugar, flour, cornstarch and butter. Rub with fingers; press into ungreased 8-inch pan. Bake at 325 F for 40 minutes. Cut into wedges; sprinkle remaining sugar on top.

My Notes:

Simple enough, right? I mixed the ingredients in my mixer and then squished it all together with my fingers. The dough was REALLY dry and I never thought it would come together, but it did--barely. This is what it looked like before and after smushing it with my fingers.


And then after pressing it down to the bottom of the pan...


It looked pretty much the same after baking as it did before baking...


Getting it out of the pan was ridiculous. The whole thing just started crumbling apart. I wondered if I was supposed to let it cool first before removing it from the pan. So I tried to smush the crumbled part back in there, and then I let it cool. (You can see on the left where I started to try to lift it out and it crumbled apart on me.)


It worked out MUCH better after it cooled. In fact, it was absolutely delicious! It was very buttery tasting and not super sweet. It would be amazing served with some strawberries on top.

Anyway, I apologize to Sharon for my sour mood. I will try making this again when I am in a better mood and maybe I'll do better at it. I'm really looking forward to making one of Sharon's mother-in-law's recipes as well!

Don't let my bad mood stop you from trying this recipe--it really is delicious!  (And if you need a super fast, easy dessert for last-minute company or something, this is perfect. Just serve it with some fruit and it'd be really pretty!

Featured Posts

Blog Archive