Showing posts with label vegan recipe review. Show all posts

September 04, 2023

VEGAN RECIPE REVIEW: Sweet Potato & Black Bean Chili (Crockpot)

Vegan Recipe Review: Sweet Potato & Black Bean Chili

I haven't done a recipe review in a long time--mainly because I haven't been cooking new recipes. As you know, I've been having a really tough year; the last thing I was worried about was cooking new recipes. But I'm feeling SO much better--I have more energy, I have been thinking more positively, and I just feel more motivated in general.

Yesterday, I went for my morning run (my very, very short run around the block) and when I got back home, I felt like I had some energy to burn. I decided to prep dinner--and better yet, I chose a crockpot recipe. I love being able to prep dinner in the morning and not have to worry about it until dinner time.

I happened to have all of the ingredients on hand, and I'm sure most people probably would (except maybe the sweet potatoes). I thought this would be a good recipe to post because it doesn't have "weird" vegan foods in it. It looked like a recipe that vegans *and* omnivores may like.

Because this is a crockpot recipe, there aren't many steps--so this will be a relatively short post. I found this recipe at Eating on a Dime. You can find the full recipe on the site. I will link to it again at the bottom of this post.

Duck is helping me write this today. He is so sweet and it absolutely melts my heart when he wants to be close to me like this. (Pressing the Return key isn't very easy, but every cat lover knows what it's like trying not to disturb a sleeping cat.)

kitty helping me blog


First up is the ingredients list:
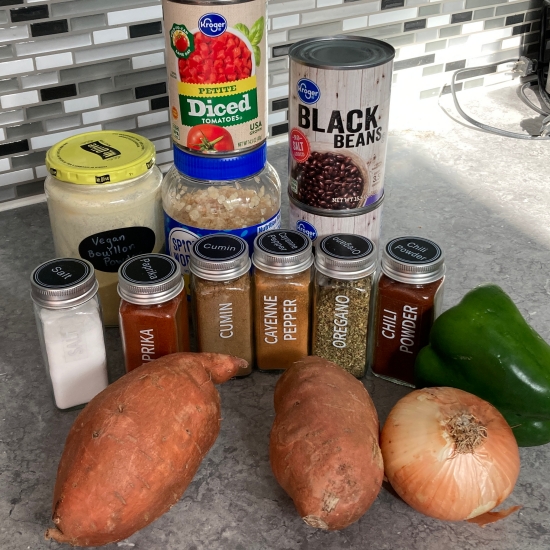
onion
green pepper
minced garlic
black beans
sweet potatoes
diced tomatoes
chili powder
cumin
paprika
cayenne (optional; I used 1/2 tsp.)
oregano
salt
broth (I use homemade bouillon, which I wrote about below)

To prep everything, I just chopped the onions and pepper. Then I cut the sweet potatoes into large chunks (I wanted them to hold their shape after the long cooking time in the crockpot). I opened the cans of beans and drained and rinsed those. 

For recipes that call for broth, I use homemade vegan bouillon powder mixed with water. It's very similar to a chicken bouillon powder. I usually use 1/2 Tbsp. of powder for every 1 cup of water. But any broth will do.


Then, I just dumped everything into the crockpot and set it on low heat (planning to cook it for about five hours).


I'm very familiar with cooking soups, stews, and chilis in the crockpot and three cups seemed like a lot of water, especially considering the amount of vegetables that would give off water as they cooked as well. 

Usually for recipe reviews, I do everything exactly as written. However, instead of the three cups of broth that is called for, I used two and set the third aside in case it was needed. After giving it a stir, I decided holding off on the extra cup of broth was probably the way to go, knowing there would be more liquid as the veggies cooked.


Other modifications: The recipe called for 1/2 an onion, which I never do--why not a whole onion? So I used a whole one. I also cut the salt in half, figuring I could add more later. (In the end, the extra broth and extra salt were not needed.)

I cooked it on low for about five hours. I gave it a stir a couple of times because I didn't want the sweet potatoes to get overcooked and mushy, and I also wanted to see if it needed more broth. This was about halfway through, and you can see there was a lot more liquid:


The house smelled heavenly of chili spices while it cooked. The kids (and Jerry) asked what was for dinner, and I told them Sweet Potato & Black Bean Chili. None of them seemed thrilled, hahaha. I have stopped trying to cater to everyone's wants and decided to cook healthy meals that I thought sounded good--they can take it or leave it. Or cook dinner themselves.

When it was done, I tasted a chunk of sweet potato and was surprised at just how good it was. I've never added sweet potatoes to chili before; I like sweet potatoes, but I only ever really eat them as a side dish  (and even that is only occasionally). Sweet potato casserole, baked sweet potatoes, sweet potato fries. I tried them in a hash one time at a restaurant and wasn't a fan. So, I wasn't sure if I was going to like them in chili.

The sweet potatoes had completely absorbed the flavors of the spices, and I honestly couldn't tell that they were sweet potatoes (judging by taste). The texture was really nice in the chili--a contrast to the usual bean chili (vegan) or meat chili.


Jerry and the kids are *not* sweet potato fans, so I totally didn't expect them to eat it. However, I wanted them to at least taste a piece of the sweet potato because I was sure that it would change their minds. And I was right! Jerry's face went from extremely skeptical to pleasantly surprised. He said they were amazing--the taste and the texture.

Eli was at work, but I gave Noah a piece to try; his face was skeptical as well, but he agreed. (I love that he is open-minded about trying foods that he thinks he won't like.) Just like Jerry, he was very surprised that he liked it. I was thrilled! Sweet potatoes are so healthy and I want to incorporate them into my diet more, so having the family on board is a bonus. I'm going to see if Eli will try a piece today. (I would bet my life that he'll say, "It's not bad". I don't think he would ever admit to liking sweet potatoes.)

Jerry took the chili to work with him and said that he "really liked the sweet potatoes, but the beans didn't have any flavor". This both surprised and confused me--canned beans are canned beans. I use them all the time in chili and he's never said that before.

I had a big bowl of it (too big, actually--I felt uncomfortably full afterward). I loved it! This is something I will absolutely make again. I would like to utilize my crockpot more, and this recipe was super easy. Noah actually ate a bowl of it for dinner, too, which I didn't expect.

Final thoughts: 

-super easy!
-lots of fiber
-tons of good nutrition
-use a whole onion
-cut salt in half
-reduce broth to 2 cups instead of 3
-good sweet potato recipe for people who think they don't like sweet potatoes
-the spiciness was PERFECT for me (if you don't like things spicy, then leave out the cayenne)
-leftovers reheat really well
-a good recipe for days when the groceries are running low

This was delicious and I definitely recommend giving it a try! You can find the recipe at Eating on a Dime.

April 24, 2023

Vegan Recipe Review: Coconut "Shrimp"


I haven't done a recipe review in a while, mainly because I haven't had time to try out new recipes. Yesterday, Jerry and I spent most of the day working on spring cleaning stuff. I was really hungry and we couldn't wait to sit down and eat! But I had no idea what to make. I grabbed this recipe from the printer (I printed it a while ago and forgot it was there until I was cleaning). I realized that I had all of the ingredients on hand and I figured I'd give it a try.

I wasn't sure if I'd be posting about it because honestly, I was very skeptical about how it would turn out. Vegan shrimp? But I always love to try new things.

I was never a big seafood fan (aside from my dad's fried perch), but I did like shrimp. And my favorite shrimp was the coconut shrimp at Red Lobster. I knew this probably wouldn't be quite the same without the piƱa colada-like sauce at Red Lobster, but if it tasted good, I'd be happy.

I got this recipe from Sam Turnbull's site, It Doesn't Taste Like Chicken. I've mentioned before that her recipes are always a big hit or miss for me--I either really love it or definitely won't try it again. You can find the recipe on her site here. (I'll link to it again at the end of the post)

First, the ingredients:

flaxseed, unsweetened shredded coconut, panko bread crumbs, flour, white miso paste, paprika, garlic powder, lemon juice, vegetable broth, salt, pepper, and soy curls

The "shrimp" is actually just soy curls (I've been using soy curls for a while now and we really like them). First, I sorted through the soy curls to pick out any that somewhat-resembled the shape of shrimp. I needed to get two ounces (dry) of them, so I wasn't very picky about what shape they were! Two ounces is only 1/4 of a bag, and these went a LONG way--I was surprised at how much this made.


Then I mixed together the marinade ingredients: miso paste, paprika, garlic powder, vegetable broth (I used a cup of water + a teaspoon of vegetable bouillon), salt, and pepper. The recipe didn't specify to use hot water, but I know from experience that soaking soy curls works much better with hot water. I put the soy curls in with the marinade and set it aside while I assembled the breading bowls.


There are three bowls: one with flour and pepper; another with water and flaxseed; and the third with panko bread crumbs and coconut.


The recipe suggested using chopsticks for each bowl so that they don't get too messy going from station to station--I thought that was clever!


...in theory, haha. First, I'm not very efficient with chopsticks. I can bring food to mouth with them if I have to, but trying to move pieces around in a timely manner just wasn't working. Also, the chopsticks got pretty messy somehow as well, so I eventually just started using my fingers. Much messier, but faster and easier.

I'd only used hot water for the soy curls and not boiling water like I usually do (boiling water makes the soy curls soak it up much faster). I thought the hot water would work here, but I wasn't too sure about it when I felt them--they still seemed pretty firm. I even let them soak a little longer. They were firmer than I usually make them and I thought that may ruin the dish completely. However, I just went along with the rest of the instructions.

First, you coat the curls in the flour + pepper mixture. Then you dip them in the flaxseed mixture. Then you coat them with the panko + coconut mixture. (Note: I really thought the flaxseed "egg" would be an odd choice for this recipe--but that was not the case. The pieces of flaxseed stayed at the bottom of the bowl, so the soy curls didn't pick much of it up.)

After about 10 minutes, I had a large plate full of the breaded soy curls.


Next, you heat a large skillet with oil and place the soy curls in a single layer to cook. I cooked them until they were browned and then flipped them over and browned the other side.


When I was done, I had a pile of (yummy looking) coconut "shrimp".


I really wasn't expecting much from these--the marinade hadn't smelled that great, and for soy curls, marinade is everything. I was very surprised, then, when I tried one and it was SO GOOD.

It was a mild flavor, definitely tasting like the coconut breading I'd hoped. And the texture--shrimp is something I thought could probably never be replicated well--was PERFECT. The texture was definitely that of shrimp, and the flavor was mildly coconut-ty. The breading was super crispy and stuck to the soy curls very well.

I honestly think that if these were shaped like shrimp (better than the pieces I used), and you didn't know they weren't actually shrimp, they could probably be passed off as shrimp. And I am NOT one to say that very often about vegan food. When it comes to vegan food, I like to call a spade a spade. (Nutritional yeast does not taste like cheese and even though I like nutritional yeast for what it is, I will never try to convince someone that it tastes like cheese.)

Jerry and I loved the soy curls! Noah wasn't here and Eli didn't want to try them, so Jerry and I ate the entire plate ourselves. He said I should mention (and I agree) that these don't have to try to mock shrimp. They are good as they are--coconut soy curls. But soy curls have such an unfortunate name--it doesn't have the same ring to it and it's gross-sounding to people who haven't tried them before.

[Side note: Soy curls are made of just one ingredient--soy beans. They are actually compliant in the whole foods plant-based diet, because they are made with the whole soybean and minimally processed. They don't have much flavor, which is why they are super versatile--they absorb the flavors of the marinade.]

I started calling the coconut soy curls "scrimp"--because soy curls (sc) and it rhymes with shrimp. *shrug*  Regardless of what they care called or what they are made of, they are DELICIOUS. I ate them plain (the recipe suggests serving them with cocktail sauce, but I never have cocktail sauce or horseradish, so we just ate them plain. And we loved them.

I'm going to see if I can find a recipe for a sauce that resembles the one at Red Lobster. Jerry and I both agreed that these need to be a regular recipe around here. I'm not sure what Noah would think of them (he likes soy curls, but I don't know if he's ever tried a coconut breading on anything). The next time I make them, I'll make sure that Noah will be here.

I know soy curls sound like a weird food to people who have never heard of them (they certainly sounded weird to me!) but if you're up for an adventure with the odd ingredient, this recipe is definitely one try! (Soy curls are only made by one company: Butler Foods. I order them directly from their website. I'm not affiliated with them in any way.)

You can find the recipe for the Coconut "Shrimp" at It Doesn't Taste Like Chicken.

February 26, 2023

VEGAN RECIPE REVIEW: Chocolate Cake!

When I became vegan a little over a year ago, I started pinning all sorts of vegan recipes to Pinterest. And when I saw this recipe for chocolate cake, it looked SO delicious that I just had to pin it and look for a reason to make it. I stuck it in my recipe binder (yes, I print recipes!) and forgot about it. Occasionally, I would think, "Oh yeah, I need to make that chocolate cake!"

I wanted to have Luke and Riley (my nephew and niece) over, and it was the day before Brian's birthday. I thought they might like to decorate a cake for their dad. Kids that age have a short attention span, so I didn't want to go through the whole process with them of baking a cake, letting it cool, frosting it, and then decorating--I figured I'd get it baked and frosted, then the kids could decorate (the fun part).

Well, this cake almost didn't happen. The first attempt was a (humorous) disaster.

But I'll get to that in a minute. This recipe for "The Best Vegan Chocolate Cake" is from Nora Cooks. (I'll link to it again at the end of the post.) The reviews on it were so good that my hopes were high.

Since I already posted a little about it on Friday Night Photos, I will go ahead and say that this was the BEST chocolate cake I've ever had--vegan or not!

First, the ingredients:

Apple cider vinegar, canola oil, vanilla extract, unsweetened original almond milk, vegan butter, flour, cocoa powder, vegan sugar, powdered sugar, applesauce, baking powder, baking soda, and boiling water (not pictured).

Notes about the ingredients: The vegan butter I used was Earth Balance brand and the sticks are shorter but fatter--they are still 1/2 cup, like other sticks of butter. Also, as you can see, I had to make more powdered sugar (I just put vegan sugar in the blender and blend until it's powdery). I usually use soy milk for everything, but I wanted to stick to the recipe as written, so I bought almond milk for it.

You start the recipe by making vegan buttermilk--combine the almond milk with vinegar and set it aside to curdle. This is what it ended up looking like:

Curdled anything always grosses me out--but I know it's actually common to use it in baking. I set that aside and moved on.

Next, you prep a couple of round cake pans by greasing and adding parchment paper underneath. I had to cut circles out of the parchment. My pans are VERY non-stick because they haven't been used much, so I didn't grease them.


Next, you combine the flour, sugar, cocoa powder, baking powder, baking soda, and salt. It doesn't say to use a mixer, but I put them in the mixing bowl for my stand mixer because stirring things by hand flares up my carpal tunnel. It also didn't say to sift anything, but my cocoa powder had lots of clumps so I sifted that into the bowl. I also sifted a little of the flour with the baking powder because the baking power tends to clump as well. 


It said to whisk until combined. I just grabbed a hand whisk rather than swapping out the attachments for the stand mixer--it only takes a few seconds to whisk that.


Then you add the oil, applesauce, vanilla, and the curdled almond milk. This is where my first problem occurred. I had JUST enough vanilla extract for the cake, so I was careful not to spill it when pouring it into the measuring spoon. As I moved the spoon toward the bowl, I dropped the goddamn thing and the vanilla--the last of the vanilla--went everywhere.


So, I had Noah pick up some vanilla on his way home from school. I wanted to make this following the recipe EXACTLY and I couldn't skip the vanilla! Once I had the vanilla, I mixed in the liquid ingredients (not the water yet). It was very thick:


Once that is mixed, you add the boiling water and continue mixing. I had put water in my electric kettle, so I just turned that on while I was mixing the other ingredients.

The recipe says that the batter will be thin, and it definitely was--it looked like I was on the right track.


Then you divide the batter evenly between the two cake pans and bake at 350℉ for 30-35 minutes, until a toothpick inserted in center comes out clean. (I always add a tablespoon or so of batter to a cupcake mold, and bake it along with the cake. That way I can taste it without cutting into the cake.)


Here is where the big disaster came in...

I was cleaning up the mess in the kitchen and, naturally, tasted the batter from the mixing bowl. It tasted really bad. I couldn't understand why! I'd followed everything right down to the letter, but it didn't taste sweet at all; so, I looked at the recipe to double check the measurements and everything. It called for 1-3/4 cups of sugar--and I couldn't remember measuring that out. One and 3/4 cups is a measurement I would remember because it's not very common. I looked through my photos and I went over the steps again in my head.

I realized I had forgotten the sugar. Of all things!

I was curious how it would turn out, though, so I finished baking it. When I pulled the cupcake out, it looked really good!


I tasted it and nearly spit it out. It was SO BAD. So, of course, I said to Jerry, "Hey, try a bite of this cake and tell me what you think." I left out the part about no sugar. His face when he took a bite was so funny--and he DID spit it out haha. The cake itself looked kind of odd when it came out--the top was perfectly smooth and the cake was very flat. It's what I always hoped my cakes would look like when pulling from the oven, haha.


I still really wanted to try this cake, so I started from scratch. I won't go through all the pictures again, so just pretend that the batter above had sugar in it.

I really like cake that has been just barely underbaked, so I took it out after 30 minutes. It looked a lot different from the sugarless one!


Next: The frosting!! My favorite. I was glad that the recipe said there is a lot of frosting--enough for a thick layer in the middle and on the top and sides.

To make the frosting, you just add the (softened) vegan butter and the cocoa powder to a mixer.


Mix well. This is what it looked like before adding the powdered sugar:


Then you add half the powdered sugar and half the almond milk--mix well. Add the vanilla, the rest of the sugar, and milk and beat until light and fluffy.

It looked so good! (And of course I tasted it at this point--YUM.)


The hardest part here was waiting for the cake to cool so that I could frost it. Finally, it was time to frost! (I don't have a cake plate, so I just turned a CorningWare tart dish upside down.) The recipe was right--there was a LOT of frosting! I put a thick later on the bottom half before topping it with the second round.


I spread the frosting all over, very thickly, but I still had frosting left over! Noah and Eli were happy to take care of that.

I'm not a baker, so my frosting skills are, well, non-existent. But I figured the kids would be decorating it, so it would be hidden anyway.


After I made the cake, Becky said that Luke was sick. So, the kids didn't end up coming over and I had a whole chocolate cake in my house. I decided to eat one piece, then send the rest with Noah over to my parents' house. It would have beckoned me constantly until it was gone.

Well, one bite and I fell in love. It was PERFECT--slightly underbaked so it was very moist, very chocolatey, and the cake to frosting ratio couldn't have been better. (Well, unless you don't like frosting. In that case, you could easily cut the frosting recipe in half and still have enough for a thin layer all around.)


Jerry and the kids tried it, too. All three of them were in love with this cake as well--even ELI. This is a recipe that I am 99% sure people wouldn't know was vegan unless you tell them. It tastes just like a very moist, chocolatey piece of cake with thick chocolate buttercream frosting. Literally the best chocolate cake I've ever tasted! (I still managed to only eat one piece--a challenge for sure.)

You can find the recipe for "The Best Vegan Chocolate Cake" at Nora Cooks.

February 12, 2023

VEGAN RECIPE REVIEW: Cashew-Bean Queso


We had a super fun time with Dave and Renee last night--it had been way too long! We played Euchre and I think that was probably the worst game of Euchre I've ever played, thanks to very unlucky deals, but we needed the laughs.

Before they came over, I made a vegan queso dip recipe that I'd been wanting to try for the longest time. A reader named Laura sent me this recipe last fall and said it was the best vegan queso dip. I kept forgetting about it, but when I wanted to hurry and put together a snack before Dave and Renee came over, it popped into my head and I thought I had all the ingredients. And luckily, I did!

I hadn't been planning to review it here, so I didn't take pictures; but Jerry loved it so much that he asked me to make more of it today for the Superbowl. This time, I figured I'd take some pictures and post about it here.

Usually I write my opinion after the recipe stuff, but since this is my second time making it in two days, I think it speaks for itself. This was VERY good (we ate it with tortilla chips). The flavor reminded me a lot of chili cheese dip; the texture was a little different because of the purƩed beans, but I thought the texture was perfect for a dip.

What the others thought: Dave complimented it right away, but I never mentioned anything about it being vegan. Renee ate some, so I'm assuming she liked it. Jerry loved it and finished off the bowl last night. Noah thought it was surprisingly good. Eli, being Eli, said it was okay--if he was "into vegan food" he would like it. Hahaha.

Anyway, this recipe was actually from a book called The Great Vegan Bean Book by Kathy Hester. I was so glad to google it and see that it was also printed online so that I could share it! You can find the recipe here (I'll link to it again at the end of the post). I ended up changing a couple of things after tasting, but I didn't make any changes until after I tried it as written.

(There's actually not much to write... this is another very simple recipe!)

First, the ingredients:

Cashews, white beans, nutritional yeast, unsweetened non-dairy milk, chopped green chiles, chili powder, smoked paprika, salt. Optional pickled or fresh jalapeƱo slices. I ended up using jalapeƱo slices--not pictured.

(I didn't mean to add the tomatoes to the ingredients photo, because they aren't called for in the recipe. After tasting the recipe as-is, I made a few adjustments, including the tomatoes, which I'll explain below.)

I used great northern beans because they have very soft skin and blend very smooth. Soy milk is my non-dairy milk of choice.

This really couldn't be any simpler: Just put all ingredients in a blender. (The cashews should be soaked in water until soft unless you have a high-powered blender that can get them super smooth.)


Blend until completely smooth.


There was still a tiny bit of texture to it but I realized it was from the beans, so there no amount of blending was going make it smoother. (The texture wasn't bad in any way--I was just unsure if I should keep blending to try to get it even smoother.)

Definitely serve this when it's hot--it's amazing! Yesterday, I ended up putting it in a small crockpot so that it would stay warm until we were ready to eat it.


YUM! It was SO good and the whole thing took less than five minutes to make. I always have those ingredients on hand, so this is something I could definitely make for last-minute guests. And it's super healthy; I think that it would be just almost as good on a baked potato as it was with chips.

Jerry and I gave it a try right away and we both loved it. First, though, I decided to add a couple of things. I *love* green chiles and you couldn't really taste them, so I added the rest of the can. I kind of missed a chunky texture, so I added a can of diced tomatoes with green chiles (yesterday, I used few big scoops of fresh salsa) and stirred it in--I didn't blend it. 

This is what it looked like after I stirred everything in. Not sure if it looks better or worse, haha! But it tasted amazing :)


I'm sure I'll be making this frequently! Here is the link to the recipe: Cashew-Bean Queso.

February 06, 2023

VEGAN RECIPE REVIEW: Dill Pickle Roasted Chickpeas


For this review, I knew I wanted to choose a recipe that called for everyday ingredients--none of the "weird" vegan foods I've been hooked on lately ;)

Eli and I are OBSESSED with anything that is dill pickle flavored (including pickles themselves). Years and years ago, we bonded over a plate of fried pickles and have been pickle buddies ever since. So whenever I see something dill pickle flavored, Eli and I just have to try it. (They aren't vegan, but I used to love Dill Pickle Soup and Dill Pickle Pizza!)

Eli and I both also have a problem with snacking. We snack too much and on too much junk food. Since I've been discovering all the benefits of fiber over the past year, I thought that making these Dill Pickle Roasted Chickpeas would be a good snacking solution--lots of fiber + dill pickle flavor? Yes, please!

The recipe is incredibly simple, to the point where I wondered if it even "counted" as a recipe--but like I said, no uncommon ingredients! And hey--dill pickles.

I can't remember where I first found this recipe, but I would bet my life it was on Pinterest. Regardless, the recipe can be found at Three Olives Branch. (I'll link to it again at the end of the post.)

First, the ingredients:

Chickpeas, dill pickle juice (a couple of tablespoons of brine from a jar of pickles), olive oil, salt, and dried dill weed.


First, you just preheat the oven to 400 F. The recipe lists 350 F for 35-40 minutes, but there is a note on the recipe that says if you want crispier chickpeas, then you can bake them at 400 F for 30 minutes instead. I chose to do that.

Then, I put parchment on a large baking sheet. Parchment paper is seriously the BEST invention ever. Until recently, I had absolutely no idea just how well it works for baking things without having them stick to the pan. Better than any silicone mat, foil with any sort of oil/grease, or non-stick pan. I especially love it for making tofu! Anyway, I lined a baking sheet with parchment paper.


To prepare the chickpeas for roasting, drain and rinse them. I actually saved the "juice" from the cans (it's the cooking liquid from the beans, called aquafaba, and I only recently learned this when making vegan pumpkin pie for Thanksgiving). This is what it looks like and how much I got from two cans:


I've seen it called for in other recipes, but unless you want to open a can of chickpeas to use just a little of the aquafaba, you're out of luck. In vegan cooking, aquafaba is frequently used to replace egg whites. So, I poured the aquafaba into an ice cube tray and stuck it in the freezer--that way, I will be able to use just a little at a time whenever needed.

The recipe states you can peel the chickpeas if you like, but leaving the skins on "gives them a little extra crunch". I'm all about extra crunch, so I left them on.

Once I drained and rinsed the chickpeas, I spread them onto a clean towel to dry off (per the instructions on the recipe). I put another towel on top and then very gently patted the chickpeas in order to dry them the best I could.


While those are drying, you just combine the pickle juice, olive oil, and salt in a small mixing bowl.


After about 10 minutes under the towel, the chickpeas looked relatively dry to me.


I poured them into the bowl with the pickle juice and tossed them in the dressing, making sure they were coated well. As you can see a lot of the skins fell right off. I wish they came off that easily when I wanted them to!


Once they are coated with the dressing, spread them out on the prepared baking sheet.


I left the skins in there, hoping they'd get super crunchy ;)

I roasted at 400 F for 30 minutes, per the recipe instructions. From there, you are supposed to turn off the oven and just let them sit there to finish drying out, for another 30 minutes or so. First, I took a quick picture of what they looked like after 30 minutes of roasting:


I slid them back into the oven, then turned the oven off. I put away some laundry and did the dishes while I waited, and then after about 30 more minutes, I pulled them out of the oven again. They'd definitely firmed up some more.


These were looking very promising to me! Haha. 

Next, you toss them into a bowl with the dried dill weed, making sure the dill coats the chickpeas (they had just enough oil on them to hold seasoning). They looked so delicious!


I was excited to try them--even though Eli wasn't here to try them with me, I had to take a taste.

And I was super disappointed, unfortunately. They didn't have any flavor at all, except for the flavor of chickpeas (which is pretty distinct to me). I added a bunch of salt, hoping that would help, but they still didn't have any flavor.

The texture was okay, but they weren't as crunchy as they look. They still very much resembled a chickpea in texture, just drier.

Over the last several years, I've found that it's very difficult for people to nail the dill pickle flavor for foods other than dill pickles. You can't add pickle juice at the end, because it will make everything soggy; but the brine is not condensed enough to use just a small amount in something.

Dill pickles are very bold--so when you want to eat dill pickle flavored anything, you're expecting (and hoping!) that it will be just as bold as a dill pickle. A lot of commercial products have nailed the flavor (Lay's potato chips, for example). I haven't had the dill pickle Lay's since becoming vegan, but I just googled it--and YES, the dill pickle Lay's are vegan!

I think I need to try out different recipes for dill pickle seasoning until I find the perfect one--and then I can use it to experiment on other foods (like making something similar to the roasted chickpeas).

I wanted to like these so much, but the flavor just wasn't there. The whole family agreed.

Still, if you want to give them a try, maybe you'll have better luck than I! Here is the link to the full recipe at Three Olives Branch.

Featured Posts

Blog Archive