I'm excited to share this! I absolutely LOVE how these little books turned out for Luke and Riley (my five-year old nephew and four-year old niece). They were fun to work on, not at all difficult, and made a very unique gift. Best of all, the kids thought they were really cool!
This is not my original idea. When Mark was sick and got cards from all around the world, he received one like this from a company called Mars. Each of the little pockets contained a few smaller cards for Mark (from the employees) and the pages had a space/Mars theme. I thought it was SO creative that I just had to hold onto it (after Mark enjoyed it, of course!) so that I could reverse-engineer it and make my own.
Nine years later, I finally did. I made cute little paper bag scrapbooks for Luke and Riley. First, I'll show you the pictures of mine to kind of explain more about how it works. Then I'll do the tutorial for assembling the bags into a book with pockets.
Here is what it looks like from the other angles:
For Luke and Riley's books, I picked out some stickers and blank note cards (with envelopes) from a craft store. I glued some colorful paper to each page (I used very thin paper meant for origami, and the glue showed through in several spots. I would probably use a strong glue stick for attaching the paper to each page.)
I wanted their books to stay kind of rustic--I knew if I tried to make them "perfect", I would never get them finished. And the kids would never notice the flaws, so I just went with it. I didn't measure anything or even draw straight lines to cut the paper--I just made approximate cuts. And the result is exactly what I wanted--perfectly imperfect.
For the pages, I was kind of clueless what to write. I asked Becky (my sister-in-law) to ask the kids a list of questions (via video) and then I used their answers to write a little book tailored to each of them. So, here are the pages, one by one. You'll notice that it alternates full- and half-pages, due to the folds of the bag.
 |
| Brian and Becky are not 55 and 59 years old, haha. I wanted the kids to make their best guesses for the questions--no help from grown-ups. |
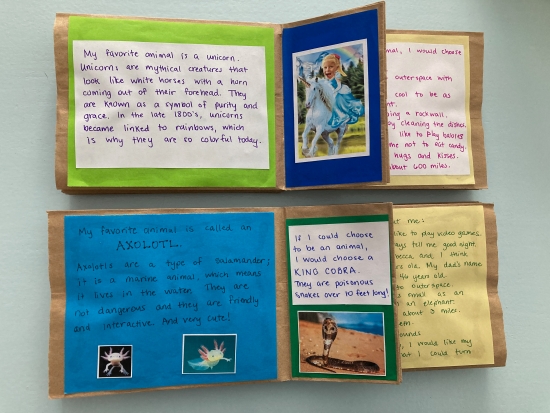 |
| Yes, Luke's favorite animal is an axolotl--wtf?! I was school by a five-year old. |
I wrote little tidbits on the pages and added some pictures. I even edited some of the pictures for fun--Riley riding a unicorn is my favorite! I also made her a nurse, and turned Luke into a pilot and a Mario Bros. character. I had most of the photos printed at a one-hour place, but some of them I just printed at home on a regular laser printer and they turned out fine.
I left a blank space on the last page for them to write their names.
For the back cover, I just glued some colorful paper. In retrospect, I wish I had written a little note like "Made just for you, with lots of love! Aunt Katie" or something like that
What are the little pockets between pages for? Well, I'm glad you asked! You can put whatever you want in them, of course. I thought the kids would have fun opening several different things, so I used envelopes. I bought blank cards in a couple of different sizes, all blank inside and including an envelope.
The larger ones (4x6) had colorful fronts, but the rest was blank. The others were totally blank card stock. I chose to use the larger ones for photographs (I labeled them "Say Cheese!" on the envelopes); and each of the smaller cards contained one of two things: 1) "Fun Facts" or 2) "[chuckles]".
The "Fun Facts" envelopes contain a card with a random bit of trivia that I thought the kids would like. (I just looked up "kids trivia" on google and found them that way.) The "[chuckles]" cards have a kids' joke on them--I wrote the joke question on the front of the card and the answer on the inner part. I randomly placed stickers on cards and envelopes, just to make them a little more fun.
Then you slide them into the cool little pockets between the pages!
Isn't that such a fun way to make a scrapbook?! They won't last forever, obviously, especially with a four- and five-year old flipping through them; but they are so creative and fun.
Some people were curious about how the books are put together, so I made a little tutorial.
You can add as many pages/bags as you want, but I wouldn't recommend using more than six bags, because it will stretch out the "spine" once you start adding envelopes. I wouldn't use less than four, though, or it won't be very impressive.
Okay, here goes...
Materials needed:
- 4-6 standard paper lunch bags
- Adhesive for paper--I used several, via trial and error as I went along. I used a very strong spray adhesive to glue the bags together. It's hard to keep the spray off of the other pages, so there is probably a better option. But you want something strong that will spread across the whole bag.
- Scissors
- Cards and envelopes--whatever size and however many you'd like, as long as they fit inside the bags. I used ten 4x6 cards and twenty-four 2x3 cards.
- Scrapbook stuff for decorating--paper, markers, stickers, etc.
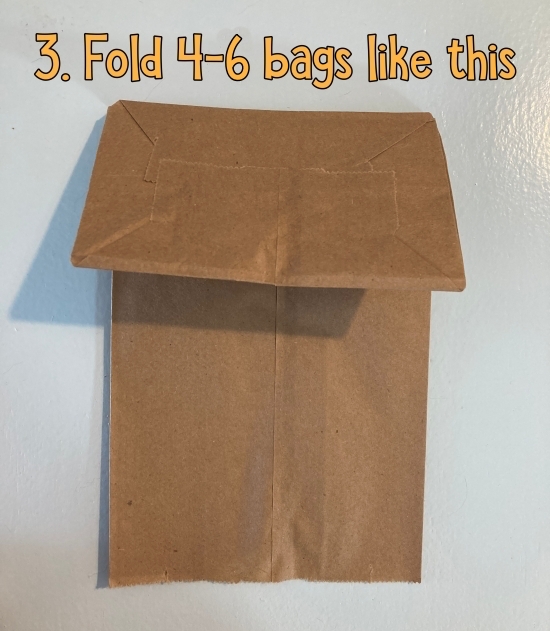
First thing's first: Count out 4-6 standard size paper lunch bags.
When putting this together, you want to make sure you know what parts get glued together. This is what I'll be referring to in the tutorial:
 |
| This probably should say "flat face" instead of side. It's the part facing upward! |
First, grab one bag and lay it with the flat face upward:
Then you're going to fold the top down like this:
Now, you should see the bottom of the bag facing up, on top of that flat face. See picture below:
Lay two bags next to each other so that you can see the bottom side of both. Those will get glued together--see photo below for where to put the glue:
 |
| Make sure that the long pages are facing in the same direction when you glue these together. |
After glueing:
Next, you're going to add another page by glueing two long faces together. Grab another one of the bags. Lay the first bags (that you've already glued) down on the table so that you just see the smooth side--no folds or anything--facing up. See photo below: the bags I already glued are the ones that are resting on the table (you can't see the second bag, but it's there).
Spread glue on each face like in the photo below and glue those together:
Note: Be careful with the little semi-circle cut-outs at the top of each bag. Those will be cut off later, but just make sure you don't accidentally glue them shut when you press the bags together--don't put glue right on the edge of that little semi-circle (in the photo above, you can see what I'm referring to on the left side of the bag).
And then after glueing (this is three bags total):
Then you'll add a fourth bag, glueing the bottoms together the same way you did for the first two bags. Spread glue on the bottom of each bag--one fresh bag and one that is part of your book--and then glue those together. See photo below:
And after:
That is what it looks like with four bags total. You could leave it at that, which will give you a front and back cover, four full-size pages and four half-size pages (or two, if you aren't counting both front and back). This creates four separate pockets between pages.
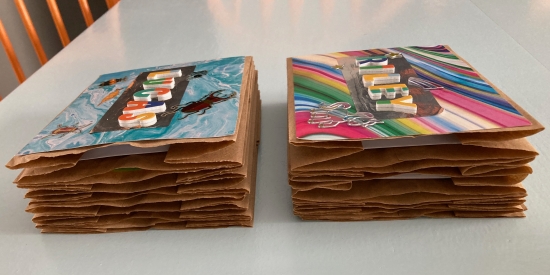
With Luke and Riley's books, I added a couple more bags (six total), which gave me a front and back cover, six full pages, and six half-pages. It created six separate pockets for the envelopes. I put two large envelopes and 3-4 small envelopes in each pocket--so in total, I used 12 large cards and 20 small cards for each book. This made a very thick book that I think should probably be the maximum size for this. I was worried about the "spine" splitting apart as the pockets got fuller--it's fine like this, but I don't know how it would have lasted with any more in there!
You'll notice some of the folds may need to be glued shut. Any open parts that face the spine can be glued shut. (There is nothing wrong with leaving them, but I preferred to glue mine shut. Just be sure you don't glue your pockets together!
When you are done adding pages, set the book with the spine facing to the left. With the scissors, cut off the raw edges on the side opposite the spine. See picture below:
And after that, you're ready to go to town with decorations, photos, memories, tidbits, etc. The best part is adding the cards!
Isn't this such a cute idea? I didn't even google this paper bags thing--so it's probably all over the internet already--but I'd never seen it before and I thought it was super creative. I have another idea of one I want to make--so I'll post about that after I'm done (if it turns out well).
If you make one, I'd love to see pictures for more ideas! You can either email them to me or tag me on Instagram (
@runsforcookies). While I rarely post on Instagram, I do like to scroll through it. And I love looking at other people's crafts--so show me :)


These are adorable! Who had more fun with them? You or the kids? ;-) Seriously though. What a great scrapbook idea. You're quite the devoted auntie.
ReplyDelete