Showing posts with label misc recipes. Show all posts

February 05, 2022

RECIPE : Tapenade & Hummus Pizza

Tapenade and Hummus Pizza

I completely forgot about making a heritage recipe today! Like I said yesterday, this week feels all messed up because the kids were off of school Wednesday through Friday. It feels like today should be a Monday.

Anyway, I did have a DELICIOUS dinner and figured I'd share that instead.

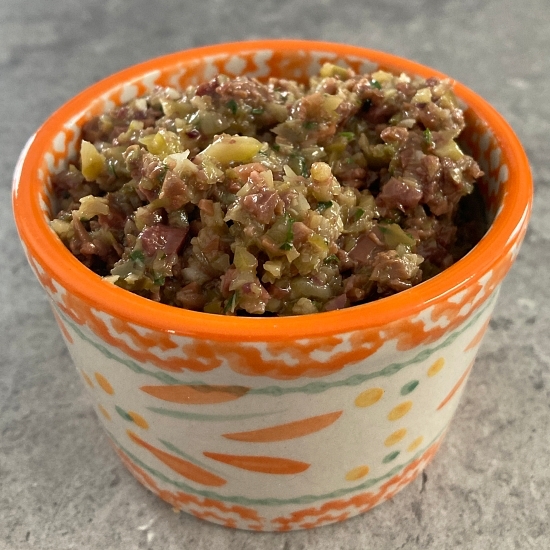
I've been craving olive tapenade for months and months--it just seemed like whenever I was in the mood to make it, I didn't have one or more of the ingredients (I never have fresh parsley on hand).

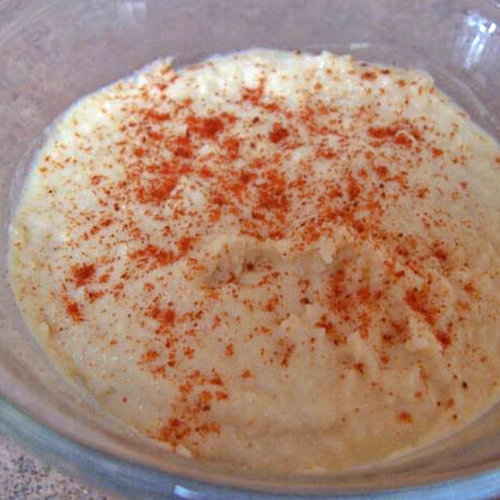
I was excited when I saw that Sabra came out with a hummus that has a dollop of tapenade on top. I bought that several times to eat with pretzels. It just made me crave tapenade even more.

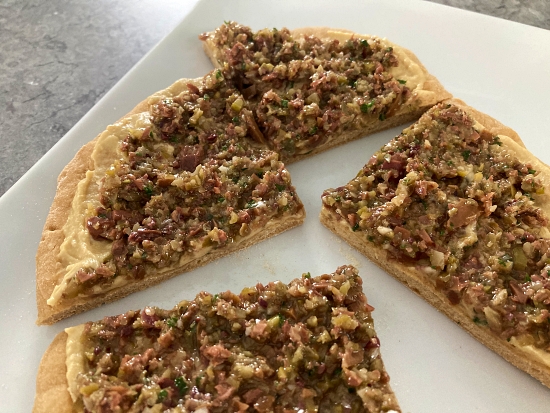
Today for dinner, I decided to make whole wheat pizza crusts so we could each make our own mini pizzas. When I was looking in the fridge to make sure we had cheese, I realized that I had fresh parsley in there--I forgot that I bought it the last time I went grocery shopping (with the sole purpose of making tapenade). So, I had the idea to make the tapenade and put it on my pizza.

olive tapenade

We didn't have cheese, so Jerry headed to the store. I asked him to get hummus while he was there so that I could basically make a tapenade hummus pizza on whole wheat crust for dinner. It was SO good. The crust was soft and bread-like, so it reminded me of warm pita bread with the hummus on there; and then the tapenade was heavenly.

Tapenade and Hummus Pizza


To make the pizza, I just used three items: pizza crust, hummus, and tapenade. I made the pizza crust and tapenade, but I used store bought hummus (just the regular flavor).

So, here is my tapenade recipe... the tapenade tastes great on crostini (mini toasts), crackers, pretzels, etc. I usually use it as a dip, but I'm sure it would be a good condiment, too--I bet it would be awesome on a toasted Italian sandwich.

Here is a printer-friendly version of the Tapenade recipe!

Tapenade

6 oz. pitted green olives (this is the drained weight of one jar)
7 oz. pitted kalamata olives (the drained weight of one jar)
1/4 cup drained capers
1/4 cup lemon juice
1/4 cup chopped fresh parsley
5 cloves garlic, chopped
1/4 cup olive oil (I use the extra light tasting--flavorless--olive oil)

Drain the olives. Put all the ingredients into a food processor and pulse a few times. Scrape down the sides of the bowl and pulse some more until it's the consistency you like it. (Don't add salt; the olives make it very salty.)

tapenade


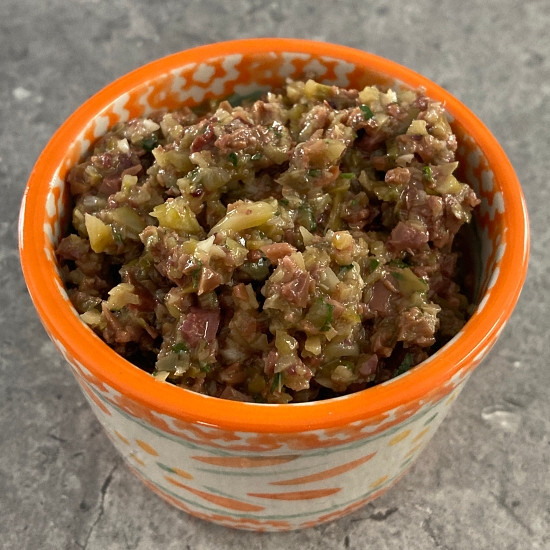
This recipe makes a good-size amount--probably about 2.5 cups. You could cut the recipe in half, but I don't like having half-empty jars of olives and capers in my fridge. The tapenade will store for about two weeks in the fridge (I'll eat it long before that, though!)

Here is a printer-friendly version of the Whole Wheat Pizza Crust recipe!

Whole Wheat Pizza Crust

1-3/4 to 2 cups whole wheat flour (enough to form into a ball)
1 cup hot water
1 Tbsp. olive oil
3/4 tsp. salt
2 tsp. yeast (one packet)

Directions:

Preheat oven to 450 F. Combine all ingredients in a bowl until a ball forms and cover with plastic wrap. Let the dough rise for at least 15-20 minutes. Divide dough into four portions and press them into circles. Lay them out on a baking sheet (you may need to add a little more flour to keep them from sticking). Bake at 450 F for about 10 minutes, until crust is just baked through.

Remove crusts to a plate. Spread about 1/4 cup of hummus on each crust; top with about 1/4 cup tapenade and spread to edges.

This was super filling and a nice change from the regular pizza!

Tapenade and Hummus Pizza

January 29, 2022

HERITAGE RECIPE : Perfect Dumplings


This is another of those recipes that does not look pretty at all--but I'll spoil the ending and say that this was delicious! SO much better than it looks.

I've been wanting to make this recipe for a while because the person who submitted it happens to be my elementary school bus driver. And let me say, the fact that I came from a very small town means that the bus driver could as much of a mom or grandma as could be before and after school.

This recipe was submitted to the Rockwood, Michigan Area Historical Society by Joyce Laura in memory of Elza Raymond. I was a little confused at first while googling, because Joyce's maiden name was Raymond; and she married Raymond Laura. Once I sorted that, it made sense ;) I'm assuming that Elza was Joyce's mom.

You know how you go through life and there are certain random people tucked into the back of you mind that bring a nostalgic smile to your face when you think of them? I don't mean the people that do these spectacular well-known things, but rather the everyday people that you encounter for one reason or another.

Joyce Laura is one of those people who is tucked into the back of my mind. I honestly can't say I remember much about her! She was my school bus driver all through elementary school, and all of us kids absolutely loved her. I do remember her giving us treats once in a while (cookies or something). But she treated us like her own grandchildren (of which she had many--she was born in 1927 and when she passed away in 2016, she had 14 grandchildren and 15 great-grandchildren.

The same kids would ride the bus together every year; we all lived in the same neighborhood, played together all summer, and even though there were certain kids we didn't like, we were a sort of family in a way. And I think Joyce thought of us like that, too. She liked seeing us grow each year and she took some pictures of us in front of or inside of the bus. (She actually did have a grandson who rode the bus with us!) She made each of us feel special in our own way.


I could still tell you all of their names and I am still friends with some of them today. I asked some of my childhood friends today what they remember about her, and they all said the same thing: "She was just so NICE. Even with some of the morons on the bus, she was so NICE to everyone."

I remember one specific incident when we were pulled over by the police. Apparently, a boy named Eric, who was known for being a troublemaker, threw his hat out the window at a cop car. So we were pulled over and the cop came on the bus to talk to him. Joyce was as calm as could be; I learned later in middle school, that most bus drivers are NOT like that!

Joyce submitted this recipe in memory of Elza Raymond--because Elza was her maiden name, I'm assuming that Elza was her mother, but I can't be sure. I cannot find that simple piece of info online!

Anyway, even though this recipe is simple, I just couldn't help but make it in memory of Joyce. An elementary school bus driver that sticks in the minds of kids 35 years later is a special bus driver indeed.

As always, I am typing out the recipe here exactly as it is in the book; the "printer-friendly version" was re-written by me to include any notes or clarifications. I did not make any modifications or substitutions while preparing this recipe.

Here is a printer-friendly version!


Perfect Dumplings

1-1/4 c. flour
3 tsp. baking powder
1 tsp. salt
1 tsp. sugar
1 well-beaten egg
1 c. milk

Mix well. Drop by spoonful into boiling liquid. Keep boiling continuously. Steam 15 minutes.

My Notes:

This recipe is super straight-forward. The only thing I wasn't sure about was the steaming. Steaming usually involves covering the pot to hold in the steam. So, here is how I read into it: I dropped the dumplings in as the liquid boiled continuously. Once all the dumplings were dropped in, I covered the pot and lowered the temp to medium, and let them steam for 15 minutes.

It says to cook in liquid, so I imagine you could use whatever liquid you like. I made them in French onion soup (just the powdered mix with water). 

These were definitely NOT pretty. The batter looked very thin when I was ready to drop it into the soup. Still, I took about a teaspoon or a little more at a time and dropped it in. I could see they were coming apart when they hit the boiling water. Look how bad they looked in the pot! (I probably should have used a wider pot as well.)

This was after steaming

I imagine that I was probably supposed to drop bigger spoonfuls. Or maybe if I lower the water to a simmer rather than a boil. I know they would stick better with more flour (a thicker dough) but I didn't want to alter the recipe at all. There are several things I could adjust a little to keep them from coming apart.

HOWEVER... despite how not-pretty this recipe is, it was absolutely delicious!! The onion broth was a great choice. And while my favorite part was the large dumplings, the smaller pieces really thickened up the broth. Next time, I think I'll try lowering the water to a simmer and trying everything else the same. If that doesn't work, I'll make bigger spoonfuls. As a last resort, I'll add more flour. Really, the flavor and texture of these dumplings is truly "perfect"!

July 24, 2021

HERITAGE RECIPE: Maple Nut Cake


This is a rather simple recipe today, but don't let the lack of ingredients fool you--I was very pleasantly surprised at how good this turned out!

I chose this recipe because we just got home from vacation yesterday and we had zero groceries in the house. I hadn't gone grocery shopping or even chosen a recipe to make for today's post, so I flipped through the heritage recipe book looking for something that was very simple.

I had all of the ingredients for this Maple Nut Cake, so I decided to give it a try--and it was delicious! It has the flavor of chocolate chip cookies (without chocolate chips) but the texture of a quick bread. (I'm assuming the "maple" in the name comes from the brown sugar; there is no maple syrup or extract.)

Jerry called this "Cookie Bread" because it tastes like cookies but it's in quick bread form.

This recipe was submitted to the Rockwood, Michigan Area Historical Society via a handwritten recipe book by Viola Herzog. However, she copied the recipe from a 1930's issue of the Detroit News.

As always, I am typing this exactly as written in the heritage book. Make sure you read my notes afterward, because there is an important error in this recipe. I made this recipe exactly as written, with no substitutions or alterations. The printer-friendly recipe is rewritten by me with any clarifications.

Here is a printer-friendly version!


Maple Nut Cake

1/2 c. shortening
1 c. brown sugar
3/4 c. milk
1-1/2 c. flour
1 c. finely chopped nutmeats
2 tsp. baking powder
1 tsp. vanilla
2 eggs
1/2 tsp. salt

Cream shortening with sugar; add egg yolks. Mix well. Add milk and flour sifted with baking powder; stir well. Then fold in the stiffly beaten whites of eggs and vanilla. Bake in a greased loaf pan 1 hour.

My Notes:

First, the obvious error (which I didn't notice until I was mixing the batter). The directions never mention adding the salt or nuts, even though they are in the ingredients. I'm not sure if this error was made in the Detroit News, or the handwritten recipe, or the heritage book. I added the salt with the flour and baking powder, and I stirred in the nuts last.

I wish I'd read ahead to beat the egg whites--if I was doing this again, I would beat the egg whites first, set them in the fridge while I mixed the rest, and then add the whites in. This way, I wouldn't have to transfer the batter to another bowl, wash the mixing bowl, beat the egg whites, then add the egg whites to the batter. Egg whites won't get stiff if any of the yolk is mixed in there, so you need a very clean bowl to beat them (ask me how I know!).

To get specific with the ingredients, I used whole milk and pecans (since it didn't specify in the recipe, I just used my preferences).

I finally got some new bakeware, and I'm excited about using it! Since I've been making a lot of the heritage recipes, I got some metal baking sheets/pans to use instead of the Pyrex glass ones. (Temperature resistant glass wasn't introduced until 1915, and a lot of these recipes are from the late 1800's to early 1900's.) I think the bake times should be more accurate with metal pans. Anyway, I greased my new loaf pan and baked the "cake" for 1 hour, as stated. (I put cake in quotes because this reminds me more of a quick bread.)

It was done after exactly one hour in the oven. Delicious!


April 03, 2021

HERITAGE RECIPE: Nut & Raisin Sandwiches on Graham Bread


I'm excited to finally be able to make this! I have seen several recipes in the heritage cookbooks that call for "graham flour". And some recipes say to "serve with graham bread". I didn't know what that was, so I did some research.

Graham flour is just whole wheat flour, but very coarsely ground. It's about as rustic a flour as you can buy. It was developed by Sylvester Graham in the early 1830's (and yes, it is commonly used to make graham crackers--although, the early graham crackers were not at all sweet like they are today).

His story is fascinating--you can find the details here. (He developed a diet that included bland starches, like graham flour, in order to stave off lustful behavior. So, I guess this bread is not what you would call an aphrodisiac! I'm tempted to rename this bread "Abstinence Bread", haha.)

I had a VERY hard time finding graham flour--even to buy it online! There were some sites that listed it for sale, but I wasn't about to pay $25 for a pound of flour. I almost bought the wrong item--I saw several listings for "gram flour", which is NOT the same thing. Gram flour is made with chick peas.

Eventually, I somehow came across a site called Purcell Mountain Farms that was selling graham flour for $4.35 per pound (and free shipping!). A pound of flour isn't much (maybe three cups or so) but I only wanted it in order to try out a recipe for graham bread.


You can certainly substitute whole wheat flour to make this bread, but after tasting it, I just don't think it would be the same. The texture really makes a difference here.

Since I was going to be making the graham bread, I also decided to choose a recipe for a spread that is meant to be served on graham bread and post the two together.

This bread is delicious! I was very surprised at just how good it was, because it's not anything special (other than using the graham flour that was difficult to obtain). When it comes to bread, I definitely prefer the white varieties. But the whole point of this heritage recipe series is to try new things, especially recipes that are off the beaten path.

I also mentioned last week that I don't like raisins, but discovered they were delicious in the Spread Cookies. This recipe for the nut and raisin sandwich spread uses raisins (obviously), so I dove in. And again, I really enjoyed them! I may be a convert to the raisin side now. (The graham bread recipe lists raisins as an optional add-in, but I did not add them to the bread itself.)

As always with the heritage recipes, I made it exactly as-written in the recipe. I will share my notes after the recipe.

This recipe for Graham Bread was submitted to the Rockwood, Michigan Area Historical Society for inclusion in their cookbook by Lenora Spitler. She said it was her grandmother's recipe and over 175 years old. The recipe for the Nut & Raisin Sandwiches came from the St. Charles 1910 Cook Book and was included in the Historical Society cookbook as well. 

Here is a printer-friendly version!

Graham Bread

1 T. rounded lard
2 c. buttermilk
2 tsp. soda
1/2 tsp. salt
1 c. flour
2 c. graham flour
1 c. raisins (optional)

Mix all of the above and place in a greased pan. Bake at 350 F for 45 minutes to 1 hour.

Notes:

Simple enough! I wrote about the graham flour in the intro. If you can't find it, you can substitute with whole wheat, but like I said, I do think that the texture of the graham flour is important for this recipe. For the other flour, I just used unbleached white flour. 

The "soda" refers to baking soda. I used shortening for the lard. As for the baking time, I pulled mine out after 45 minutes because it looked done to me. And it was perfect!


Nut & Raisin Sandwiches

1-1/2 c. raisins
1/2 c. nuts
1/2 lemon
buttered bread

Pass nuts and raisins through a chopper. Blend smooth with juice of 1/2 lemon. Spread between slices of well-buttered graham or white bread.

Notes:

Again, this is a simple recipe. I chose to use walnuts (we have a billion of them for the squirrels). I put the nuts, raisins, and lemon in a food processor and pureed until it was like a very thick paste. It reminded me a lot of a Larabar--only with raisins instead of dates.


While I was preparing this, the squirrels kept coming up to the back door, hoping for walnuts. I thought the paste would make a nice little treat for the squirrels, so I grabbed a grape-sized amount and rolled it into a ball. Then I rolled the ball in the "flour" at the bottom of the walnut container (the "flour" is just referring to the very fine walnut crumbs that settle on the bottom).

One of the squirrels took off with it before I could take a picture of her. I'm going to make some more with the leftover filling.


Overall, I absolutely loved the bread and was pleasantly surprised by the nut and raisin spread. I would definitely make them again. I think the graham bread would make a really delicious toast to have for breakfast!

February 27, 2021

HERITAGE RECIPE: Poppy Seed Tea Bread


I have been doing a series of recipes from a few old cookbooks put together by the Rockwood, Michigan Historical Society back in 1995. You can find the original post here.

I have a very fun story to share before this recipe for Poppy Seed Tea Bread. The story and recipe aren't related (as far as I know) but the story is about tea party memories and I chose the recipe from the same section in the book (in the category of Victorian Tea). This story is written by Frances (Vizard) Skinner, who shares memories of her mother attending tea parties with her friends in the 1920's.

"Back in the late 1920's, around 1928 in Rockwood, four women got together every two weeks or once a month to have a little tea party.

They would dress real nice wearing their long skirts and always wore white gloves and hats. This was the only time outside of church they would have a chance to dress up.

This was also a chance to show off their fine china and good linens; the table was set perfectly. The women looked forward to this. It was a chance for the latest news and gossip. They would sit around the dining room table with their best linen tablecloth and napkins. (Paper napkins were not heard of yet.)

They all showed off with their baked goods. Ma always made her homemade fried cakes or her very special apple pie; it looked like a picture when she was done and the other ladies made their favorite desserts. My dad always went around smiling on the day of the party because he knew he was going to get some real tasty goodies.

I always had to go. I was told to sit in a chair and be quiet. After the ladies were done, I got my goodies. I also remember never put your teaspoon on the tablecloth, always put it on the saucer. I wish now I would have paid more attention to what was going on. But I was just a little girl and was bored with the whole thing.

The women were Mrs. Agnes Vizard (my mother), Mrs. Lena Baumeister, Mrs. Catherine McKnight and Mrs. Julia Lambrix. We lived in the old Kramer house on Huron River Drive (now the parking lot of the church). Mrs. Baumeister lived on the corder of Huron River Drive and Burton Street. The house is still there. Mrs. McKnight lived behind her at the corner of Burton and Grant Street and that house is still there. Mrs. Lambrix's house, later to be the George and Eunice Lemerand Home, was on Church Street.

These were the good old days as I remember. I was there!"

Out of curiosity, I looked up Frances Vizard Skinner (who wrote the story above) and discovered she passed away in 2014 at age 93. She had 2 children, 9 grandchildren, 21 great grandchildren, and 10 great great grandchildren at the time she passed away. Amazing!

Unfortunately, the recipes for her fried cakes and special apple pie were not listed in the book. However, there is a recipe for Poppy Seed Tea Bread that was submitted by Judy Breitner and I decided to make that. I just had to share the tea party story, though!


Poppy Seed Tea Bread (*Remember, I am writing the recipe exactly as submitted to the cookbook--but make sure you read my notes afterward)

Here is a printer-friendly version!

Ingredients:

3 c. flour
2-1/2 c. sugar
1-1/2 tsp. salt
1-1/2 tsp. baking powder
3 eggs, slightly beaten
1-1/2 c. milk
1 c. cooking oil
2 Tbsp. poppy seeds
1-1/2 tsp. vanilla
1-1/2 tsp. almond
1-1/2 tsp. butter flavoring

Directions:

Grease the bottom and 1/2-inch up sides of an 8 x 4 x 2-inch loaf pan. *See notes below!

Mix eggs, milk, oil, poppy seeds, vanilla, almond and butter flavorings. Add dry ingredients; stir just until moistened. Spoon batter into prepared pans. Bake at 325 F for 50 to 55 minutes for 8-inch loaf pan or until toothpick comes out clean. Cool in pan on a wire rack for 10 minutes. Remove from pan and cool completely on wire rack; wrap and store overnight.

Notes:

*This recipe is pretty straight-forward with the exception of the loaf pan(s). From reading the directions, it mostly refers to a singular pan, except when it says to spoon batter into PANS. I figured that was a typo and planned to bake it in one pan.

However, once I made the batter, there was way too much for just one pan. It very clearly makes enough batter for two loaves. I baked them together and they needed more time than stated--this may because I used glass pans and not dark pans (as well as baking two loaves at once). I just started checking with a toothpick after 55 minutes until they were done.

*The last three ingredients are all extract flavorings. I used pure vanilla and almond, but obviously the butter extract was artificial.

*For specificity, I used white all-purpose flour, whole milk and canola oil.

*I wrapped in plastic wrap and stored in the refrigerator.

This recipe was delicious! It was so fun to make something that I'd never even seen before and it smelled and tasted amazing. The flavor reminded me of an almond cookie, and the texture was perfect for this type of bread. (Which is good because I have two loaves of it!) I will definitely make it again.

February 07, 2021

HERITAGE RECIPE: Corn Oysters (from the 1930's!)


Today's heritage recipe was a win for sure. It was delicious! (I also learned a lesson the hard and painful way, which I'll explain later.) This recipe is from the Rockwood, Michigan Area Historical Society cookbook (produced in part by my most favorite aunt). Here are the other "Heritage Recipes" I've posted.

This caught my eye because of the "oysters"--I've never tried oysters, and I'm not sure I'm ready to make them, but once I read the ingredients I saw that there are no oysters involved.

And I love it when the recipes specify the date--this one said it was from the 1930's. I had all of the ingredients at home already, so I decided to go ahead and make it today--I had chili in the slow cooker for dinner, and these sounded like the perfect side dish for the chili.

My only regret is that I did not have raw corn; I didn't want to make the recipe with canned corn if canned corn wasn't a "thing" in the 1930's. I looked it up online, though, and sure enough--you could buy corn in a can back then. So I decided it was okay to use the canned corn.

Here is the recipe, as written. Thankfully, it was an easy one to read.


Here is a printer-friendly version! You can choose to print the pictures or not.


Corn Oysters

2 eggs
2 c. chopped raw corn or canned corn
1/3 c. flour
1/2 tsp. salt
1/8 tsp. pepper
1/8 tsp. paprika

Beat eggs; add corn, then flour sifted with seasonings. Drop from tablespoon into hot fat and fry or cook on a well-greased griddle. Makes 15 medium-sized oysters. If corn is very moist, more flour may be added, or a little less if very dry.


My own notes (photos are at the bottom):

So, there weren't many variables here--just the texture of the batter; the depth and temperature of the grease; and how long to cook them. This is how I made them:

I mixed the ingredients as listed. For the "hot fat", I used shortening. Normally, I'd never use it because it grosses me out, but Jerry bought some for Christmas cookies and I figured it was probably better for this recipe than olive oil! I looked up shortening, and it was mentioned as far back as 1796 in a cookbook.

I didn't get the impression that these were supposed to be deep-fried, like corn fritters, so I used a skillet and added probably about 1/4 cup of shortening--it ended up melting down to about 1/2 inch deep. 

I am not familiar with deep-frying or even pan-frying, really, so I wasn't sure what temperature to set the stove. I went with medium-high, where it looked very hot (my dad makes deep-fried fish, so I've seen him do that). 

The texture of my batter looked how I imagined it should--kind of like pancake batter, only with lots of corn in it. 

I had to be VERY careful dropping the batter into the skillet. It started sizzling right away, and it was HOT. I dropped three in the skillet at one time, and had a plate lined with paper towels next to the stove to place the corn oysters when I removed them.

I made them a little too big, so I only got nine from the batch.

Almost immediately, I could see that the bottoms of the corn oysters were browned, so I tried to carefully flip them, but they still splashed a little. I stood back as far as I could.

Here is where the "fail" part comes in. I was standing next to the stove, just watching them cook (they cook fast!) when suddenly, one of them popped and basically exploded boiling hot grease on me. I screamed and jumped back, rinsing my hands and face with cold water. When all was said and done, I have a bad burn on the knuckle of my right thumb, in the wide space between my thumb and pointer finger, and on my eyelid. I'm very lucky I was wearing a long sleeved sweatshirt and that it didn't get IN my eye. 

BE CAREFUL WHEN MAKING THESE BECAUSE THEY MAY POP OIL IN THE AIR.

After flipping, I cooked each for another 90 seconds or so and then placed them on the plate. They didn't turn out as crispy as I imagined, so I think I'd cook them a little longer on each side. Regardless, they were delicious!

I ate one as-is, and it was great--I LOVE corn! (If you like corn, you will love these.) But I decided to add a drizzle of honey (such a great combination!) and it took it to a whole new level. This was such a simple and delicious recipe, I'll definitely make it again... I will just be extra careful about the grease exploding! I literally just bought a splatter screen for my pan from Amazon, haha! (affiliate link)

This is the texture of my batter...


And this is the amount I dropped into a 10-inch skillet...


I flipped them after about 90 seconds to 2 minutes--as soon as they looked golden brown.


After removing from the pan, I set them on paper towels...


This is what the inside of them looks like...


And here they are topped with a drizzle of honey!


Enjoy :)

January 31, 2021

HERITAGE RECIPE: Onion Shortcake


Wait!! Before the words "onion shortcake" turn you off, open your mind just a little--because this recipe is delicious! It's the perfect side dish for just about anything. I could eat this as a meal all by itself, actually. It tastes like cornbread with a creamy onion topping.

I'm writing out the recipe exactly as it is written (submitted by Alverta Robillard) in my heritage cookbook. I cannot fathom using margarine in anything I cook--I use butter--but "butter or margarine" was written in the original, so I am including it here. I also cooked it exactly as written, with one exception that happened by mistake. See notes/photos below the recipe.

Here is a printer-friendly version!

Ingredients:

1 sweet Spanish onion
1/4 c. butter or margarine
1-1/2 c. corn muffin mix*
1 egg, beaten
1/3 c. milk
1 c. grated sharp cheese, divided
1 c. cream-style corn
2 drops of Tabasco sauce
1 c. sour cream
1/4 tsp. salt
1/4 tsp. dill weed

Directions:

Peel onion; slice and sauté slowly in butter. Combine muffin mix, egg, milk, corn and Tabasco sauce. Turn into buttered 8-inch square pan. Add sour cream, salt, dill weed and 1/2 cup of the cheese to sautéed onions. Spread over batter. Sprinkle with remaining cheese. Bake in preheated 425 F oven for 30-35 minutes or until set. Cut in squares and serve warm.

My own notes:

I didn't know what a Spanish onion was (I was picturing the red onions for some reason!) but it's basically just a sweet onion. 

I used butter. Margarine reminds me so much of the 80's! Haha.

For the corn muffin mix, I used one box of Jiffy's.

I used cheddar cheese, although it doesn't specify which type of cheese to use.

I accidentally used a full can of cream-style corn, even though the recipe called for one cup. I had no issue with it at all, so if you don't want to measure out the corn, go ahead and add the full can.

I used dried dill weed. I made the assumption that it wasn't referring to fresh dill.

I was tempted to use an extra onion, because I REALLY like onions and I wanted to make sure it was very, well, oniony. But the one onion was perfect. I cut it in half before slicing so that the slices were shaped like C's instead of O's.

I baked it for 33 minutes, but would probably stick with 30 if I did it again. I was afraid I burned it when I saw the cheese, but it still tasted delicious--not burnt at all!


June 03, 2020

RECIPE: Broccoli and Cauliflower Salad in a Pita Pocket


With the weather being warmer (in the 80's!) I've been craving colder things to eat. And this summer recipe is so nostalgic for me.

My mom showed me how to make this years ago, and I thought it sounded so strange when I read the ingredients. But they all work so well together! This is a delicious lunch--I love to stuff this into a pita pocket. Don't be tempted to skip any of the ingredients--they all work together to make this taste so good!


Here is a printer-friendly copy of the recipe!


Broccoli & Cauliflower Salad in a Pita Pocket

Ingredients:

1-1/2 Tbsp. minced red onion
2 Tbsp. ranch dressing (I like Hidden Valley or Bolthouse Farms)
1 oz. (about 2 Tbsp.) finely shredded cheddar cheese
1/2 cup finely chopped broccoli
1/2 cup finely chopped cauliflower
2 Tbsp. raisins (yes, raisins... trust me!)

Directions:

Combine all ingredients in a bowl and stir mix well. I like to stuff this into a pita pocket for serving, but you can just eat it as it is, right out of the bowl. It sounds like an odd combination of ingredients, but don’t skip any! They work together really well.

To keep it fresh, I store the extra broccoli and cauliflower in a Ziploc bag separate from the other ingredients. Then when I want to make the salad for lunch, I mix the ingredients together.


April 02, 2019

Infamous Glazed Carrots Recipe


My family hated these, but I happen to love them! You can read the story here of how these became "infamous".  You can make glazed carrots with pretty much anything that contains sugar. When you heat it, some of the liquid evaporates and it reduces down into a syrup-like glaze.

The first time I made these, I used frozen carrots. I've also made them with canned carrots. I'm sure I'd like them with fresh carrots as well. Just make sure that the carrots are cooked until fork-tender before you add them to the glaze.

Here is a printer-friendly version!

Infamous Glazed Carrots

1 can sliced carrots, drained (or fresh or frozen, but make sure you cook them first)
1 Tbsp. orange juice concentrate
1 Tbsp. butter
1 Tbsp. maple syrup
1/2 Tbsp. packed brown sugar
2 Tbsp. dried cranberries (Craisins)

In a skillet, combine the orange juice concentrate, the butter, the cranberries, and the maple syrup, and cook over medium heat for a couple of minutes until thick and syrupy. Add the carrots and brown sugar and toss to coat, keeping over the heat until the carrots are heated through.

Makes 4 side-dish servings (approximately 1/3 cup each)

glazed carrots with cranberries

March 10, 2019

RECIPE: Basic Hummus

Basic Hummus Recipe

Everybody seems to have their own hummus recipe. This is my version. I love garlic--so this is very garlic-y. If you're not a huge fan of the garlic, just use one small clove. I like to use 3-4 big cloves.

Here is a printer-friendly version!

Basic Hummus

1-3 cloves garlic, peeled
1 can chickpeas/garbanzo beans, drained
2 Tbsp. water
1 lemon (juice and zest)
2 Tbsp. tahini (sesame seed paste)
3 Tbsp. olive oil  (seems like a lot, but it makes the hummus REALLY smooth and rich)
salt to taste
paprika to sprinkle on top

In a food processor, put in the cloves of garlic and process until they are finely chopped. Add the drained chick peas, water, lemon juice and zest, and tahini. Process on high until smooth, stopping to scrape the sides of the processor once or twice. While the processor is running, drizzle in the olive oil. Run the processor for another minute or two, until everything is combined and smooth. Sprinkle paprika over the top.

Makes 8 (1/4 cup) servings. Per serving:  110 calories, 8 grams fat, 3 grams fiber, 8 grams carbs, 3 grams protein.


Featured Posts

Blog Archive