
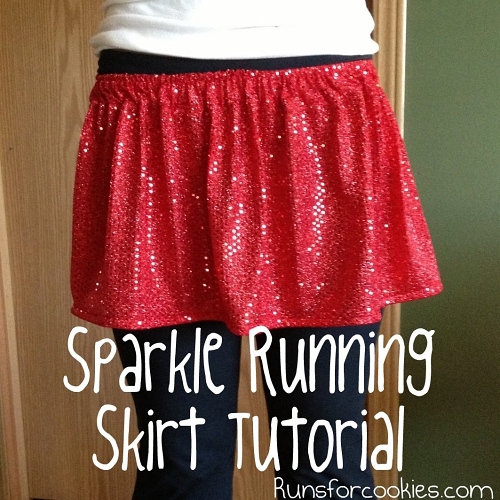

As promised, here is the running skirt tutorial. I explained it the best I could, so I hope it's clear enough!
This tutorial is written for a skirt to fit my size--my hips (where I wear the skirt) are 35", which equates to 29" unstretched elastic. To make it bigger, add approximately two inches of fabric for every one inch of elastic. (It doesn't have to be exact). The waist band will be very stretchy, so the measurement doesn't have to be perfect.
The finished skirt will be 11 inches long. If you want it longer, just measure down farther from the sparkle line (I measured 12 inches down, but just add however many inches you want to add to the length of the skirt).
Each skirt will only cost roughly $5-10 to make.
Materials:
- 1.5 yards of fabric (you CAN buy 3/4 of a yard and cut it in half, then sew the pieces together--you will have two seams instead of one); 1.5 yards will yield 2 skirts. I will explain this better at the very end of the tutorial.
- 3/4" elastic, 30 inches long
- Thread
- Scissors, straight pins, a safety pin, and a tape measure
This is 1.5 yards of fabric folded in half lengthwise. Just ignore the bottom piece for now. If you want, you can make a second skirt out of it.

The edge of the fabric looks like this (the sparkles start a couple of inches from the raw edge). This will become the waistband of the skirt.

Starting at the sparkle line, measure 12 inches down (vertically). Do that across the entire length of the fabric, and mark it with pins or a fabric marker. (If you want your skirt longer or shorter, you can adjust the length by adding or subtracting from the 12 inches)

I didn't explain that very well on the photo, so here is a drawing. You'll cut along that dotted line where you've measured 12 inches.


Fold the raw edge down toward the inside of the skirt, so that the top of the skirt is where the sparkle line starts. Pin down the raw edge inside of the skirt.


Cut your piece of elastic so it's 30 inches long. (If you are making a larger or smaller skirt, add an extra inch or so to the measurement because you will overlap it a little when you sew it together.)


Attach a safety pin to one edge of the elastic. This will help you guide the elastic through the tunnel you just made.


Line up the edge of the fabric under the needle of the machine to sew it along the top of the skirt. Before you start sewing, use both hands to stretch the elastic while you sew. If you don't hold the stretch while you sew, the elastic won't stretch without breaking the thread when you're done.

The fabric will be pulled taut, because you're stretching the elastic out while you sew. If you don't stretch it out while sewing, the elastic will be sewn in a way that it won't stretch any more without breaking the thread holding it together. You may need to ask someone to give you an extra hand for this part.


The next part is optional. You can leave the bottom edge of the skirt as it is (raw along the cut line)--I actually prefer it this way. Or, for a neater edge, you can sew a hem.
To do that, fold the raw bottom edge up 1/2 inch, and then another 1/2 inch, so it looks like the photo below. Pin it like that around the entire skirt, and then sew.
And there you have it! A cute sparkle skirt :) (You'll definitely want to wear something under it, haha)

Now, about buying half the amount of fabric...
I've always bought 1.5 yards of fabric for my skirts (which makes two), but you can also buy half the amount you need. Here is what it looks like when you lay it out, unfolded:

So if you buy less (we'll say 3/4 in this example), here is what it looks like:

Cut along the center fold line, and you will have two identical pieces of fabric. Then you will line up the short edges and sew them with right sides together, like this:

Then just follow the tutorial as if this were one piece of fabric.


Thanks for the tutorial. I've linked your blog to my faves list on my blog-- I hope that's OK. You are a HUGE inspiration to me as I finally lose the baby weight and get back into running. Let me know if you don't like having your blog linked. Thanks!
ReplyDeleteOf course! I'm flattered that you enjoy my blog enough to include it on your list :)
DeleteI love it! I'm just getting into sewing and now I've got my next project! Thanks!
ReplyDeleteJust let me warn you, this fabric is NOT fun to work with! So if you get frustrated, just put it aside and work on something else until you feel like going back to it. I've been sewing since I was a kid, and I still got annoyed working with this stuff!
DeleteThe skirt is so cute. If I ran, I'd definitely make me one. But I don't think I need one for my walking! Plus I'm pretty old--and somethings us 60+'ers just can't pull off. My son thinks I should buy some fancy cowboy boots to wear on my Today Show appearance but I don't think so....
ReplyDeleteWhat type of sewing machine do you have and do you recommend it?
ReplyDeleteIt's a Singer 5825C--I got it about nine years ago, when I was pregnant with Noah. I'm not sure if they even still make that model anymore, but I love it! It does all the basics--I didn't need the bells and whistles of a touch screen, embroidery, etc. My mom has a Singer as well, and it has to be at least 35 years old. It still works perfectly :) Singer is a great brand for a sewing machine!
DeleteKatie! You rock the sparkle skirts! I am hoping that you will some day just start selling them because as crafty as I try to be, the sewing machine and I are not friends. Congrats on getting down to your goal weight!
ReplyDeleteI would get super bored making them over and over again--but if you're serious, and you want one, e-mail me :)
DeleteThanks very much for the tutorial Katie! I've got a 5 mile "Rudolph Race" coming up on 9th December, so will be making one of these skirts to wear for that (in addition to my antlers!).
ReplyDeleteI bet that will look super cute!
DeleteI need to get my sewing machine out of the basement, bring it to the shop and get it tuned up. I haven't used it in at least 10 years and I could be making my curtains if I figured out how to use it!
ReplyDeleteThat's so nice of you to post this for us! It looked very time consuming for you. So thank you :) you look fab in your 2 months photo by the way! So so good.
ReplyDeleteYES! Thank you! I run my first 5K on Turkey Day AND I'm picking up my first sewing machine tonight at 5.
ReplyDeleteThis skirt will help me with my issue of people being able to see my thighs jiggling during a public run. It'll do wonders for my self-esteem. Thank you!!!
Oh goodness! That took a lot of work to put together for us. I'm exhausted reading it. Can you just make me one? I'll pay you. ;-)
ReplyDeleteI made these quick and easy (especially for someone who sews rarely) for my young teen and preteen to run their first 5K on Thanksgiving with the rest of the family. They loved them and felt so special having a sparkle running skirt. Thank you for inspiring me.
ReplyDeleteI made your skirt for my Jingle Bell run this Sunday and I love it! Thank you so much for posting. I was going to make 2 skirts with it but I'm going to have to wait awhile...this fabric is a real pain to work with; my thread just didn't want to sew it together right. Thanks for sharing!!
ReplyDeleteI have a friend running the Princess Half at Disney in a couple of weeks and she has a gold skirt to wear and I was looking at it thinking "I could make one of these" so my Google search led me here and it's just what I needed! Green sparkle skirts are in my future for a Get Lucky run in March.
ReplyDeleteKatie! I am trying to make this for a race I am running for a friend's birthday... any idea what types of stitching you used for this fabric?! The sewing machine isn't happy!! I love it, though! Thanks!
ReplyDeleteHmmm, I'm not sure what the problem is. The fabric definitely isn't easy to work with! But I didn't use any special stitching. I do have a heavy duty needle on my machine, since I work with denim a lot (it's a denim needle); so maybe that would help?
DeleteI'll try that next, thanks for the idea!
DeleteHi, I used this tutorial to make a skirt for my first half-marathon which was The 2013 Disney Princess. My skirt was awesome and the race went great. Thanks so much for taking the time to share this with other runners. It was very easy to make and I am a beginner at sewing.
ReplyDeleteKatie,
ReplyDeleteI wanted to let you know I posted a link to this blog post in my blog. Thanks for posting such great instructions. http://backofthestampede.blogspot.com/2013/04/week-14-round-up-or-week-i-outed-my-blog.html
Hi, thank you for this tutorial! I just found it! I tried to make a pink one but I messed up on the part of pulling the elastic while you sew. Didn't quite come out as it should have. Now a side of it looks funny. :) I'll have to try again.
ReplyDeleteMy skirt didn't turn out. Its my own fault for not measuring properly :-/
ReplyDeletewhere did you get the fabric? I am wanting to make a cape out of it.
ReplyDeleteI am going to be making a snow white costume and want to make a cape out of the sparkle material. Where did you get it from?
ReplyDeleteI bought it at Hobby Lobby, but you can get the fabric pretty much anywhere that sells fabric! :)
DeleteThanks! :)
DeleteI love this skirt! Did you have trouble with the fabric "gumming" your needle? I'm reading online that its a problem and am just worried about ruining my machine!
ReplyDeleteThanks! Yes, the needle got a little "gummy" on the needle, so I wiped it off every once in a while. But it won't ruin your machine--worst case scenario, you might break a needle!
DeleteThanks for the tutorial!! I made this skirt in blue for a super hero run. I used a ball point needle and had no trouble with the needle gumming.
ReplyDeleteThank you! I'm heading straight to the sewing store to buy fabric and start working on my Halloween costume (that I can wear to exercise class)!
ReplyDeletewhat type of needle did you use for this fabric?
ReplyDeleteI'm not sure of the specifics, but I used the smallest needle I had on hand. I didn't have any problems with it.
DeleteHey there! Thanks for posting this tutorial- I'm just about finished with my first ever sparkle skirt. I ran into issues with my needle gumming up and the thread not catching correctly and jamming up my machine. I searched online and found a couple of useful tips- swipe the needle with rubbing alcohol to remove any gunk. I also found laying wax paper on top of the fabric (directly under the footer) eliminated any issues with the thread not catching properly. Thanks again for this helpful post! I've enjoyed reading through the rest of your blog, too. You're very inspirational!
ReplyDeleteI can and will measure my hips..just curious, if this is you in the photo...what size do you typically wear. I would probably order a small if I purchased a skirt. But I would use the same fabric cut if you are a small as well.
ReplyDeleteIn this photo, I was a comfortable size 4 jeans. If buying small/med/large sizes, it would have been a small. Hope that helps! :)
DeleteI know this is an old post so not sure if you're reading comments still - just had a question about the stretching elastic and sewing part of it. When I tried that, the fabric goes taut as you said, so it ended up being all bunched up at the very end. I'm a newbie sewer so have no clue what I'm doing, but the rest of it turned out great! Thanks to the person who posted about the wax paper - at first I didn't use it and the thread wouldn't catch, but once I layered wax paper on it sewed like a breeze. Anyway, if you have tips on keeping the fabric gathered while sewing/stretching the elastic, please share! Thank you!! :)
ReplyDeleteI'm not sure I fully understand, but you do want the fabric to gather so that it "ruffles". If the fabric alines with the elastic exactly, then the skirt will be too small. The fabric should be much longer than the elastic. You can pin it in a few places so that it stays evenly distributed along the elastic--which will prevent it from having a bunch of it leftover at the end. Maybe that's what you're referring to? I would pin it in about 4 places (each side, and front and back). Then make sure you're pulling the elastic so that it's as long as the fabric when you sew. It will gather nice and evenly. Hopefully that helps!
DeleteThanks for the quick response. Yes, it's getting the "ruffles" to stay there while stretching the elastic that's the problem. When I stretch the elastic, the fabric stretches along with it if that makes sense? I think I need a video or something. :) I may search YouTube! I will try the pinning thing, too. Thanks.
DeleteI know this is an old post so not sure if you're reading comments still - just had a question about the stretching elastic and sewing part of it. When I tried that, the fabric goes taut as you said, so it ended up being all bunched up at the very end. I'm a newbie sewer so have no clue what I'm doing, but the rest of it turned out great! Thanks to the person who posted about the wax paper - at first I didn't use it and the thread wouldn't catch, but once I layered wax paper on it sewed like a breeze. Anyway, if you have tips on keeping the fabric gathered while sewing/stretching the elastic, please share! Thank you!! :)
ReplyDeleteA good friend and I are about to register for the Disney Princess half marathon. Last year we spent a fortune on costumes from Etsy. I love supporting small businesses, but it's so hard to justify spending $125+ on a costume that (a) I'm going to run in and get all sweaty, and (b) that I'm only going to wear once or twice. This year, I bought a Cricut secondhand and dug up this tutorial (I remembered reading it a while back!) and we're going to make our own! I'm going to be Anna and she's going to be Elsa.
ReplyDeleteAwesome!!! Make sure you send me some pictures when you are done. I would love to see them!
DeleteI know this is an old post, so I am not sure if you'll see this...why is it necessary to sew the fabric to the elastic band and not just leave it free floating in the casing? Thanks!
ReplyDeleteHi! This I know this is an old post so I am not sure if you will see this, but why is it necessary to sew the fabric to the elastic and not just leave it free floating in the casing? Thanks!
ReplyDeleteYou could just leave it free floating, but then the fabric may slide around and gather in certain spots, so that it's uneven. Also, the elastic could roll inside the casing. By sewing it to the fabric, you eliminate problems with the elastic moving around and the fabric bunching up. Hope that makes sense!
Delete