June 29, 2022

Wednesday Weigh-In: Week 57


Those are the shortest "shorts" you will ever wear me see ;)  (And hopefully the dirtiest my mirror will ever be--why do I not see that until I do these mirror selfies?!)

This weigh-in was going to be totally up in the air--my eating habits were completely different than usual this week. Considering I've been dealing with anxiety and mild depression this week, my eating patterns were way off. Instead of having my usual breakfast and lunch, then cook some sort of dinner, and have a snack in the evening, I was skipping eating all day long until after dinnertime. Then I would eat dinner plus a snack all at once.

I knew it wasn't going to go well. It was nice to be so busy working on Noah's bedroom and then the landscaping that I didn't even think about eating all day, but then I totally made up for it after dinner. Last week's weight was at 147.2. I was surprised to see that I'd actually lost a little this week:


At 146.4, I'm down just under a pound from last week. At this point, I'm happy with any weight loss or even just not gaining weight. I like keeping my weight in such a small window. (That's not to say that I wish the window was lower, haha)

There's really not a I can change this week; I wasn't deliberately fasting during the day and eating a lot at night. When my anxiety is really high, I just tend to lose my appetite. So this coming week, I'd like to focus more on easing my anxiety. I have several projects that I want to get done--actually, today I painted the shutters on my house!

Every time I finish a project, I feel a big weight lifted off my shoulders and it helps relieve my anxiety so much. Getting the landscaping "done" (not really--but the mulch was the biggest part) made me feel so good yesterday! And today, painting the shutters gave me a huge sense of satisfaction. (I'll post photos for Friday Night Photos.)

I don't feel like I'm at a stand-still as far as my weight goes. I know that if I got back to counting calories consistently like I used to, I'd lose weight consistently as well. I'm not sure what the big deal is, but I just have such a hard time actually *doing* it!

I'm also starting to get tired of my usual breakfast and lunch--Grapenuts with blueberries and almond milk for breakfast, cold almond joy oats and fruit for lunch--so I'd like to try to figure out a different go-to. Something easy that I can prepare ahead of time. I like the convenience of the oatmeal for lunch; I just grab it from the fridge and it's ready to eat!

So, I guess that'll be a goal this week--to try to find a convenient breakfast and lunch that I enjoy. I really should eat more leftovers! Since the kids don't usually eat the vegan stuff I make, I usually have a lot of leftovers. When I meal plan this week, I'll try to think of foods that reheat well. Hopefully that will help eliminate some stress/anxiety and I'll be able to get back to a normal eating pattern.

Well, I'd count this week's weigh-in a success overall. Can you believe I'm still weighing in after 57 weeks?!

(Tomorrow, I may do another "Candidly Katie" post (answer questions from readers) so if you have a question for me--anything at all--just send it to me at: katie (at) runsforcookies (dot) com. Don't worry, I'll keep your name anonymous! )

June 28, 2022

Transformation Tuesday #77

Happy Transformation Tuesday! I've been having a much better mental health day today--probably because I got a lot done as far as the landscaping goes! As you know, it's been driving me crazy for at least probably six years now. Neither Jerry nor I have any interest in gardening, so we've been procrastinating taking care of our yard for--well, probably since we moved in 19 years ago.

I'm going to skip the usual Transformation Tuesday today because mine is kind of long and I don't want to attention take away from anyone else's transformations. So if you sent me one, I will post it next week!

I don't have a "before" and "after" to share, because we aren't done yet, but I do have a "before" and "current". Jerry was off work yesterday and today so we spent a lot of time tilling the dirt and spreading it out evenly, preparing it for mulch. I was really surprised how quickly that part went--it was a nice day (not too hot) and we chatted while we worked. The dirt was as hard as a rock, but once we started moving, it was fun to see progress.

Here is the big "before and current" comparison (that first picture was from May 2021):


Although, you may remember the rainy day that I decided to get rid of all the weeds and the whole top layer of soil with it. I was SO sick of looking at it like that!


Yesterday, we tilled the dry soil and leveled spread it out evenly. By the time we were done yesterday evening, it was level and ready for mulch.


Today, we went to Lowe's to pick up the mulch. I knew that I wanted black; my mom chose black mulch this year and it looks so good! I also picked up paint so that I can paint the shutters black. I'm just ready for a change.

It was CRAZY seeing the amount of mulch we loaded up onto the cart. 


We bought 25 bags, and it happened to be pretty perfect; we only had one bag left over! We can use it to fill in any spots that need it. We laid it on pretty thick, and I love the way it turned out.


I haven't painted the shutters yet--one project at a time--but I'll probably do those this week. Finally, we got the stain to stain our stoops and our deck. That is going to be a huge project and we'll have to wait for Jerry to have a long weekend off. I've never stained a deck before, so I have no idea what to expect!

Anyway, here are some before and current pictures. Once I'm done-done (with plants), I'll post the before and afters.


This final collage is my favorite--progression from May 2021 until now. We have to plant bushes and stuff, but right now, I'm just happy to have to the weeds gone and the mulch down.


So, I apologizing for hogging this Transformation Tuesday, but I was too excited not to show all the work I've put in. This is something that I've been wanting to do for the longest time, but because I *despise* yard work and/or gardening, I've procrastinated as much as possible.

Please send me your transformations for next Tuesday! (It doesn't need to be all this detailed, of course.) Just email a before photo and an after photo to me at: katie (at) runsforcookies (dot) com. Include your name and a description of your transformation! :)

June 27, 2022

VEGAN RECIPE REVIEW: Shortbread Cookies


I had a recipe prepared to post about last week but when I started to type it out today, I realized I'd forgotten to take pictures! I took a picture of the ingredients (of which there were MANY) and the final product, but nothing else. Not super important, but for a recipe review, it makes sense to show the process.

Since I've been having a rough time this week mentally, I wanted to choose something super easy that I could knock out in an afternoon so that I could write the post before evening. And that's when I came across 'Gluten-Free Almond Flour Shortbread Cookies with only 3 Ingredients' (there are more words in the recipe name than are in the cookies!). You can find the recipe at The Conscious Plant Kitchen. (I'll link to it again at the end of the post.)

Something to keep in mind when people say that there are X number of ingredients in a recipe, they aren't counting the things that are everyday ingredients like salt, pepper, etc. This is one of those recipes. The very simple ingredients are: almond flour; maple syrup; coconut oil; salt; vanilla extract; and almond extract. It states that the salt, vanilla extract, and almond extract are optional. I can't imagine making these without those flavors! So I chose to use all three of them.


I had all of these things--always a bonus!--so I got started working on them right away. As far as the ingredients, the coconut oil, it specified to use refined coconut oil (so it's flavorless) and that you must use coconut oil or the cookies will be way too soft. Regardless, the recipe does say that the cookies are "slightly softer than regular shortbread cookies. They are vegan, gluten-free cookies made with wholesome ingredients, crispy on the outside and chewier in the center."

I *love* shortbread cookies, but I enjoy the dry, crumbly texture of them, so I was curious how these would compare.

This recipe couldn't be more simple...

Just measure the ingredients into a bowl:


Stir it up until it forms a ball:


Roll into balls about the size of a tablespoon:


Flatten each just a touch with a fork:


Bake and cool.


The verdict: Like all shortbread cookies, they aren't overly sweet or rich. They're light enough to eat the whole batch (and believe me, I was tempted). They were so good! I couldn't believe how good just a few ingredients can turn out to be.

I love almond extract and I could definitely taste that (or maybe it was the almond flour). I just think it tastes like maraschino cherries--yum! But anyway, the dominant flavor was almonds, which is just what you'd expect.

As far as the texture... I didn't even miss the crumbly texture of traditional shortbread cookies. I flattened some of them more than others to see if I could get them to crisp up (the recipe suggests that for crispier cookies, flatten them more). They all seemed to be the same in texture. 

The texture is similar to a chocolate chip cookie--a sort of crispy "skin" on the outside and then a chewier/fluffier center. Regardless, they were so good that they didn't last 10 minutes in our house. The boys housed them! Well, I saved a couple for my parents. As soon as we tasted them, all of our eyes got big and we immediately wanted more ;)  (FYI, I got 14 out of the batch.)

I brought one to each of my parents and they both really liked them, too! Remember when my dad told me the blondies I made tasted like meatloaf? Hahaha! Well, he liked this cookie enough to eat the whole thing and he didn't have a single complaint about it. 


This recipe was ABSOLUTELY a winner! I think you could serve these at a dinner party or potluck or something and nobody would ever question that they might be vegan. The recipe makes the perfect amount for a family of four--three rather smallish cookies each. I'm for sure going to make them again and maybe experiment with adding some coconut or dried cranberries.

Now go make some of these... you won't regret it! (Unless you eat the whole batch, then please don't blame me.)

The whole recipe can be found here: Vegan Shortbread Cookies at The Conscious Kitchen.

June 26, 2022

Noah's Bedroom Makeover Reveal!

Well, I accidentally published this early! But since yesterday's post was kind of a downer non-post, I'll just leave this up until tomorrow night.

Finally! I've been wanting to post these pictures all week, but I knew it was going to take awhile (prepping pictures is a slow-going process). When I gave our entire house a makeover a few years ago (it was in 2018, can you believe it?), I gave each of the kids' rooms a makeover as well.

I removed the textured ceiling, drywalled the gap where the crown molding had been, sanded sanded sanded, painted the walls, installed new casings for the doors and windows, and got new bedding. I also remodeled the closets a bit, which I'll explain below. (You can get all the details and pics of their bedroom makeover on this post). 

It looked great! But the kids didn't love the color after a year or so. Eli wanted khaki-colored walls and olive green bedding. Noah wanted more Japanese-esque decor. He wanted to get rid of his bed and put a Japanese-style mattress on the floor (it's surprisingly very comfortable!). He wanted a table that was very low to the floor with cushions for seating. For his birthday last year, we went to Menard's and picked out the materials to build the table. Then he helped me make it and stain it.

He also wanted a very minimal desk (no drawers--just a corner table for his computer monitors). I made his desk as well. And that's the extent of it. No dresser or nightstand (by his own request); just the Japanese-style mattress, the table (that he put in his closet when not using it for homework), and his desk. 

Here are some "before" photos:

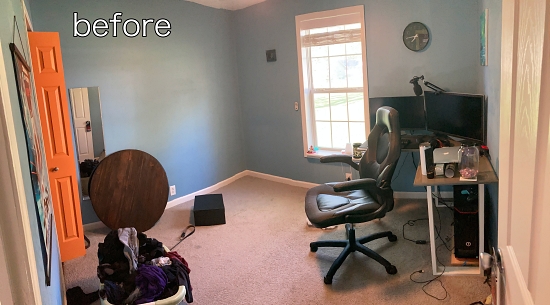
This is a panoramic pic, so it looks a little warped


This is from after pulling everything out of his closet. I put his mattress in my closet so it wouldn't be in the way and the cats wouldn't be all over it.


The next step was putting everything back into the closet (if that's where it should belong). It looked a million times better! (My only regret was that I didn't have time to paint his closet doors. I'd like to paint them black.)


Once I got all of that stuff off the floor, I moved his desk to the middle of the room and covered it with a sheet to protect the computer. (The great thing about his having scarce furniture is that it's easy to prepare the room to paint!) I added a coat of Kilz 2 primer. Love that stuff!


Of course, the county inspector was there to make sure everything was up to code:


I absolutely LOVED the color once it dried. I can't really describe it--kind of like a very light tan/gray.


The biggest part of this project for me was to make shelves. I had no idea what sort of shelves to make and each time I started, I ended up scrapping them because they just didn't look right. I was looking online for inspiration and I came across this photo:


I really liked it and it seemed very simple to make. Since I had only 24 hours until Noah was going to be home, I decided to go for it. I actually cut down 2x4's for the ends:


I had a large piece of sanded pine that I used for the shelves themselves. I rounded the edges of all of the pieces just the tiniest bit with the router and then I sanded all the pieces well.


I couldn't decide how I wanted to piece them together. Glue wouldn't be strong enough for the butt joints. I didn't want pocket holes because they would be easy to spot. I didn't have time to use things like dowels (I still need to build a dowel jig anyway), so I just simply screwed in the ends and filled in the holes when I was done. Not perfect, but since I was painting and not staining, it worked. I spray painted the end pieces black:


I painted the shelves gray. I normally would have used oil-based paint for his shelves, but since there wasn't time to let it dry, I just used the paint I used when I painted the garage. It has enamel in it, so it was a little more durable than regular latex.


That dried super quickly. I was SO excited to put the shelves together! I spent way too long in Noah's room leveling and measuring to get them just to my liking.


(The little whimsical stuff that Noah has are sentimental things from friends.) Here are both shelves together:


I absolutely love how they turned out.

While the shelves were in the works, I temporarily brought in a piece of furniture that I'd been wanting to paint for a long time. I had it in my bedroom, but it wasn't crucial or anything. I figured once the shelves were done, I could take it back out. But when Noah saw it, he LOVED it. He wanted to keep it in there.

From that point, it was just adding a few decorations. I bought a few things that I thought were kind of "zen" and put those around. I also got a duvet cover with Japanese cherry blossoms (the duvet cover is actually a cream color and not pink, how it looks; but regardless, Noah loves cherry blossoms and he was very happy with the duvet cover). 


I got a little rock fountain, some tiny fake potted plants, a cherry blossom tree night light, a neon ramen sign (love this!), and a cherry blossom incense holder (he likes incense). The area looked kind of peaceful and calm when I was done. Especially when we turned the lights off and it was dark except for the few lights from the ramen sign, the fountain, and the cherry blossom tree night light.

Then came the posters/canvases. He has several of them! (Actually, there are still two more that we haven't hung up yet.)  Only a couple of the posters/canvases had a way to hang them or frame them or something. Taking a cue from the Japanese Star Wars poster, which has strips of wood with magnets to place on the top and bottom, holding the poster in place (rather than taping it to the wall).

I didn't use magnets, but I did cut a bunch of very thin strips of wood and stained them the color of the table we made last year. Then I used double stick tape and wood glue to glue them together with the edge of the poster sandwiched in between. I tied a knot on each end of a long piece of jewelry cord and stapled it to the back of the top piece. Hard to explain--maybe the pictures will help:


And here you can see them hung up:

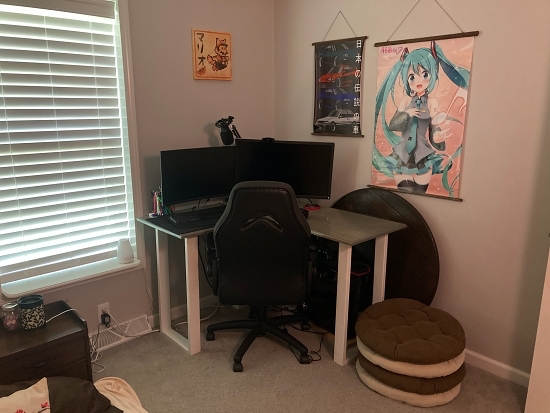
You can see here that I put his round table and the cushions by his desk; before, he just crammed them into the closet.


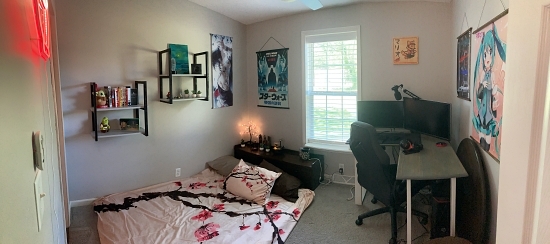
Here are some final before and afters:


The final product:


I can't even describe how excited Noah was when he saw it! He hugged me about 12 times and said "I love you! Thanks for doing this!"

Totally worth all of the blood, sweat, and tears ;) 

If anyone is curious about the products, here are the links on Amazon (these are affiliate links, meaning I may get a small commission if you use them). But I bought everything with my own money:


This was a labor of love for Noah's 18th birthday. I wanted to do something special for him that wasn't just about money. While it wasn't super cheap, it was probably less than $300 (including the Sherwin Williams paint)--very cheap for a makeover like this. My favorite parts are the shelves and the ramen sign! I'm just so glad he loves it :)

Featured Posts

Blog Archive