Showing posts with label pattern. Show all posts

September 01, 2018

Cabled Mug Cozy: A Free Knitting Pattern

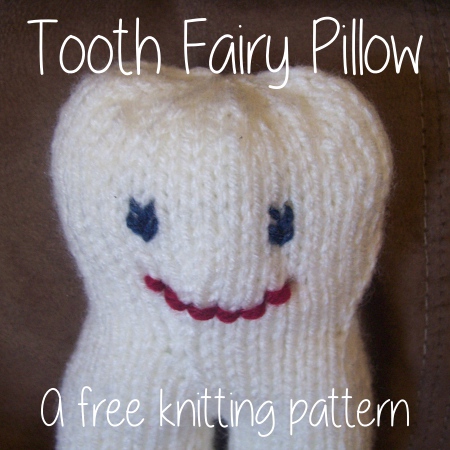
(Over the next few weeks, I may be posting some seemingly random things like this. I have a separate blog that I created years ago to share some knitting/crochet patterns that I'd written. I used to knit and crochet a lot while I was losing weight--when my hands were busy, I wasn't eating! ;)

There aren't many patterns to transfer to this blog--I think about six or so--and I'm going to move them here instead of having a separate blog. So, I apologize for the excessive number of posts that you may see! Once I get everything transferred over, my posting will go back to normal.)


I love to wrap my hands around a hot mug of coffee or tea... unless it's TOO hot. I found myself wrapping a paper towel around the mug to hold it how I wanted without burning myself, so I decided it's time to make a cozy...


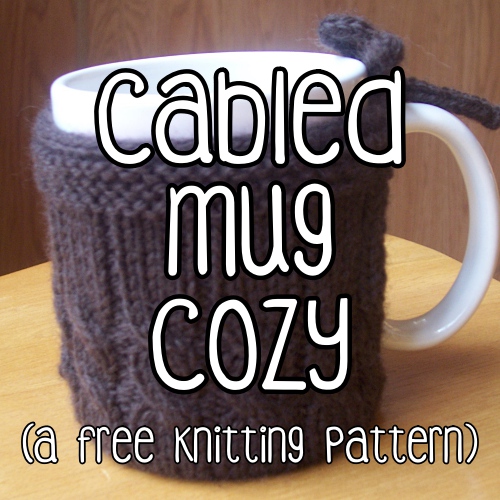
This is made in one whole piece, without any sewing or seams--yay! (Here is a link to the pattern in Ravelry, in case you want to add it to your queue. And here is a link to my Ravelry profile.)

Here is a printer-friendly version of the pattern

Materials:
  • small amount of worsted weight yarn (I used Patons Classic Merino Wool)
  • set of US 5 double pointed needles (or US 5 circular needle for magic loop if preferred)
  • cable needle (or you can use an extra double pointed needle for the cables)
  • crochet hook size F for casting on
  • tapestry needle for weaving in ends

Gauge:

6 sts and 8 rows = 1 inch

Abbreviations:

dpn- Double pointed needle

K- Knit

P- Purl

Sl- Slip the stitch

BO- Bind off

KFB- Knit front and back of each loop. Knit the stitch as always, only do not slide it off the left needle. Knit into the back of the same stitch. One increase made.

KLL- Knit left loop. With your left needle, pick up the left loop of the stitch TWO ROWS BELOW the last completed stitch, and knit it through the back loop. One increase made.

Special stitches/rows:

Cable row- Place the first two sts on a cable needle and hold to the front of your work. Knit the next two sts, then knit the sts from the cable needle. Purl the next stitch. Repeat around, ending with the cable (there is no purl on the end).

4x1 rib- K4, P1 across on the right side; P4, K1 on the wrong side.

Directions:

CO 8 sts and join in the round, using a circular cast on method

Rnd 1: KFB each st around. (you should have 16 sts)

Rnd 2 and all even rows: Knit.

Rnd 3: (K2, KLL) around. (24 sts)

Rnd 5: (K3, KLL) around (32 sts)

Rnd 7: (K4, KLL) around (40 sts)

Rnd 9: (K5, KLL) around (48 sts)

Rnd 11: (K6, KLL) around (56 sts)

Rnds 12-14: Knit around.

Row 15: BO 2 sts, K4, (P1, K4) across. Turn (you'll be working in rows now--but you'll still have to use either dpns or magic loop)

Row 16 (wrong side): Sl1, P3, (K1, P4) across.

Row 17: Sl1, K3, (P1, K4) across.

Rows 18-20: Repeat rows 16-17 once, then repeat row 16 once more.

Row 21 (right side): work cable row.

Row 22-26: Work rows 16-17 two times, then work row 16 once more.

Row 27 (right side): Work cable row.

Rows 28-37: Work 4x1 rib, slipping the first st of each row (for a nicer edge).

Rows 38-43: Knit each row (garter stitch). Break yarn, but DO NOT BIND OFF.


Work i-cord:

Set aside the cozy, and pick up working yarn. With an unused dpn, CO 3 sts. Knit across. Now, without turning, slide the loops to the other end of the needle, and knit across again, pulling tight to form i-cord. Repeat until you have about 33 rows.

Now attach i-cord:

Pick up the needles with the cozy on them. Slide the 3 sts from the i-cord dpn onto the cozy needles, with the working yarn sandwiched between the i-cord and the cozy. Now, with an empty needle, knit the first 2 sts, then knit the next 2 sts TOGETHER through the back loop. Slide the 3 sts you now have on your right needle back onto the left needle as they are. Repeat knitting the first 2 sts, then knitting the next 2 sts together through the back loop until you have 3 sts remaining. Work the i-cord for about 33 rows and BO.

Weave in ends. Enjoy your coffee or tea without burning your hands! ;)


(This pattern was my own creation, and I am happy to offer it for free! I just ask that if you share it, please link back to it here instead of republishing it elsewhere. If you have any questions, please feel free to ask!)


December 01, 2009

Baby Earflap Hat (a free crochet pattern!)


A neighbor and friend of mine asked me to make a hat to photograph her niece in for Christmas. She showed me a picture online of what she had in mind, so I created this for her. It turned out really cute, so I wanted to share the pattern. This is about a 0-3 month size, but I'm sure it'd be easy to make larger by increasing the hook size and/or making a couple extra increase rows.

This is my first crochet pattern I've written, so I apologize if it's not as clear as it should be. If you have any questions, please let me know and I'd be happy to help!

Here is a printer-friendly version of the pattern!


Materials:
1 skein Sugar 'n' Cream cotton for main color (MC) (or any worsted weight yarn)
small amount of contrasting color (CC)
G hook (4.5 mm)
tapestry needle for weaving in ends

Abbreviations:
sl st- slip stitch
sc- single crochet
hdc- half-double crochet
dc- double crochet
st- stitch
ch- chain

Directions:

HAT: The hat is worked from the top down. Earflaps are added seamlessly. Then the CC is worked around the whole hat.

Using MC, ch 2. (Or you can do a magic ring--here is a tutorial for that. I like to do the magic ring, but it's hard to write out, so I wrote the pattern without using the magic ring)
6 sc into the second ch from hook, and join with a sl st to first sc.
Ch 1 (counts as sc here and throughout), sc in same st, 2 sc in each sc around. Join with a sl st to first sc. (12 sc)
Ch1, sc in same st, sc in next, *2 sc in next, sc in next*--Repeat between *'s around. Join with sl st. (18 sc)
Ch1, sc in same st, sc in next two sts, *2 sc in next, sc in next two sts* --Repeat between *'s around. Join with sl st. (24 sc)
Ch1, sc in same st, sc in next three sts, *2 sc in next, sc in next three sts* --Repeat between *'s around. Join with sl st. (30 sc)

Continue rounds in this manner, increasing by 6 sc in each round, until you have 60 sc.

Ch 1, sc in each sc around, join with a slip stitch. Repeat this round until you have a total of 24 rounds (counting from the very first round at the top of the hat). Finish off and break yarn.

EARFLAPS:

I've put the stitch counts here to center the earflaps, but this doesn't have to be exact. You just want to have the "seam" in the back, and the earflaps centered on each side. You can just eyeball it if you don't want to count out the stitches. You should have 16 sts between earflaps (in front and back)

Hold hat right side up, with the "seam" facing you. Count about 6 sts (doesn't have to be exact--you're just trying to make the seam in the back of the hat, with the ear flaps on either side) to the right of the seam. Flip hat over, and join MC yarn with a sc at that stitch.

Sc 13 more sts across, for a total of 14. Turn.
Ch1, skip first sc, sc in each sc across. (13 sts) Turn.
Repeat this last row until you have just 1 sc. Finish off.

Holding hat upside down, count 16 sts to the left of earflap #1. Join yarn, and work second earflap as you did for the first. Finish off.

Using CC, join with sc in back of hat (where the "seam" is).

Sc around the hat until you get to the bottom of an earflap. Ch18, then sc in second ch from hook. Sc in each ch up to the earflap, and continue to sc around hat. (Work the second earflap the same way). Join to first sc in back of hat, and finish off. Weave in ends.

You can leave the hat how it is, or if you'd like to add the flower, here is how I made the flower:

FLOWER:
Using CC, ch 3.
Rnd 1: Work 12 dc in second chain from hook, and join to first sc with a sl st.
Rnd 2: Working in FRONT LOOPS ONLY, *3 hdc in next st, then sl st in next st*, around. This will form 5 little "petals".
Rnd 3: Then, working in BACK LOOPS ONLY from round 1, *work 5 dc in next st, sl st in next st*, around. This will form 5 larger petals behind the small ones.
Finish off and sew onto the hat.


(Copyright notice: This pattern may not be sold or republished without my written permission. You may post links to the pattern, but may not reproduce the pattern. Thanks for understanding!)


February 19, 2009

A "Twilight" Inspired Coffee Cup Cozy (free knitting pattern)


I'm getting together with a bunch of girlfriends next week to talk about Twilight (losers! I know!) and since we're meeting for coffee, I thought it'd be appropriate to make a coffee sleeve with Edward's famous "Be safe" line. Very fast project! At first, I did the lettering in fair isle, but it didn't show up very well. I went over it with duplicate stitch, and it looked much better, so that is what I'd recommend.


Materials:
  • small amount of worsted weight black and red yarns
  • U.S. size 6 dpns (or long circ for magic loop)
  • tapestry needle for weaving in ends and for duplicate stitch

Gauge: Doing a gauge swatch on this would probably take just as much time as knitting the sleeve, so I wouldn't bother. But my gauge measures 5 stitches to the inch in stockinette.

The final measurement of my cozy is 4 inches tall which fits a medium to large to-go cup). If you want it a little shorter, you can work just 3 rows of rib on top and bottom).

With black yarn, CO 48 stitches, and join to work in the round.
*K2, P2* around for 5 rounds.
Knit one round.
Switch to red yarn, and knit one round.
Switch back to black yarn, and knit 13 rounds.
Switch to red yarn and knit one round.
Switch to black and knit one round.
Still holding black, work *K2, P2* ribbing for 5 rounds.
BO loosely.

Using the chart below, with a long length of red yarn and your tapestry needle, duplicate stitch the pattern as shown (the bottom of the chart corresponds with the third row of black yarn after the round of red yarn). (Click on chart to enlarge)


August 08, 2008

Ice Cream Pint Cozy (a free knitting pattern)


I’ve been wanting to make one of these for about two years. I eat entirely too much ice cream and I’m always vowing to not buy it anymore, so I never made the cozy. Finally, I just decided to make one, because let’s face it–I’m never going to give up ice cream!


Here is a printer-friendly version of the pattern!


This cozy is knit from the bottom center outward, and then up.

Materials:
  • size 7 needles for knitting in the round (dpns or magic loop)
  • about 20 grams of worsted weight yarn (I used Patons Classic Merino)
  • stitch marker
  • tapestry needle
Gauge:
  • 5 sts = 1 inch
Abbreviations:

  • CO: Cast on
  • K: Knit
  • Sts: Stitches
  • KFB: Knit front/back. Knit into the next stitch like normal, but don't drop it off the needle. Knit into the same stitch from the back. One increase made.
  • KLL: Knit left loop. With your left needle, pick up the left loop of the stitch two rows below the last stitch you just made, and knit into the back of it. One increase made.
  • M1: Make one. There are lots of different ways to do this, but I make a backwards loop (like you would for casting on, but you're only going to do one stitch like this).
  • 2x2 rib: Knit 2 sts, purl 2 sts. Repeat around.
  • BO: Bind off in pattern.


Directions:
CO 8 sts and join, using a circular cast-on. Place marker at the beginning of the round.

Rnd 1: KFB each st around. (you should have 16 sts)
Rnd 2 and all even rows: Knit.
Rnd 3: (K2, KLL) around. (24 sts)
Rnd 5: (K3, KLL) around (32 sts)
Rnd 7: (K4, KLL) around (40 sts)
Rnd 9: (K5, KLL) around (48 sts)
Rnd 11: Purl around.

Next: Work stockinette stitch (knit every round) for 1.5 inches (measuring from the purl row)

Next round: *K12, M1* around. (52 sts)

Next: Work stockinette stitch until the cozy measures 2.75 inches from the purl row.

Next: Work 2x2 rib for 5 rows.

BO in pattern. Using tapestry needle, weave in ends.


May 30, 2008

Quick & Easy Knitted Baby Hat (a free pattern!)

Knit from the bottom up, this hat works up very quickly in the round.


Here is a printer-friendly version of the pattern!


Materials:
  • US size 6 needles to work in the round (I used magic loop, but do whatever you prefer)
  • small amount of sport-weight yarn
  • stitch marker
  • tapestry needle for weaving in ends
Gauge:
  • 5.5 sts and 9 rows equals 1 inch
Abbreviations:
  • K- knit
  • P- purl
  • K2tog- knit two stitches together
  • CO- cast on
  • PM- place marker
Instructions:

CO 70 sts. PM and join to work in the round, being careful not to twist.
Rnd 1: K
Rnd 2: P
Repeat rnds 1-2 once more.

Rnd 5: *K6, P1* around.
Repeat rnd 5 until piece measures 3.75 inches from the cast-on.

Next: Purl two rnds.

Begin decrease:
Rnd 1: *K5, K2tog* around.
Rnd 2 and all even rounds: Knit.
Rnd 3: *K4, K2tog* around.
Rnd 5: *K3, K2tog* around.
Rnd 7: *K2, K2tog* around.
Rnd 9: *K1, K2tog* around.
Rnd 11: *K2tog* around (10 sts remain)
Rnd 13: *K2tog* around (5 sts remain)

Here you can either cut yarn and thread through remaining sts, or work a 5-stitch i-cord for 5 rounds. When you're done with the i-cord, cut yarn and thread through the remaining sts. Pull tight to close. Using tapestry needle, weave in ends.


February 13, 2008

Janice (a free knitting pattern for a plush cat)

This pattern is in memory of our cat, Janice, who was solid black. I made this stuffed cat for my 3-year old son. The face could look better, but I'm not very talented at that part yet :)


The cat is knitted from the top down, seamlessly, and then the ears are worked last.

Here is a printer-friendly version of the pattern!

Materials:
  • TLC Amore yarn in black (or whatever your color preference)... I would not substitute yarn here, unless you pick something with a lot of texture to it. There are a lot of increases and decreases, and this yarn hides ALL of that, including any flaws.
  • US size 5 dpns (or long circular for magic loop, which is what I used)
  • contrasting yarn for the face
  • stitch markers
  • stitch holders (I just used scrap yarn)
  • tapestry needle
  • polyester fiberfill (batting)

Gauge:
  • not important

Stitch Abbreviations:
  • CO: Cast on
  • K: Knit
  • P: Purl
  • Sts: Stitches
  • KFB: Knit front & back--Knit the stitch like you normally would, only don't slide it off the left needle. Now knit through the back loop and slide off.
  • PM: Place marker.
  • SM: Slip marker.
  • K2tog: Knit the next two stitches together.

Directions:

CO 6 sts, then knit one row as if you were doing an i-cord. Divide the sts to work in the round, marking beginning of round.

Rnd 1: KFB all sts
Rnd 2 (and all even rnds): Knit.
Rnd 3: (K1, KFB) around. 18 sts total.
Rnd 5: (K2, KFB) around. 24 sts.
Rnd 7: (K3, KFB) around. 30 sts.
Continue increasing 6 sts per round in this manner, until there are 54 sts on the needles.
Knit 4 rounds even.

Begin decrease...
Rnd 1: (K7, K2tog) around.
Rnd 2 (and all even rnds): Knit.
Rnd 3: (K6, K2tog) around.
Rnd 5: (K5, K2tog) around.
Decrease in this manner until you have 24 sts.

Neck & Shoulders...
Rnd 1: Knit.
Rnd 2: (K2, KFB) around (32 sts)
Rnd 3: (K3, KFB) around (40 sts)
Rnd 4: (K4, KFB) around (48 sts)
Rnd 5: K2, PM, K20, PM, K4, PM, K20, PM, K2
Rnd 6: K1, KFB, SM, K20, SM, KFB, K2, KFB, SM, K20, SM, KFB, K1
Rnd 7: K2, KFB, SM, K20, SM, KFB, K4, KFB, SM, K20, SM, KFB, K2
Rnd 8: K3, KFB, SM, K20, SM, KFB, K6, KFB, SM, K20, SM, KFB, K3

Rnd 9: K5, then move those sts to a st holder. K20, Sl next 10 sts to another holder, K20, place next 5 sts onto the first st holder. You should have 10 sts on each of the two st holders.
Rnd 10: Knit (40 sts)
Rnd 11: (K4, KFB) around (48 sts)
Knit 3 rounds even
Rnd 15: (K5, KFB) around (56 sts)
Knit 3 rounds even
Rnd 19: (K6, KFB) around
Knit 3 rounds even

Begin Decrease...
Rnd 1: (K6, K2tog) around
Knit 3 rows even.
Rnd 5: (K5, K2tog) around
Knit 3 rows even.
Rnd 9: (K4, K2tog) around
Knit 3 rows even.

Form tail...
Rnd 13: K3, K2tog, K3, PM, K4, PM, K1, K2tog, (K3, K2tog) to end.
Rnd 14: K7, SM, KFB, K2, KFB, SM, K to end.
Rnd 15: K7, sl 6 sts between markers onto st holder, K to end. (29 sts)
Rnd 16: Knit.

Form legs...
Rnd 1: K1, PM, K12, PM, K4, PM, K to last 3 sts, PM, K3
Rnd 2: KFB, SM, K12, SM, KFB, K2, KFB, SM, K9, SM, KFB, K2
Rnd 3: K2, SM, K12, SM, K3, KFB, K1, KFB, K9, SM, KFB, K1, KFB, K1
Rnd 4: K2, SM, K12, SM, K3, KFB, K2, KFB, K1, SM, K9, SM, KFB, K2, KFB, K to end.
Rnd 5: K2 and slip those two onto a st holder, SM, K12, Sl 10 sts between markers onto st holder, knit to last marker, slip last 8 sts onto the first st holder.


At this point, stop and fill with the batting (not too full, because you'll distort the shape).

Legs & Tail:
Slide the sts from the holder onto the needles, and pick up 2 sts (or more, to avoid leaving a hole). Work stockinette stitch in the round until desired length. Fill with batting (I left the tail empty), break yarn, and pull through remaining sts. Pull tight and using the tapestry needle, weave in the ends.

Ears (make 2):
CO 12 sts.
Row 1: Knit.
Row 2: Purl to last st, then turn.
Row 3: K1, then pass the unworked st from the right needle OVER the one you just knitted and off the needle (decrease made). Knit across to last 2 sts, K2tog.
Repeat rows 2-3 until there are 2 sts left. K2tog, BO.
Using the tapestry needle, place the ears into position and sew into place.

Face:
Like I said, I'm no expert with this part :) Just embroider or duplicate stitch a face on your kitty.


January 18, 2008

Tooth Fairy Pillow: A free knitting pattern

When I was a kid, my mom had sewn a tooth-shaped pillow out of white fur, with a little pocket to put our teeth while waiting for the tooth fairy to come. I now know that she did this so we didn't lose the tooth before she could swap it with a dollar bill. I decided to create a knitted version. Here is my pattern...


Here is a printer-friendly PDF copy!


Materials:
  • worsted weight yarn in white, red, and blue. Not sure how much of the white yarn I used, but I would estimate maybe 80 yards? The red and blue were just scraps.
  • US 5 double-pointed needles
  • 1 US 5 circular needle (for holding stitches--if you don't have one, you could thread a piece of yarn through the stitches to hold them)
  • crochet hook for provisional cast-on
  • yarn markers
  • tapestry needle
  • batting for stuffing the pillow
Gauge:
  • not important
Abbreviations:
  • PM- place marker
  • KLL- knit left loop: with your left needle, pick up the left loop of the stitch TWO ROWS below the last completed stitch, and knit it through back loop (an increase made)
  • WNKS- wrap next stitch: turn the work, then slip the first stitch on the right hand needle to the left hand needle. Send the working yarn back between the needles, then slip that unworked stitch back onto the right hand needle. Then bring the yarn forward to purl.
  • WNPS- wrap next purl stitch: turn the work, then slip the first stitch on the right hand needle to the left hand needle. Bring the working yarn forward between the needles, then slip that unworked stitch back onto the right hand needle. Then send the yarn to the back again.
  • K2tog- knit the next two stitches together.
  • KWS- knit wrapped stitch: insert your right needle under the "wrap" first, then the stitch that it is wrapped around. Knit them both together.
Directions: (you'll be casting-on just below the "crown" and working down. Then later, you'll work the crown)

Provisionally cast-on 40 sts, divide evenly on dpns, and join to work in the round. PM to mark beginning of each round.

Rnds 1-5: Knit.
Rnd 6: *K8, K2tog* Repeat from * around.
Rnd 7: Knit.
Rnd 8: *K7, K2tog* Repeat from * around.
Rnd 9: Knit.
Rnd 10: *K6, K2tog* Repeat from * around. (You should have 28 sts)
Rnd 11: Knit.
Rnd 12: *K7, KLL* Repeat from * around. (Don't forget to KLL after the very last stitch of the round--you'll have 32 sts now)
Rnd 13: Knit.
Rnd 14: *K8, KLL* Repeat from * around. (36 sts)
Rnd 15: Knit.
Rnd 16: *K9, KLL* Repeat from * around. (40 sts)
Rnds 17-19: Knit.

Rnd 20: K the first 20 sts with the circ needle (or use dpns and slip the 20 sts onto a stitch holder or slide a scrap piece of yarn through the sts) Let these hang around, you'll be working them later. K the last 20 with the dpns--you'll be working these sts now.

CO 2 sts, and join into the round (22 sts on the dpns now).
Rnds 1-2: Knit.
Rnd 3 (short rows): K18, WNKS. P14, WNPS. K9, WNKS. P7, WNPS. K7, KWS, K4, KWS, K3 (you should be at the end of the round now).
Rnd 4: Knit, KWS as needed.
Rnd 5-6: Knit.
Rnd 7: K to last 4 sts, *K2tog* twice. (you should have 20 sts)
Rnd 8: Knit.
Rnd 9: *K3, K2tog* across.
Rnds 10-11: Knit.
Rnd 12: *K2, K2tog* across.
Rnd 13: Knit.
Rnd 14: *K1, K2tog* across.
Rnd 15: Knit. Break yan, and thread remaining yarn through sts and pull tight.

Using the stitches from the circ needle (or holder) join yarn and knit around. CO 2 sts and join in the round. Repeat rounds 1-15 above. Sew the opening between the legs.

Working the "crown":
"Unzip" the provisional cast-on carefully, slipping each stitch onto a dpn. PM at the beginning of the round, and after the 20th stitch to mark the center. (I used 4 dpns, with 10 sts on each needle)

Rnd 1: Knit.
Rnd 2 (short rows): *K14, WNKS, P8, WNPS, K8, KWS*, K to middle PM. Repeat between *, then K to start of round (KWSts as needed).
Rnd 3: Knit around, KWSts as needed).
Rnds 4-5: Repeat rnds 2 and 3.

You may want to stop here and fill the pillow with the batting before going on. I used a pencil eraser to stuff it into the "legs".
Rnd 6: *K2, K2tog* around.
Rnd 7: Knit.
Rnd 8: *K1, K2tog* around.
Rnd 9: *K2tog* around. Break yarn, and draw through remaining sts. Make sure you have as much stuffing as you want, then pull tight and weave in ends.

Pocket:
CO 10 sts with red (or whatever color you want).
Rnd 1: Sl1, *P across*
Rnd 2: Sl1, *K across*
Repeat for 7 rows. BO. Sew the pocket onto the tooth pillow.

For the face, you can embroider eyes and a mouth (I just used scrap yarn for this).


(Copyright notice: This is an original pattern created by myself, and may not be distributed without my written consent. You may link to this pattern, and use the photos with a link back to the pattern, but you may not sell the pattern or republish the pattern in any way. Thank you!)


Featured Posts

Blog Archive