
Yesterday, I finished one of my favorite projects so far... I made Noah a bed frame. When Jerry and I were in a time crunch to make over the boys' bedrooms while they were away for a week, I'd planned to buy Noah a new bed frame (his was very old and very overdue for a replacement).

However, we ran out of time. I went to a couple of stores looking for one, but didn't see one that I liked. Last week, I was looking on Amazon for one, and I couldn't believe how expensive they were. Now that I know a little about woodworking, I knew that I could make one for a small fraction of the cost of buying one.
I liked the idea of making Noah a daybed, because he likes to sit on his bed as if it's a couch--doing his homework, watching TV, working on his computer, etc. I've always kind of thought of daybeds as being girly (I had one when I was a teen), but a quick search online showed that they could be boyish, too.
I found some plans by Ana White, and I thought they would be perfect. I printed off the plans and purchased the wood from Lowe's. The materials only cost $140, and I knew this bed was going to be super good quality (assuming I didn't screw it up, haha).


(The beer bottle in the photo was from Jerry! I'm still doing great without drinking--139 days now)
Putting together the headboard and the sides was really easy, but I noticed that the plans ended there. The plans I'd printed were a modification to a different set of plans for a storage bed. I'd seen this in the instructions, but I didn't realize that I'd need to actually print and follow both sets of plans.


So, I had to improvise. I still had leftover scraps from the other projects I've done, and I used that to finish it up with a nice, solid frame. I painted it with the leftover paint from my closet shelves (which I'll write about below), then I put his old bunkie board and mattress on top.


I LOVE how it turned out! It's simple, not too girly, and a very solid, quality piece of furniture. And I made it with my own two hands! The total time spent on this project was only about six hours. The priming and painting took the longest. Now we just need to get (or make!) some cool pillows.

Not as exciting are a couple of other projects I did recently...
I mentioned that I gutted my bedroom closet (which is a mirror image of my pantry; when choosing the layout of our house/trailer, there was a "sunroom" between my bedroom and the kitchen. I had no use for a sunroom, so I had the builders split it down the middle and make half of it a walk-in pantry and the other half a walk-in closet. One of the best decisions I've ever made! haha).
Here is a picture from before. Everything was crammed in there. (This picture was from before we got new carpet, however).

Jerry scraped the ceiling texture off for me, because of my carpal tunnel (the ceiling part is what makes the carpal tunnel flare up the most). He even tried his hand at the taping and mudding for the drywall seams. He realized how difficult it was and decided to leave it up to me from now on ;)
Anyway, I painted the closet a slightly off-white ("spare white" by Sherwin Williams), the same color that I used for the trim in the house. I didn't want to go with a darker color because I wasn't thrilled with how dark the pantry seemed to be after painting it blue. I also decided to paint the shelves white, because we'd have lots of gray and black baskets/containers on the shelves.
I didn't use a plan for these shelves, but I did read a lot about building sturdy shelves before I made the plans for these. I built the shelves closer together than the previous ones (with varying heights) so that I could fit an extra shelf in there. I also made them a little deeper so that we could fold things like jeans in thirds instead of fourths to reduce the height of the piles (and therefore fitting more in the pile and saving space).
You guys... when everything was said and done, we were able to fit ALL of our clothes in the closet, INCLUDING the clothes that we'd had in the dresser! A couple of years ago, I adopted Marie Kondo's method of folding and storing clothes so they are standing up in bins. I leave out the bulky things like sweatshirts, though, and just stack them. So, now we can get rid of our dresser and have more space in the bedroom. The dresser is really nice, so I think I'll sell it on Facebook Marketplace.
Anyway, here is what it looks like now. The only thing left to do is put in molding along the floor. That will have to wait until we either buy a trim nailer or charge the batteries for Brian's (the charger isn't here).

Finally, I made a shelf for the TV in Jerry's and my bedroom. We had the TV on the dresser, but since we are getting rid of the dresser, we needed a new spot for the TV. For this, I used this plan from Pretty Handy Girl. I made it 40 inches long instead of 48, just because we didn't need it any bigger. Also, I definitely wasn't comfortable about whether it would be sturdy enough without having supports underneath it, so I added those when I was done.
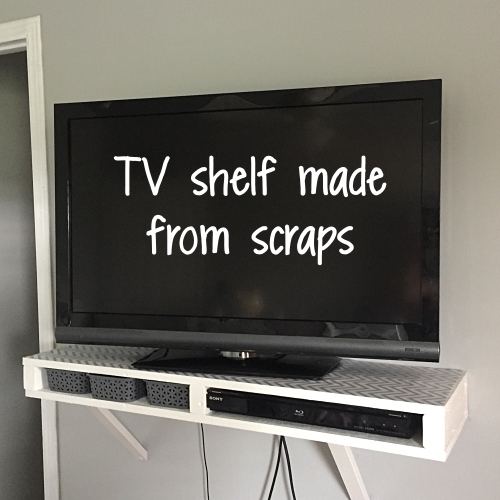
This was unbelievably difficult to paint! I would highly recommend painting before assembling. Again, I used leftover paint from the shelving in the closet. This isn't anything fancy, but it's the perfect size for our TV, DVD player (I have no idea why we still have one, because we never use it) and a few little baskets for remote controls and such.
Now, I'm constantly thinking of other things I can build! Jerry and I don't have a headboard on our bed, which drives me crazy, so I may make one of those. I'd also like to build some shelves for the laundry room, but that is going to have to wait until we are ready to completely make over that room this summer.
It's kind of funny how my Amazon wishlist is growing and it's full of tools, hahaha. I would really like a table saw next. I've been watching Facebook Marketplace, but so far, I haven't had luck finding what I want. I'll just have to set aside my allowance for a few months. I never thought I'd be saving up for a table saw! It cracks me up.
Anyway, I am loving this new hobby of mine, and it feels so nice to accomplish things that have nothing to do with weight loss or running or anything like that!


Pocket hole jigs are the best thing ever.
ReplyDeleteIf you are ever wondering if you need supports under a shelf, you need to visit the Sagulator: http://www.woodbin.com/calcs/sagulator/
Ooooh, that is so cool!
ReplyDeleteLove this! We saved up and bought ourselves a brad nailer system, so I feel you, hahahaha!
ReplyDeleteYour projects are amazing! I love reading about them.
ReplyDeleteYour talent is amazing!
ReplyDeleteIf you're going to make your own headboard, I highly recommend making a tufted headboard that hangs on the wall. I made my own and it came out great and was super easy. I can't find the actual site I used for instructions, but this one is similar - http://blog.jennasuedesign.com/2012/03/diy-upholstered-tufted-headboard
ReplyDeleteI just made a simple rectangle-shaped one, but it still looks fabulous.
Watch auction lists for a table saw. My dad had two in his estate auction and they went for a fraction of what they cost. :(
ReplyDeleteI love seeing your projects! You do an amazing job, and give me some new ideas, too :) (I also love using my kreg jig, and just recently bought myself a table saw - it's great to have the right tools to make jobs easier!)
ReplyDelete