Showing posts with label woodwork. Show all posts

February 01, 2022

Just a "before" photo

Sadly, I do not have any transformations to post today. So, I hope you've had a happy Tuesday! And February 1st.

Here is today's "random fact of the day":


I do have a "before" photo that I hope to post as an "after" soon. I bought a couple of pieces from Facebook Marketplace today--a coffee table and shelves. I only wanted them for the wood (like how I took apart the dining room set and got a ton of really nice oak!).

These are the two pieces--it's hard to tell they are separate because they are side-by-side, so I put a red line between them (also hard to see). I took the legs off the coffee table (the one on the right) so you can just see the top.


Anyway, I've spent several hours today break them down. I have to run them through the planer tomorrow. You can see a lot of the pieces in the background that I've already cut on the table saw. 

Once I get all of the "raw" wood, I can start working on Noah's shelves! And then I'll FINALLY be able to start working on the cat wall. (Here is my Pinterest board with all my cat wall inspiration, haha)

This is kind of random, but I would kind of like to do a weight loss "series" on my blog other than my Wednesday Weigh-Ins. I know I've probably written all there is to write on the subject over the years, but my blog is now 11 years old; so it's time for an update! Should I update old posts? Answer questions from readers? Write random thoughts? Other ideas?

I know that most people read my blog for weight loss stuff and I got really bored with it for a while, but now that I'm back in losing mode and I'm feeling good about it, I kind of want to revive it. I definitely don't feel like an expert--don't get me wrong--because my weight has fluctuated so much over the last decade. But I do feel like I have a lot of info I could share (or already have shared). So just let me know your thoughts if you have any!

November 22, 2021

Measure Twice, Cut Once

It's 9:27 PM as I start this (there is no way I'll get it done before 10:00, which is when I usually publish my posts) and I just got in from a run. In the dark! The craziest thing happened today... I got a burst of energy in the afternoon(!) and it lasted all evening (which led to the run).


I used to have energy in the afternoons until my chronic pain started a few years ago. I started getting tired earlier and earlier in the day and the list of things I could no longer physically do was growing. (Still no real diagnosis--my doctor is calling it fibromyalgia for now, but still testing.)

I still have the pain, but I started a new medication after my last appointment with my rheumatologist and I think--I THINK--it might be helping! I've tried so many different meds this year while trying to figure out what's wrong with me and nothing helped even a little bit.

The past few mornings, I've gotten out of bed without moaning and groaning and so hunched over I could barely walk. The main pain that I still have is the old one--the very specific spot on my back (my T10-T11 vertebrae)--that's been there for 30 years. I don't want to downplay it, because when it really hurts, it hurts badly enough to make me just lie in a ball and cry. There is also a new (very bad) pain in my L5-S1 area (lower back). I feel super confident that it's a herniated disc. But the other pain I've been feeling all over my body seems to be getting better.

I really hope that the medication is working and I'm not just having a good day. I have an MRI scheduled for December 2nd, and I really hope that it shows something. (Interestingly, she ordered it for my cervical spine (neck) and lumbar spine (lower back) but not my thoracic spine (where the T10-T11 pain I have is). My neck and lower back have been really bad, though, and the x-ray showed some enough degeneration to prompt the MRI, so we'll see.)

My dad told me he had a project he was working on and asked if I could help with it. He was making a chess board out of an old piece of plywood (repurposed from something or another). He put all the squares on it, but they weren't quite square to the board, so he just wanted me to square it up.

This is no big deal--like seriously a three minute task--with a table saw and a miter gauge. You just set the angle of the miter gauge and cut.

Now, I have some pretty cool tools, including the fancy saw I splurged on recently; but I don't have a miter gauge! A miter gauge to a woodworker is like a skillet to a chef. It's just a given! There was one that came with my saw (albeit a poor quality one, but a miter gauge nonetheless), and it broke. So I've been without a miter gauge for months, trying to get by with jigs and other tools. (A good miter gauge is expensive--$150-250--so I've been waiting to get one. I don't want to buy a cheap one only to have it break again, so I'd rather wait and get a good one.)

Anyway, my dad dropped off this board as well as another board that he wanted squared up to the same exact size as the chess board he was making. I figured I could get it done in an hour or so, if I got creative with my other tools.


I finally decided to use my router to get one clean edge, then move it over to the table saw to get another clean edge. Then use a table saw jig to cross cut each end.

It did not go as planned.

I was really worried I was going to mess up the chess board he so carefully painted, so I was careful about my cuts. It took forever, but I finally got it nice and square with the edges how he wanted them. Next up was the easy part! Cutting down the plain board to the size of the chess board.

The board was not at all nice looking, so I cut away the bad edges, keeping the best part in the center. I had three cuts done, and was on to the fourth and final cut. I laid the chess board on top to make sure it would be perfectly sized and I drew a line (there were already a couple of other lines on there).

I carefully made the cut on the table saw, and was happy when I saw that the whole thing was square. Then I realized that it was too short on one side!


When I put the piece up to the table saw, I was thinking that the cut line was the innermost line; but it should have been the outermost line that was on there. I got confused about which line I'd just drawn, so it was a an inch or so too short.

I was grateful I didn't screw up the chess board, but I felt terrible about the other board. I had a very nice piece of oak plywood that I was saving for something special that might come along (when I have nice plywood, I get very excited about it--I can't buy it often because I don't have a way to get it home). So, I reluctantly pulled it out to measure it, and it was just slightly bigger than the chess board--so it was perfect to use as a replacement.


My dad hasn't picked them up yet, so he doesn't know about my mistake, but he got lucky in a way--the oak plywood is so much nicer! ;)

November 08, 2021

Hexagon Shelving Progress

I am extremely tired today for some reason, so I'm just going to keep this short. (Even when I try to keep it short, I always manage to go on and on...) I want to take a shower, put on super comfy pajamas, and try really hard to fall asleep early tonight.

I don't have a ton of progress to show on the hexagon shelves I'm making, but I don't really have anything else to write about! I did get the first shelf put together and I LOVE it. It's not totally done--I'm going to put a backing on it and use a French cleat to hang it on the wall. I'm also going to paint it.


If you missed it, I am working on a sort of "jungle gym" wall for the cats and I am starting with some hexagon shelves/honeycomb shelves. Here is a picture of what inspired me to do it...

(I don't know who to credit for this photo--I couldn't find the original source)


I had cut out six sides and beveled the edges so they would form a hexagon, but I was dreading putting holes in two of the faces (the shelves in the photo have four holes, but I want to make a couple of the shelves with just two holes). I HATE using the jigsaw and it's not easy to make a perfect circle with it anyways. There are hole cutter drill bits you can get that cut holes 6 inches in diameter, which is about the size I needed to cut, but they're expensive and I doubt I'd ever use it again.

After staring it down in the garage for about an hour and racking my brain, I decided to try my router. I'd never cut circles with a router before, and I don't have a circle-cutting jig, but I managed to rig something up that I thought might actually work. I made a temporary plate for the router out of small rectangle of plywood that would rotate around a nail in the center of the circle. (Like using a compass to draw a circle, only it would cut it out instead of drawing it.)

I don't have a plunge router, which is ideal for this. (The best way I can describe it would be like drawing a circle on a piece of paper--with a plunge router, you can just place the tip of your pen anywhere on the paper and start drawing. With a regular router, like mine, it would be like having to start drawing with your pen at the very edge of the paper.)

I decided to try it anyways and just make a super shallow cut. (I'll spare the details.) Long story short(ish), the bit didn't lock into place where I'd planned for it to (to make the shallow cut). I wasn't able to move the router and suddenly the wood started smoking and it smelled burnt. I turned off the router only to see that I'd accidentally pushed the bit through the board and right down to the concrete in the garage!! It destroyed the bit and burned the wood.


Thankfully the weather was nice enough to put me in a great mood--I just shrugged it off and moved on!

I switched out the bit and figured out how to make extremely shallow passes to bypass not having a plunge router. After lots of rotations of the router, the circle was finally cut--and it was PERFECT. (Well, aside from the burned edge! Haha. When I sanded it, the burn came right off and now you can't even see it.)


The second one was much quicker and I was really excited that I'd managed to make it work. Cutting through solid oak with a jigsaw would have taken FOREVER, would have really bothered my carpal tunnel, and would have made a very imperfect circle. (Now, I'm going to make a proper circle-cutting jig for the rest of the boards.)


Once I cut the circles out of the two pieces, I started working on the glue-up. I laid out a couple of pieces of painters' tape and then placed all of the pieces side-by-side on top.


Then I spread glue on the beveled edges and basically rolled the whole thing up to form a hexagon. I was so excited that it was actually doing what it was supposed to do, haha. I put a strap clamp around it to hold it tightly together. 

I let it sit overnight and then today I took the clamp off--I was thrilled to see it looked exactly how I'd hoped. I sanded the glue off and then I brought it in the house to see if the cats would fit through the holes. I didn't want to finish the whole project only to find out that the holes were too small for my porky kitties!

I set it on the floor and immediately, the kittens were drawn to it. Cats are so predictable! Haha. 

I still have to cut out a hexagon-shaped piece for the back. And I have to make about four more of these! Now that I kind of know what I'm doing, though, it should be easier.

If you want to see all the ridiculous inspiration I may be putting into action for the cats, you can check out my cat wall Pinterest board. I really am crazy, I think! ;)

I need some transformations so I can post a Transformation Tuesday tomorrow--so please share what you have!

October 03, 2021

Hypomanic Woodworking

This post may come off as whiny, but I'm writing it with tongue-in-cheek. Writing all of this out leads me to believe I may be on the verge of a hypomanic episode. (This is also VERY long, by the way!)

I had a disaster of a week, and it's still going on. I'm not even referring to my diet/exercise, which have been right on point since my last post about it. I'm referring to the chain of events that led to my garage looking like THIS right now:


A couple of weeks ago, my garage was super clean. Usually after I finish up a project, I clean the garage well before starting another. As I wrote previously, I bought a dining set via Facebook Marketplace (for $25!) and I have to repair several spindles on the chairs before I can paint it. There were a couple of small hand tools that I needed to get for this, so I went onto Facebook Marketplace to look. And I couldn't help but look at jointers again.

A jointer is a power tool that you slide a board across some rotating blades and it makes that side extremely flat. So if you have a board that is bowed or warped, you can run it through a jointer to get one side very flat. Then you use that side as a reference to finish squaring off the board.

A thickness planer is a similar tool, but it's meant to make the faces of the board parallel, so the board is the same thickness all the way through. Once the three sides are all flat and square, you can run the board through a table saw to square off the fourth side.

The biggest benefit to a jointer, in my opinion, is that you can create surfaces so flat that you can "joint" them together with wood glue--the edges fit together so perfectly that they look like one solid piece of wood when you're done. 

There are creative ways of doing all of this with only one tool (if you ever have to choose, choose the table saw!) but using the jointer, planer, and table saw is like one sweet wood working harmony.

BUT. These tools are crazy expensive. The Dewalt planer I wanted is $550, so I was THRILLED when Shawn (my brother-in-law) traded me that planer for our lawn mower. To use the planer to its full potential, though, a jointer would have been awesome. I've been looking at Marketplace for two years(!) and while I've seen lots of them, they either have something wrong with them or they're too expensive. So, I continued to look about once a week.

Well, I finally found one that looked good! They were asking $150, which was quite a bit cheaper than the other jointers I'd seen. A woman was listing it for her father-in-law, so she relayed my questions about it and I did my research on this particular model. It's old--from 1988--but it's cast iron, super solid, and free of rust. And it runs! From what I could see online, though, $150 may have been asking too much.

I was debating whether to get it and I offered $100. I figured if they said no, then it wasn't meant to be and I'd keep looking. Well, the father-in-law counter-offered $130. I told him thanks, but I'm going to think about it some more and keep looking. A couple of hours later, he said I could have it for $100 if I picked it up that day.

Considering it's made of cast iron and incredibly heavy, Jerry went to pick it up for me on his way to work. The woman told me she'd give me her address when he was on his way (she didn't want to give it too early, I guess for safety reasons). Well, he got to the general area and she wasn't replying to my messages. Jerry drove around for 25 minutes, and then had to leave so he could get to work. Not cool on her part.

A couple of hours later, she messaged me and was super apologetic. She said if I still wanted it, I could have it for $90 because of the hassle. Jerry was going to stop by there in the morning; she was going to have it in the driveway and she told him to put the money underneath a decorative pumpkin on the porch.

Jerry was a little surprised when he saw the pumpkin because had to remove a literal CRACK PIPE  in order to put the money under there. Oh, well--I got a jointer for $90! I just hoped it would work.

At this point, one thing just kept leading to another which eventually led to what my garage looks like right now...

Now that I had a jointer, of course I wanted to use it to build things! There have been several things I've wanted to make but jointing was a necessity to make them. And I've tried building jigs for my table saw to joint wood but they always needed little hardware pieces that I didn't have and when I did try jointing, it just didn't work as well as an actual jointer would have.

The first thing I wanted to make was an extension for my table saw. I have a job site table saw, which means is smaller and portable--convenient for saving space in the garage, but it causes problems when cutting larger pieces of wood. I found plans to build an extension and I already had the wood I needed.

Before I started, though, I wanted to make a zero-clearance throat plate for my table saw--it's easiest if I show a picture:


The one that came with the table saw (on the left above) has a wide gap so that you can tilt the blade to 45 degrees. If you're just making 90 degree cuts, you don't need a gap that is any bigger than the saw blade. This is a good thing because it reduces "tear out" on the plywood I would be cutting for the table saw extension (basically just cutting cleaner edges). And it prevents thin slices of wood from dropping below the plate.

To make the throat plate, I needed a board that was 1/2 inch thick. I had a nice piece of poplar my brother gave me (I always ask for his scraps! haha) that was a good size. It was closer to 3/4 inch thick, so I had to use the planer to shave off a little at a time until it was the correct thickness (and very flat).

When I ran it through the planer, I saw some ugly lines--raised ridges. I had no idea what would have caused that. The only thing I could think of was that the blades were chipped, but I had just replaced them when I got the planer from Shawn. I spent a whole day messing around with the planer--cleaning it, inspecting the knives very carefully, and running boards through to try and locate the problem.


I assumed it had to be microscopic nicks in the blades, so I ordered a new set (I'd gotten an off-brand the first time, so this time I paid the extra $10 to get the Dewalt ones). 

While I waited for those to arrive, I decided to clean my miter saw and make sure it was squared up. This is the thing that drives me the most crazy about tools--the slightest imperfection for making cuts can make projects super frustrating because then boards don't line up and they look sloppy.

My miter saw is also old (I got it on Marketplace). When I was making test cuts while squaring it, I noticed how bad the edges looked. I don't know why it never occurred to me, but this problem with the planer blades made me realize that I probably needed a new blade for the miter saw. I ordered a blade for that and held off on squaring it up until the blade arrived.

While I waited on blades to arrive, I decided to mess around with the jointer and see if it worked (and learn how to use it). I watched a ton of YouTube videos about how to joint correctly and then I gave it a try.

Oh, man. It was terrible! It looked like I'd taken an axe and hacked away at the bottom of the board. It was also harder than I expected to push the wood along the blades. And at one point, the blades threw the board across the room!

I thought maybe the blades weren't set properly, so I went through all the steps of adjusting the blades and the table. This took TWO DAYS. I'm not kidding. I had no idea how hard it would be to fine-tune them. I was so frustrated. Finally, I got them lined up to where it was working--kind of--but the edges looked terrible. Definitely not at the point where I could joint them to other boards.

When the planer blades arrived, it hit me again--maybe the jointer needed new blades! So, back on Amazon I went, ordering new blades for the jointer.

I made sure to be extremely careful when installing the planer blades so that they were lined up perfectly. I tried it out and it looked so much better! All of the ridges were gone, so the problem had clearly been with the blades. Unfortunately, by the time I ran the poplar through the planer a few more times to fix the flaws, it was only 3/8-inch thick and not 1/2, like I needed. So I just decided to use a piece of 1/2-inch plywood.

And I finally got the throat plate done and it worked perfectly. Thankfully! (It's the one on the right in the side-by-side comparison of the throat plates.)

When my miter saw blade arrived, I swapped that out (that's a very simple process) and I couldn't believe I hadn't done it two years ago. It made a HUGE difference! Check this out--the before and after:


Next up was the table saw extension. I cut the plywood pieces I needed for that, but in order to complete it, I would need to make another jig. And that jig required me to use a jointer. Gah! I was dreading switching out the blades on the jointer after it had taken so long to adjust them. It took me about four hours, but I finally got the new ones properly installed.

I tried it out on some scrap wood and I couldn't believe the difference! It cut through like butter--so much easier and after squaring up the fence that sits perpendicular to the blades, I had perfectly square cuts. I was so excited!

Once I got that working, I started looking through my scraps for the wood I would need to make the jig. I was digging through boxes and couldn't find what I was looking for. This led to me thinking that I really need to organize my scrap wood. I had a huge box of scraps in the corner that made it impossible to find what I needed. And I had 3-4 other small boxes that were pretty unorganized.

As I was thinking about how to organize all of the scrap wood, I realized that I needed to get a bunch of clutter out of the way. And the most annoying thing in the garage at the moment was a wheelbarrow full of our shovels, rakes, and things like that. Those are things people normally hang on the wall somehow, but I never got around to building a rack for them when I drywalled the garage.


I put that on my list of things to do this fall, so I decided I was going to finally do it. After thinking about how I best wanted to hang them, I bought some PVC rings (for 78 cents each) and I used a couple of scrap 2x4's for the rest. The idea with the PVC rings was to slide the pole handle through to keep it in place while it's propped on the wall. It's easier just to show pictures (this is before I cleaned all the sawdust!):


For something like the snow shovel, with a large handle that won't go through the PVC ring, I just boxed in a small section. To keep it adjustable for other items in that spot, I figured we could use bungee cords to hold them in place. I cut out little circles along the bottom edge to hook the bungee cords on after wrapping them around the tool.

I had to use PVC rings on the bottom as well; at first, before I added them on the bottom, the poles slid around and just made a mess of things.

Once I got that done, I started pulling out all of my scrap wood to begin organizing it. I don't want to buy a sheet of plywood in order to make a cart of some sort (what most people seem to do for scrap wood) so I'm going to have to get creative. I'm thinking of connecting some five-gallon buckets together, side-by-side, and standing the wood up in that. But then I have to figure out something for all of the wider pieces and the plywood.

Anyway, that was a REALLY long story of little to no importance! But it's what I've been doing in my spare time all week. All of this started because I went on Facebook Marketplace to look for a couple of hand tools to fix the dining chairs. And I never even got to that part! Hahaha. Once I get all of the wood organized, I'll clean up the garage and then get to work on the chairs. 

January 13, 2021

How To Build Cat Bunk Beds (or Doll Bunk Beds)

Cat and Doll Bunk Beds

I'm so excited to share this project! It's been a long time in the making and it was very intricate to make, so I wanted to take my time working on this post. In retrospect, I spent way too much time working on the project AND the post, haha--but hopefully someone will find it helpful and actually make it!

Because don't we all need cat bunk beds? Or baby doll bunk beds? ;)

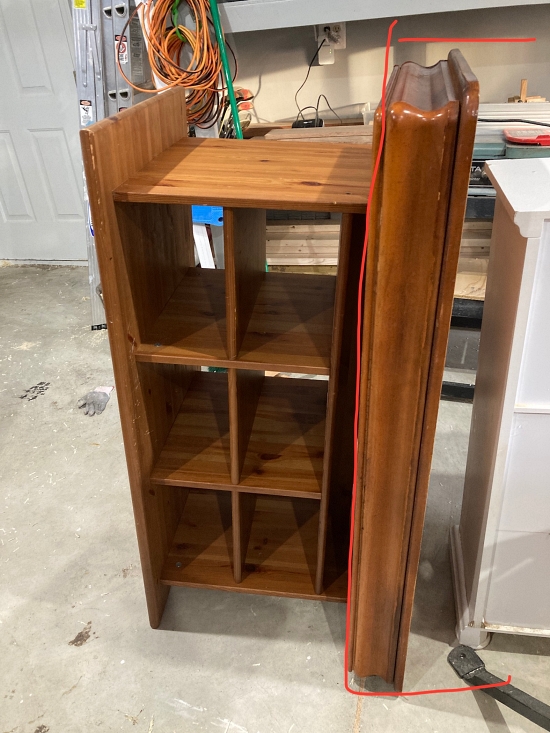
My mom was shopping at a second-hand store a few months ago and found an adorable bunk bed set... for dolls! She knew that Riley (my niece) would love it for her dolls, so she bought it. When I saw it, I could tell that it was handmade and I was very interested in it. I decided to try to replicate it.

Since I don't have a child who plays with dolls, I thought, "Hey, this could make a great cat bed!" So, these instructions are to build cat bunk beds or doll bunk beds--you choose. :)  (I think it goes without saying that these are NOT for real babies. Don't do that.)


I'm going to be as detailed as possible in this post, and I am also including a PDF for printing (it's super long, so I apologize--I made the pictures smaller on the PDF to shrink down the number of pages, but it's still 20-something pages long.) If something isn't clear, feel free to comment or email and I'll answer the best that I can!

(Here is the PDF version - it's basically this entire post, including photos.)

The Materials:

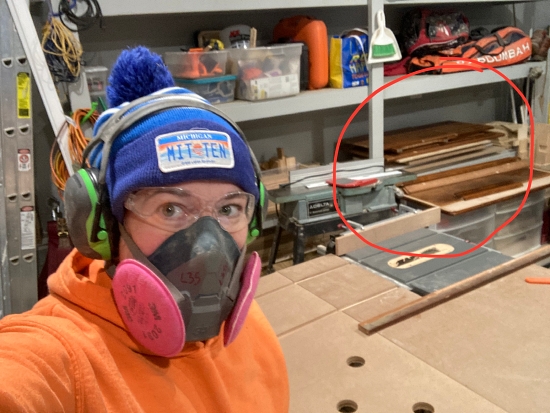
I used lots of scraps of wood--some pine, some poplar, some cedar. A lot of it actually came from a 2x4x12 of pine! The bunk boards for the "mattresses" were just scraps of poplar. Basically, it doesn't matter what wood you use if you're going to paint the bunk beds. But if you're going to stain them, then I'd choose more carefully.

I will list the wood cuts below, but first:

The Tools & Supplies

measuring tape
pencil
wood glue
table saw
router (optional - this is to cut out grooves down the center of some pieces--I used my table saw instead of a router table because a lot of people don't have a router table)
*trim nailer (I used 16-gauge) with 1-1/4 nails to 2" nails
*pin nailer (I used 23-gauge) with 3/4" nails
pocket hole jig with 1-1/4" screws (only 12 of them) (Amazon affiliate link)
drill (for the pocket holes)
wood filler
sandpaper
spray primer and spray paint


*If you don't have the nailers, you could use small nails and/or screws to put this together. The nailers made this MUCH easier, however, because the pieces are so small and delicate. Pin nailers are not very expensive. This is the one I have (Amazon affiliate link). The trim nailers can be a little (or a lot) more. Here is a cheap one on Amazon (affiliate link). I use my nailers a LOT. This is a slightly different model of the trim nailer that I have. I got it cheap on Amazon Marketplace. 
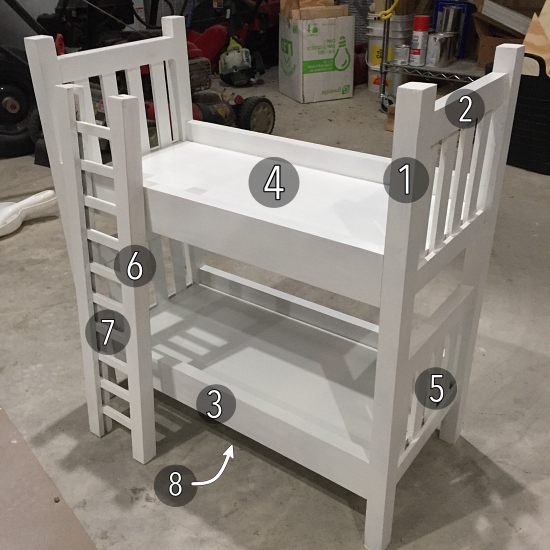
Wood Cuts


#1. Corner Posts (make 4) - 1-1/8" x 1" x 24"
#2. Head/Foot Board Rails (make 8) - 3/4" x 1-1/4" x 8-3/4"
#3. Side Rails (make 4) - 3/4" x 2-1/2" x 20-1/2"
#4. Bunk Board Bottoms (make 2) - 1/2" x 9-1/2" x 20-1/2"
#5. Slats for Head/Foot Boards (make 16) - 1/4" x 1" x 6-1/2"
#6. Ladder Side Rails (make 2) - 1" x 1" x 22"
#7. Rungs for Ladder (make 10) - 1/2" x 1/4" x 4"
#8. Support Boards Under Beds (make 6) - 3/4" x 1" x 9-1/2" (Note: You can't see these in the below photo because they are underneath the bunk boards.

(Note: The measurements given are ACTUAL measurements and not "common" measurements.)

First, cut all of the wood. Trying to do it as you go along gets confusing.


You'll notice that there is a deep groove in the side rails for the ladder as well as the head/foot boards where the rungs/slats slide in. You can make these grooves with a router if you choose, but because I was already using my table saw, I just used that. I will explain how to do that below.

The Head/Foot Boards

Start with the 8 front/back railing pieces. You will put a groove along the entire length of the 9-1/4" boards (all of them). You want the groove to be in the side that is 3/4" wide (so, when you run it through the saw, the wider side will be the side that slides along the rip fence.

Set the blade of the table saw to be about 1/2" high. You do NOT want the blade to go all the way through the top of the wood--it's only going to go as deep as you want the groove to be (in this case, 1/2").


Set the cutting width to 1/4" (the width from the rip fence to the blade). Laying the 1-1/4" side against the rip fence, run the board through the saw. It will look like this photo when you're done. The groove won't be wide enough yet, but this is just the first pass through the saw.


Once you do the first pass on all eight of the railings, change the width of the cut by slightly less than 1/8" of an inch (note: make sure you are making the cut slightly wider--where the rip fence is a little farther away from the blade--instead of smaller. That way, the second cut will shave off a little to the left of the first cut.)

Run them through the saw again, and the groove will be a little wider. My slats didn't fit into the grooves just yet, so I adjusted the width of the cut just a hair again and ran them through a third time. I was left with a groove that was 1/4" (or just a tiny bit bigger). You want the groove to be just big enough to slide the head/foot board slats in.


Once you make sure the slats fit, remove them so that you can make marks to line up the rungs evenly on all of the railings.

Now, you'll make pencil marks so you can evenly space out the slats into the grooves. (You only have to do the measurements once, and then I'll show you how to transfer to the rest of the railings.)

The center of the 8-3/4" railing happens to be a ridiculous number of 4.375. Make a mark as close to that number as you can. Then, to make it easier, slide the tape measure over a touch so that the 4.5" spot on the tape measure lines up with the pencil mark you made. (see photo below)

Then, make pencil marks where the tape measure reads 1", 2", 3", etc. You'll have 9 pencil marks. You can erase the center one, because you won't be using it. The slats will slide between 1" and 2", 3" and 4", 5" and 6", and 7" and 8". Since they are 1" wide, they will be evenly spaced--a 1" slat followed by a 1" gap.


To transfer the marks to all of the railings, I lined up the railings tightly and evenly (starting with four, because the speed square was too small to do all eight), then I used a speed square to draw light lines along all of the railings at the pencil marks.


Using a speed square, lightly pencil a line across all of the boards where the pencil marks are.


Once you transfer the marks to all the boards, they will look like this:


Next, you'll put the railings and slats together. Put some wood glue on the end of one slat and slide it into the groove between two of the marks (shown in the picture above--where the numbers are). Wipe off any glue that oozes out.


Continue until you have all of the slats in the groove of the railing. Then put some glue on the top of each slat and carefully slide another railing onto the slats. You'll have to maneuver the slats a bit to get them to line up with the pencil marks. Once they are all lined up, place a couple of clamps to hold it all together while the glue dries and you nail the rungs into place.


Now, one head/foot board is done! Repeat the glue and nails for the other three.


THE LADDER

Repeat the entire process for the ladder, starting with making grooves in the railings with the table saw. Note that the ladder railings are a different size than the head/foot board railings, so you just want to create the grooves along the length of the center. Since the sides of the ladder are 1" wide, I started by cutting at 1/2" and then adjusted a little at a time to widen the groove.


To space out the rungs, I made a mark in the center ( at 12") and then marks every two inches apart: 


Glue each rung and place in the groove of one railing, with the pencil marks lined up at the center of each rung. Finish with the pin nailer.


Then add a little glue to the other sides of the ladder rungs and carefully slide the other ladder railing on top, pushing the rungs into the groove. It can take some maneuvering, but it'll work out! (I don't have a picture of the finished ladder at this point, unfortunately.)


BASE FOR BUNK BOARDS

Next, you'll work on building the base for the bunk beds with the 6 support boards and the 4 side railings. For these, I used pocket holes to screw them together and give them more support. I chose to put the pocket holes on the side that faces upward, because they will be covered with the bunk board.

I made one pocket hole on each end of the support boards. When you screw the support boards to the side railings, you want the support board to be flush with the railings on bottom. Then the side railings will stick up higher than the support boards. (See photo--it explains it better)

Note: The support boards are 3/4" by 1"... when you screw them into the railings, you want the 1" side to be flat on your work station. They should only stick up 3/4" from the work station, allowing enough room to place the bunk board for mattresses.


Next, you're going to attach the head/foot board railings to the base of each bed. Measure and mark the center of the ends of each base as well as the railings. See photo below:


Place a line of glue along the end of the base and then place the railing on top--lining up the two marks so that the railing is perfectly centered. Note: the railing is not going to stretch across the entire base--you still have to attach the posts later.


ATTACHING THE POSTS

Next, I attached the posts to that side. (You could always glue other end first and then work on the posts--I don't know why I did it in this order!)

Note: The posts aren't square. They are 1" x 1-1/8". The wider side will be facing you when you look directly at the side of the bed. See photo below.


To attach the posts, mark a line 1" down from the top of the post and another like 12" down from the top of the post. (Do this to all four posts.) These marks are going to be where the TOP of each head/foot board is attached.


To attach the posts, I first lined up the top of one of the head/foot board railings with the 12" mark on the post. I used some wood glue and my 18-gauge trim nailer to attach it. Then I attached the post to the other side the same way.


I repeated the whole process for the other side of the bed--glueing and nailing the head/foot board to the support, then attaching the posts. Now you should have four railings holding up the support with the head/foot boards at each end.


ASSEMBLING THE BUNKS

Next, you're going to build another base support and attach the head/foot boards, just like before. Then, line up the top of the head/foot boards with the marks you made 1" from the top of each post. It can be tricky to hold everything in place while you glue and nail or screw it to the posts--but just make sure that the head/foot boards are 1" from the top, and then attach those to the posts as well as the base support. I used glue and 16-gauge trim nails to do this. It should look like the photos below:


Next is the easy part. Just take the bunk boards and set them on the support bases. I used my pin nailer to secure them in place.


FINISHING

Fill in the nail holes with wood filler and sand any spots that need sanding.

Painting this was a bitch, I'm not going to lie! I first primed it with a brush and primer, but getting into those grooves was impossible and messy. I sanded off as much primer as I could and then chose to use spray paint instead. I should've thought of that in the first place!

Spray the whole thing with primer and then paint (do the ladder separately). Finally, attach the ladder using a nailer. Fill in those holes and touch up the paint.


THE BEDDING

If you're familiar with sewing, you can certainly wing this part. I cut four pieces of fabric (for the "mattresses") to be about 22" x 11-1/2" (allowing room for batting and seams). Then I cut out some batting to be the size of the bunk board (20-1/2" x 9-1/2"). I put two pieces of the fabric, right sides together, and sewed three sides, then turned right side out.


I placed the batting inside, straightening it out. Then I folded the raw edge sides under and sewed that fourth side closed. The mattress fit pretty perfectly on the bunk boards.


To make the pillows, I just cut rectangular scraps of fabric and sewed three sides (with right sides together). I stuffed it with poly-fill stuffing and then folded the raw edges under, and finally sewing up the fourth side. I plumped them up a bit and they were done!


This is possibly the longest post I've ever done, but I wanted to make it as detailed as possible. Now, if only I could get my cats to sleep on the bed so I can get good photos, I'd be thrilled! Hahaha, but you know cats ;) The only way I grabbed these photos was with a little catnip.


To make them into doll beds, you can also make a little blanket to go on top of the mattress so your child can tuck the dolls in :)


I had to borrow those dolls from my mom's house (they are Riley's).

I happened to have the toy Tuck and Roll dolls from Pixar's 'A Bug's Life' (I adored Tuck and Roll and Jerry bought these for me). So I had some fun taking pictures of those, too! ;)


Please let me know if you have any questions or need something cleared up! (Or if you should find a mistake in my directions--it certainly happens.) Also, if you use my tutorial, I would very much appreciate it if you would link back to my post and credit me for the work... it was a LOT of work!

Finally, if you found this tutorial helpful and want to donate a couple of bucks toward my DIY fund, I'd be so grateful! My PayPal is my usual email address: Katie (at) runsforcookies (dot) com. However, I hope you enjoy the tutorial, regardless! And if you do make the project, please email me photos! I'd love to see them :)

Featured Posts

Blog Archive