

This chalkboard wall clock was a ridiculous idea that I came up with after I'd ordered a DIY clock that arrived with defective pieces. I'd been searching for months for a huge clock, and couldn't find what I was looking for. Finally, I ordered one of those DIY wall clocks from Amazon, where you put adhesive numbers on the wall and add the hardware. (Here is the link, although I'm not saying I recommend this one--like I said, the numbers were defective--but I did end up using the mechanical part of the clock, which works great.)
I received the box and was super bummed that some of the numbers were defective. I packaged it to send it back, when I had the idea that I could probably just make my own numbers to put on the wall. The ones that came with it weren't anything super special. As I pondered a color scheme, I remembered that I had almost a full container of chalkboard paint leftover from one of my kitchen cabinets.
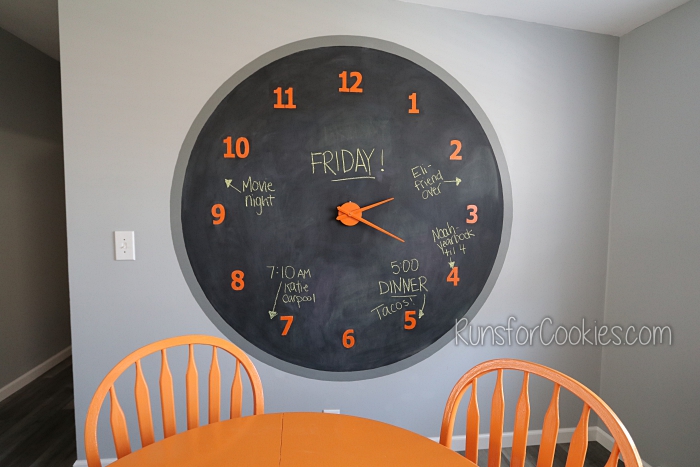
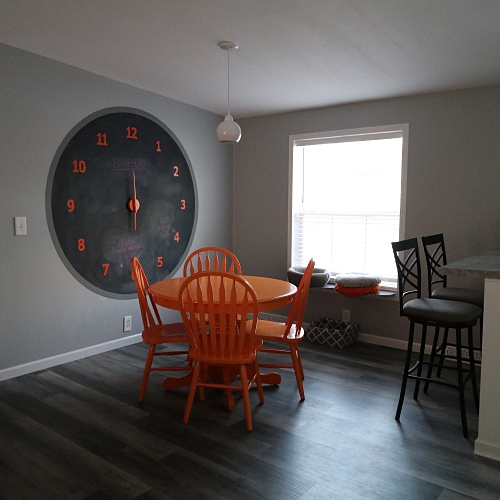
So, I introduce you to the gigantic painted-on wall clock--fully functioning, and a chalkboard to boot! I thought the chalkboard would be fun to write out the day's schedule. For my family, it has turned into our "what's for dinner and when?" clock. My kids are CONSTANTLY asking me when is dinner and what I'm making. It drives me crazy! (My family likes to add their own things on there, too, which is helpful).

Anyway, I've had some requests for a tutorial, so I will do my best. I didn't take a ton of pictures along the way, so I will do what I can with what I have. Also, this would have been much easier to follow if I had done a video tutorial. But because it was a make-up-as-you-go-along sort of thing, I wasn't thinking ahead.
I ended up making a ton of diagrams, and this has turned into the blog post that I have spent the longest amount of time working on. Haha! Hopefully, someone will use it.
Note: I started with primed and painted walls in a light gray color latex paint (Sherwin Williams' Cashmere in the color "Argos"). If your wall needs fresh paint or touching up, definitely do that beforehand.
Materials
-Chalkboard paint (a very small amount--I bought a quart at Lowe's and only used 1/4 of it)
-Oil-based primer and paint for the numbers of the clock, whatever color you'd like*
-Wooden yard stick
-Protractor (the cheap plastic ones you can get for a dollar in the school supplies section)
-Drill
-Drill bit (you want it to be small, but it doesn't have to be an exact size; you want the tip of a sharp pencil to fit in there without a lot of wiggle room. I used a 3/32" bit.)
-Pencil with a sharp tip
-12 pins (like you would use for sewing--not needles, just pins with a head on them)**
-1 tiny nail
-Hammer
-Good quality paint brush (1-1.5 inches or so)
-Stencil brush (I didn't use one, but as I explain later, it would be VERY handy)
-A tiny paint brush for touch-ups (I used an old eyeshadow brush)
-Number stencils (I printed out these ones)
-The mechanical part of a clock (I bought this $20 clock from Amazon and just used the mechanical piece). I'm sure you can use any sort of mechanical piece from a clock.
-Laser Level (I highly recommend a laser level--it made spacing out the numbers so much easier! I cannot find the one that I have, but this one is very similar. I got mine at Lowe's, and I use it all the time!)

-A small flockfoam paint roller (see pic below) - This will give you a much smoother finish than other rollers or brushes when using chalkboard paint. I used a brush on our cupboard, and the finish isn't nearly as smooth. The employee at Sherwin Williams recommended this:

*I used oil-based paint for my numbers because that's what I had on hand. I am not sure how it would work with latex paint.
**Note: I marked the spots for my numbers BEFORE I painted the chalkboard paint on. This was partly due to the fact that only after I made the marks did I notice that the clock numbers I'd purchased were defective, but I also later realized that it would have been difficult to mark the number placement after painting anyway. This is where the pins come in handy. I'll explain below.
Read through all these instructions and look at the diagrams first; everything will make more sense if you take it all in as a whole instead of each step.
Marking the Circles
1) Determine where you want the very center of your clock to be, and mark it with a tiny dot on the wall. Make sure you are SURE about the placement, because this dot will be the center (literally) of all the steps from here on out.
2) Using the drill and tiny drill bit, you are going to drill four holes into the yard stick. At one end, you will drill a hole that will be for the center of your clock. Then, the other three are for a pencil guide to place your numbers, the inner edge of the border, and the outer edge of the border (respectively).
In the guide below:
The distance from the yellow hole to the green hole will be HALF the final width of your clock. So, if you want your clock to be 50 inches wide, then the yellow and green holes should be 25 inches apart. This is important, so choose wisely ;)
The space between the green hole and the pink hole is how wide your border will be. If you want your border 5 inches wide, then place the holes 5 inches apart, for example.
The purple hole is simply a guide for placing your stencils--this circle will go through the very center of your numbers--so, again, choose wisely.
(For MY clock, which is about 70 inches in diameter:
I placed the green hole at about 1", the pink hole at about 3", and the purple hole at about 10". The yellow hole is at about 35.5". My measurements weren't exact... I just eyeballed where I wanted them.)

The holes that you drill should be just big enough to fit the tip of your pencil. If they are too big, the pencil line might get sloppy.
3) Using the hammer, tap the tiny nail through the hole (marked "center" in the diagram) in the yard stick into the mark on the wall where the center of the clock will be. Now, you should have a yard stick hanging from a small nail in the wall.
4) Insert the pencil tip into the green hole (green on the guide above--that is just for reference). Now, while holding the pencil tip in the hole, simply make a large circle on the wall by rotating the yard stick on the nail 360 degrees. You will have a perfect circle when you are done. This circle will be the size of the entire clock.
Again, make sure this is the size you want your clock to be.

5) Leaving the yardstick on the wall, insert the pencil into the pink hole, and repeat the last step. Use the yardstick as a guide to make a perfect circle inside of the first circle.
You should have two large circles on the wall--a large one and a smaller one just inside of it. (The space between these will become the border of the clock.)
6) Next, do the same thing with the purple hole. (This circle is a guide for where you will place your numbers).
Now you should have a center nail and three large penciled circles on the wall. You can remove the yardstick--you're done with it now.
Marking the numbers' placement
This is the most tedious, time-consuming part!
1) Next, you'll be using the laser level, pencil, and protractor. The protractor will likely have a little hole in the bottom center for alignment (see photo below), with a horizontal line on each side. Pull the nail from the clock center and use the nail to attach the protractor to the wall (through the same hole in the wall).
2) Now, you'll want to make the protractor perfectly level. Using the laser level, line up a perfectly level line from one end of the protractor to the other. The lines at the 0 degrees and 180 degrees should be level with the line of the laser. (see photo below)

Here is what it would look like without the protractor in the way. (If it looks unlevel, it's just because of the cropping of the photo. Trust me, it is level.):

Once you have the protractor perfectly level, hold it against the wall firmly so it doesn't budge. You are done with the laser level for the moment.
4) While holding the protractor against the wall, use your pencil to place small marks every 30 degrees.

(Again, I did this one handed while I took a picture--pretty impressive, right?!)
Eventually, you will need to turn the protractor upside down so you can do the bottom. Just make sure you line it up perfectly by using the guide lines on the protractor (there is a line that runs from 0-180 degrees--line that up with your marks).
Continue using the protractor to mark spots every 30 degrees until you have a mark for all 12 numbers. See the diagram below--the pencil marks are 30 degrees apart.

5) Use the laser to create a straight line from the center of the clock through the pencil marks you just made, and all the way to the "purple" (inner) circle. Then mark a little dot on the "purple" circle where the laser line meets the circle. THAT DOT is going to mark where the *center* of your number will go. (It's circled in green in the diagram below. I will explain the pins afterward.)

Do this for all 12 of the pencil marks you made. Once you've transferred all 12 dots to the purple circle, then you can erase the ones that are close to the protractor (the aqua ones above).
Here is where the pins come in handy. Because you've marked all these spots, you don't want to cover them up with black chalkboard paint. Insert a pin (I tapped it gently with a hammer) into the marks you made for each number, 1-12. (Again, use the pins on the "PURPLE" circle--you can erase the other ones once you mark the purple circle.)
Also, make sure you keep the small nail in the center of the clock--you want that to be marked, always.
Use the laser all the way around, lining up the center of the clock with the 30, 60, 90, etc. degrees marks and making a little dot on the large "purple" guide circle.

Once you have pins placed on the inner pencil line (the "purple" line), you are ready to paint. Leave the nail in the center of the clock, and leave all the pins in the wall. DO NOT REMOVE THEM. You are going to paint over them with the chalkboard paint.
Time to Paint
1) You can do the border first or the chalkboard paint first, it's up to you. I chose to do the border. I used dark gray latex paint and a 1.5-inch brush to fill in the border of the clock (the space between the two outer circles--"green" and "pink").
I painted this freehand, so you can see it isn't perfect (I am fine with that). But I would suggest watching a few YouTube videos about how to "cut in" paint when you're painting walls. Using that technique helped me SO much when I was freehand painting the walls against trim and the ceiling.

2) When the border is filled in, then it's time for the chalkboard paint. I would use a brush to do the edges, just like you did for the border. Then, use the roller to fill it all in. Be VERY CAREFUL not to disturb the pins. I used a brush around those.
3) Once it's all dry, apply a second coat of paint (per the instructions on the can... I think mine said to wait four hours).
Now, you should have a large circular chalkboard with a border, and there will be a nail in the center. There will be 12 pins spaced evenly (every 30 degrees) inside of the chalkboard.

Make sure it is all dry before continuing. I would wait 24 hours just to be safe.
Priming the Chalkboard
This is weird, and I never knew it was necessary until just recently when I used chalkboard paint for the first time!
1) Once the chalkboard paint is applied, you have to "prime" it before using it. To do this, you turn a piece of chalk on its side and then rub the chalk over the entire space, covering it all with chalk. I think I went through about six whole pieces of chalk to do this!

2) Once it's all filled in, then you can erase it. (I chose to prime it before painting on my numbers; I'm not sure if it matters, but it worked well for me this way, so that's what I would do.)
The Stencils
1) Place each stencil over the corresponding pin, with the pin in the very center of the number itself. (If you place the numbers to the side, top, or bottom of the pin, they will be all off-center. Make sure the pin goes through the center of the number. In the "11" below, I had to cut out a small square to fit the number over the pin.)
2) Tape the edges of the stencil to the wall. I wouldn't remove the pins until you are done placing all of the numbers. You want to step back and make sure it looks even.

I quickly used the laser level to make sure the numbers themselves weren't crooked, but you could honestly just eyeball it, because I doubt it would be noticeable if a number is slightly tilted.
Step back and it should look like this:

When you are satisfied with the number placement, THEN you can remove the pins.
3) From here, it's just about stenciling the numbers on with paint. First, I painted the primer on. See my notes below. I used a small paint brush, and it was a big mess. I would definitely recommend using a stencil brush. (A stencil brush is very thick and round with stiff bristles. You dab it over and over again over the stencil with a small amount of paint, rather than stroking it on.)

I made several mistakes with the numbers, and due to trial and error, here is my advice:
- Use a stencil brush and dab both the primer and paint on with that. A stencil brush would have solved all the issues I had regarding the numbers!
- Do NOT use spray paint. I did this and the paint was way too thin and drippy. I don't have a photo from the immediate result, because I panicked before I could take one. It didn't cover well, and it looked terrible. I ended up having to spray the paint into a small plastic cup, and then use a brush to dab it on. It was a big fat mess and I cried real tears.)
- Use a primer first--one or two coats, per instructions on the can.
- Then apply the color (again, I'd use a stencil brush and dab it on). I used an old eyeshadow brush to fix how terrible the numbers looked! I spent a lot of time trying to keep a steady hand and paint over my mistakes).


4) Once the numbers are stenciled on, then you can carefully remove the stencils. You'll need to make a few touch ups and fill in the gaps in some of the numbers (like the numbers above).
5) Once all the numbers look the way you want them to, it's time to place the mechanical part on the wall. To do this, you'll have to just follow the instructions per the manufacturer. The end goal is to make sure that the center of the mechanical part is dead center with that tiny nail you still have in the center of your clock.
As long as the mechanical part is dead center, then your clock should work smoothly! I primed and painted the mechanics orange. I took the hands off of it first, then painted and waited for it to dry before putting it back together. I made sure to cover the working parts with tape so paint didn't get inside).
Aaaaannnnnddd... if you managed to make it through all of these instructions, you should have a huge, functioning, chalkboard wall clock :)
I hope I explained this well. It wasn't nearly as hard as I make it sound in this tutorial. The biggest headache is just from aligning where the numbers will need to go. (Instead of using pins, you could probably even paint the chalkboard first, and then use chalk to mark the spots. This is just the way that I chose to do it, based on what was working/not working out.)
Good luck! It was a lot of work, but I LOVE the clock, and it's definitely the center of attention when people see it. It's very unique and fun :)
If you DO happen to make one, or something similar, make sure you share a picture with me! I'd love to see how it turns out.


This is amazing! Your tutorials are so well-written, and it's impressive how you've tackled all these projects, they'd intimidate the crap out of me.
ReplyDeleteLove, love, love it!!
ReplyDelete