

This post is continued from DIY Kitchen Makeover, Part 2 and previously, DIY Kitchen Makeover, Part 1
Countertops
I wasn't sure what to do with the countertops. I had planned on painting them--there is actual paint that is used for countertops--but I wasn't in love with the idea. I knew I didn't want to replace them with granite or something (I happen to really like laminate, even though it's not what the cool kids are using these days!).
Again, I began some online searches and discovered that people actually make their own laminate countertops. This never even occurred to me! I assumed it would still be very expensive, but after pricing it out, I was so surprised. I wished we'd done it years ago.
In the end, we made our own countertops out of particle board and sheets of laminate. It was so much easier than I expected! I also installed a new kitchen sink (bigger and only one basin, rather than a divided one).
Countertops are much simpler than I thought: particle board, laminate, and contact cement. That's it!
First, I cut down the particle board to the sizes we needed (basically long rectangular shapes). I cut two of each and stacked them so that they would be 1.5 inches thick (the particle board is 3/4-inch). To do that, I put wood glue all over the surface of the bottom one, and then I put the other one on top. I lined them up very carefully and clamped them together to get a good seal while the glue dried.

After that, I used a router (I had no idea what a router was--I borrowed Brian's, and I learned that it is the coolest tool ever!). The router basically trims the edges so that they are flush. I was going to try to explain how it works, but it is way too difficult to explain. Just know that it's an amazing tool and I'm sad that I have to return it to Brian.
After making sure that the countertops were tightly glued together and the edges were smooth, it was time to apply the laminate. I had to cut the laminate to size (with a bit of an overhang in all directions, which will be cut off later). I put masking tape on top of all of the lines where I'd be cutting (with a circular saw) so it didn't chip the laminate. That worked really well! I cut the pieces for the tops and the sides that would be visible.
Next, I applied the contact cement to the sides of the particle board as well as on the back of the long strips of laminate that would cover the sides of the countertop. (I used an old paintbrush for this, knowing I'd have to throw it away afterward.)
I let the contact cement dry, per the instructions. Once it was dry, Jerry and I carefully lined up the laminate strips to the sides of the countertop and pressed them together to bond them. I used a router (this time it was a smaller one that is specifically for this purpose--called a trim router) to trim off the excess laminate. The sides were done!

Then it was time to apply the laminate to the tops, which is done similarly to the sides. Because the tops are so big, and the laminate sheet has to be lined up carefully, we used dowels to keep the laminate from bonding to the particle board until we were ready.
When contact cement is dry, it's not sticky at all. It doesn't bond to other things--only to itself. So by pressing the two pieces coated with contact cement together, they are bonded permanently. With dowel rods in between the laminate and the particle board, the two can't bond just yet.

We laid the laminate sheet on top of the dowels and made sure it was evenly lined up (a small overhang on each side). Then, starting in the center, we removed the dowels one by one, pressing the laminate down onto the particle board.

I had been so intimidated to do this, but it was so easy! Once the top was bonded, we used the trim router on each edge to cut away the excess. Viola! New countertops. Jerry screwed them into the counters, and I was thrilled with how they turned out.

For the sink, I had cut (with a jigsaw) the hole for the sink into the particle board top, and used a router along the insides of the hole. Then we applied the laminate on top of the entire countertop, even over the hole for the sink. Finally, I drilled a pilot hole in the laminate over the hole for the sink, and I used the router to cut out the laminate to the edge of the hole.
I installed the sink (the plumbing was the most frustrating part of the entire project thus far). I was SO excited about how it looked!
You can read more about the countertops and sink on this post: I Made My Own Countertops!
The Kitchen Island
This was a project in and of itself. I had an idea in my head from the very beginning, and I was determined to carry it out. The island we had was four feet long. I wanted to extend the countertop to eight feet long, but keep the cabinet part the same size. That way, we could add some barstools and have seating on the other side of the island.
Here is my post about making the island from scratch: The Story of Our Kitchen Island

I left that post off with a cliffhanger (that might be overdramatizing it, haha!) about what we were going to put down underneath the epoxy countertop.
The next post can be found here: Completing the Epoxy Countertop!
Finishing the countertop was a complete nightmare, and I'm sure I have several (more) gray hairs because of it.
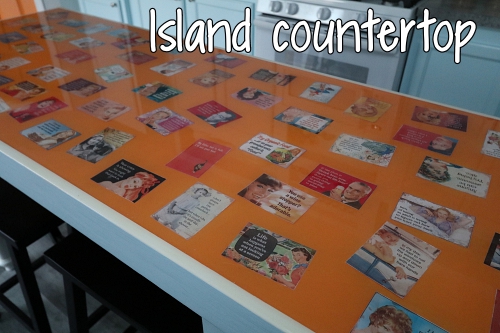
The final post of the island countertop nightmare can be found here: An Epoxy Nightmare
The Floors
This was the most expensive part of the project, and I knew I wanted to do it last, as the "finishing touch". This was all Jerry. While I did about 90% of the other work (solely by choice--since he works full time, it was only natural that this DIY makeover would be my project), he did an amazing job on the floors.
I knew I wanted luxury vinyl planking for the floors.
I searched and searched, reading about all the different kinds, what to look for in terms of durability and quality, and I was completely overwhelmed with choices. I wanted high durability (with two cats, a dog, and two teen boys, it had better be durable!) but I didn't want to spend $6-8 per square foot.
In the end, I chose MSI Herritage planks in the color Beaufort Birch (shades of gray--not too light, not too dark). The day it was delivered, I threw on my shoes and coat to go outside and help the delivery guy bring it into the garage. Well, it weighed a tad more than I expected. It was on a pallet, and the pallet full of planks weighed over 2,100 pounds!!
Rather than carrying in each 44-lb box, he used a pallet jack. I was SO nervous watching him lower it from the truck to the ground. The ramp on the truck looked very unsteady, and at one point, I was so sure the pallet was going to tip over and fall off the ramp. (The delivery guy said the same thing.) Once it was on the ground, he pulled and I pushed all 2,100 pounds of planks up the driveway and into the garage.
Jerry and I tore up the linoleum in the kitchen, as well as the carpet from the living room/dining room and hallway. And then Jerry got to work.

Jerry's friend/coworker used to install flooring for a living, and he was so nice to come over and get Jerry started, giving him tips for installation. He was only here for about an hour, but he finished nearly half the kitchen! Jerry continued to work on it, and a couple of days later, the flooring was done--in the kitchen, pantry, living room, dining room, and hallway.
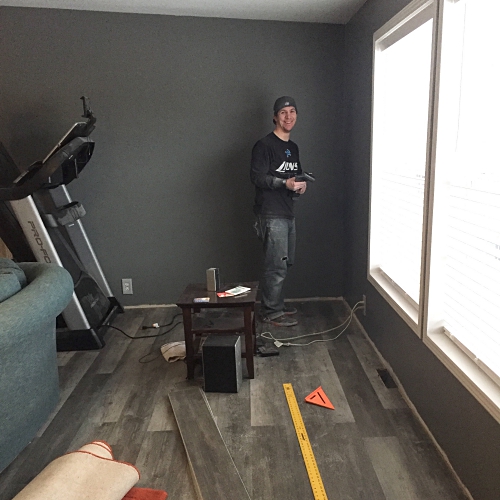
And it looked awesome.
I was so happy with the floor! Since I ordered it without a sample, I had been a little nervous. But the quality is fantastic and the installation wasn't bad at all (I speak for Jerry on this, haha).
We had leftover planks, so we used them in the bathroom and the kids' closets.
Floor Trim and Finishing Touches
For the floor trim, I bought this simple baseboard molding from Menards. I borrowed my dad's miter saw and did the baseboards pretty quickly. It was already primed, so I just had to cut and nail it to the wall with a trim nailer (borrowed from Brian). Then I filled in the holes with wood filler, and put a single coat of white paint on it. Done!
Other touches:
Painted my dining table and chairs
Hung and painted new door slabs for each doorway
Installed a new fan in the living room and light fixtures in the kitchen and dining room
Made a "pet feeding station"
Painted an enormous chalkboard wall clock in the dining room
Bought some new (used) furniture for the living room
Bought some used barstools for the snack bar
Bought some counter stools from Amazon for the island
A new range! (Our oven died about two years ago, but we continued to use the stove and countertop oven. We finally got a new range with a working oven. I've only used it twice in a month, hahaha--I'm so used to NOT using it now.)
Continued in Part 4...
No comments:
Post a Comment
I used to publish ALL comments (even the mean ones) but I recently chose not to publish those. I always welcome constructive comments/criticism, but there is no need for unnecessary rudeness/hate. But please--I love reading what you have to say! (This comment form is super finicky, so I apologize if you're unable to comment)