

This is continued from DIY Kitchen Makeover, Part 1...
The Moulding
Next up: painting the window and door casings, as well as the window sills and door jambs. Since we were going to replace the flooring later on, I decided to remove the floor board trim instead of painting it (it was very cheap material and definitely not worth trying to save). I would replace it with new trim later.
In retrospect, I wish I'd have replaced the moulding around the windows and doors. We ended up doing that in the kids' bedrooms, and it wasn't nearly as expensive as I imagined. However, it all worked out, so it's no big deal.
I knew nothing about caulk until I started researching paint, and then I learned all of the great uses of caulk! I filled in any gaps in the moulding with caulk (just make sure it's paintable!). I used these little caulking tools to smooth it out, and I was amazed at how much better the caulk made it look. I always wondered how trim looks so seamless and smooth! It's due to caulk and wood filler.
I used Kilz oil-based primer on the moulding. I thoroughly cleaned it all beforehand, but I didn't sand it. After a lot of research on paint, I decided that sanding trim wasn't necessary. I applied a coat of the primer, and then two coats of oil-based paint. I used Sherwin Williams oil-base in a slightly off white color called "Spare White".

I read a ton about oil-based paint versus latex with enamel, and decided oil was definitely the way to go (on the moulding and the cabinets). The main downside of oil-based paint is the drying time (24 hours minimum) and the clean-up (using mineral spirits--no water--and having to properly dispose of the mineral spirits which can't be poured down the drain). It was definitely a pain to use, especially on the cabinets (more on this later) but I wouldn't consider anything else.
I also added a paint thinner called Penetrol (Amazon affiliate link) to the oil-based paint in order to make it easier to apply and minimize brush strokes. I don't mind brush strokes (I like that they make things look less manufactured) but adding the Penetrol helped with the application a lot. Without it, the paint was hard to spread around and get into the little crevices of the moulding and cabinets.
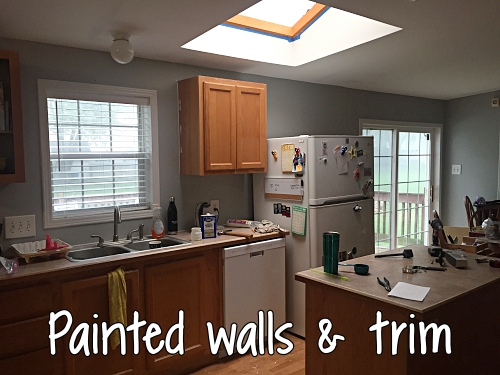
While the paint was drying, I had to hang plastic sheets over the window sills so the cats wouldn't step on it. I couldn't believe the difference that a little paint can make--the trim looked so much better! We weren't even close to done, but look at the difference already:
The Cabinets
Since we were going to have freshly painted walls and new flooring, I figured we might as well give the cabinets a makeover, too. Even though our cabinets are not top quality, they function just fine and I didn't want the expense of replacing them. So, I decided to paint them.
I also wanted to do something with the space between the cabinets and the ceiling. It seems like such a waste of space, so I began browsing the internet for ideas of what to do with it. In the end, I decided to make some open shelves that extended the cabinets to the ceiling.
I was very unfamiliar with woodwork, and I had no idea how to start. I had some ideas in my mind, but they didn't pan out very well. Finally, I bought some plywood to make boxes and some finished boards to make "faces" (the outer, finished border of the cabinets).
I wish I had known about using a Kreg jig for pockethole screws--those would have made this SO much easier! Instead, I used screws, braces, and wood glue. It was much more work than using the jig, but I was happy with how they looked when I was done. I placed them on top of the cabinets and fastened them together.

Painting the Cabinets
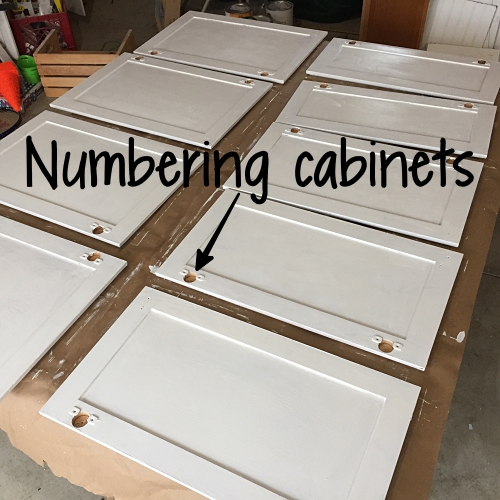
I have a lot of cabinets, even after removing the ones we did in the beginning. I removed all of the doors and drawers, so I was left with just the "shell" of the cabinets in the kitchen (as seen in the photo above). I knew I wanted to do something different with our island, so I didn't bother painting that just yet.
When removing the cabinet doors, I marked a number on each one to correlate with the location of that door to the cabinets. I wanted to put them back on exactly where they were before. I put the numbers inside of the little hole where the cabinet hardware would go, so it wouldn't be seen or painted over.
I took all of the cabinet doors out to the garage and laid them out. (Doing this in the house would have guaranteed pet hair embedded in the doors, haha.) I chose to sand these, even though it probably wasn't necessary. I didn't sand them super hard, but I did a light sanding after cleaning them thoroughly with TSP (trisodium phosphate, found in the painting section of Lowe's).
I applied a single coat of Kilz oil-based primer. The primer dries really fast, so I was able to apply a coat to one side of the doors on the same day.
The problem with painting the doors of the cabinets was that I could only paint one side every 24 hours.
Also, it got cold outside.
I learned that oil-based paint does not like to dry in the cold! It took up to three days for a single coat to dry, and then I'd have to turn it over and paint the other side. The doors took much longer than expected because of this.
Meanwhile, I got to work painting the "shell" of the cabinets inside. Again, I cleaned them very well with TSP. I also filled in the minuscule holes in the cabinets where trim nails were used by the manufacturer with wood filler (it's just a tube that you squeeze, like toothpaste, and rub the filler into each hole with your finger, and then wipe off with a damp rag).
Painting the cabinets inside the house didn't take much time at all, because it dried quickly and I didn't have to turn anything over and get the other side, like I did with the doors.

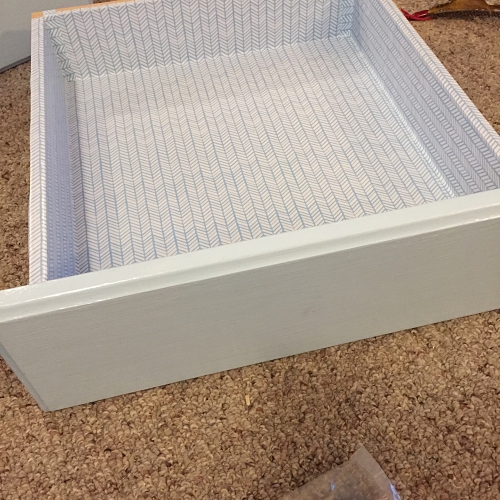
While the doors were off, I lined the inside of the cabinets with contact paper, which made them look so much better.
Once the doors finally dried, I brought them inside and reinstalled all of the hardware. I bought knew knobs and drawer pulls, and used a Kreg jig for cabinet knobs and pulls. This tool was invaluable! I wanted to make sure to get everything on uniformly and evenly, which is much harder than it sounds. The Kreg jig made it super easy. I highly recommend this if you are installing new knobs or drawer pulls.


Finally, I hung all of the doors back on the cabinets, and was thrilled with how good they looked!
I loved the color, but I didn't love it next to the gray walls. For some reason, the blue-on-gray didn't look right. I was very undecided what to do. I knew that it would bother me every time I looked at it, so I decided to change it up. I left the gray everywhere except for the areas around the cabinets. I painted the walls surrounding the cabinets white and it looked so much better!

The only problem was the transition from white to gray on the walls. I looked online at different ways to transition paint between rooms, but I didn't like those ideas. Finally, I decided that a single stripe of dark gray (the color we painted the living room) would work. For this, I did use tape--I used a laser level to get perfect lines and applied the tape along those. Then I painted with the gray between those lines.
I really like how it looked after that!
Continued on Part 3...
No comments:
Post a Comment
I used to publish ALL comments (even the mean ones) but I recently chose not to publish those. I always welcome constructive comments/criticism, but there is no need for unnecessary rudeness/hate. But please--I love reading what you have to say! (This comment form is super finicky, so I apologize if you're unable to comment)