August 08, 2008

Ice Cream Pint Cozy (a free knitting pattern)


I’ve been wanting to make one of these for about two years. I eat entirely too much ice cream and I’m always vowing to not buy it anymore, so I never made the cozy. Finally, I just decided to make one, because let’s face it–I’m never going to give up ice cream!


Here is a printer-friendly version of the pattern!


This cozy is knit from the bottom center outward, and then up.

Materials:
  • size 7 needles for knitting in the round (dpns or magic loop)
  • about 20 grams of worsted weight yarn (I used Patons Classic Merino)
  • stitch marker
  • tapestry needle
Gauge:
  • 5 sts = 1 inch
Abbreviations:

  • CO: Cast on
  • K: Knit
  • Sts: Stitches
  • KFB: Knit front/back. Knit into the next stitch like normal, but don't drop it off the needle. Knit into the same stitch from the back. One increase made.
  • KLL: Knit left loop. With your left needle, pick up the left loop of the stitch two rows below the last stitch you just made, and knit into the back of it. One increase made.
  • M1: Make one. There are lots of different ways to do this, but I make a backwards loop (like you would for casting on, but you're only going to do one stitch like this).
  • 2x2 rib: Knit 2 sts, purl 2 sts. Repeat around.
  • BO: Bind off in pattern.


Directions:
CO 8 sts and join, using a circular cast-on. Place marker at the beginning of the round.

Rnd 1: KFB each st around. (you should have 16 sts)
Rnd 2 and all even rows: Knit.
Rnd 3: (K2, KLL) around. (24 sts)
Rnd 5: (K3, KLL) around (32 sts)
Rnd 7: (K4, KLL) around (40 sts)
Rnd 9: (K5, KLL) around (48 sts)
Rnd 11: Purl around.

Next: Work stockinette stitch (knit every round) for 1.5 inches (measuring from the purl row)

Next round: *K12, M1* around. (52 sts)

Next: Work stockinette stitch until the cozy measures 2.75 inches from the purl row.

Next: Work 2x2 rib for 5 rows.

BO in pattern. Using tapestry needle, weave in ends.


May 30, 2008

Quick & Easy Knitted Baby Hat (a free pattern!)

Knit from the bottom up, this hat works up very quickly in the round.


Here is a printer-friendly version of the pattern!


Materials:
  • US size 6 needles to work in the round (I used magic loop, but do whatever you prefer)
  • small amount of sport-weight yarn
  • stitch marker
  • tapestry needle for weaving in ends
Gauge:
  • 5.5 sts and 9 rows equals 1 inch
Abbreviations:
  • K- knit
  • P- purl
  • K2tog- knit two stitches together
  • CO- cast on
  • PM- place marker
Instructions:

CO 70 sts. PM and join to work in the round, being careful not to twist.
Rnd 1: K
Rnd 2: P
Repeat rnds 1-2 once more.

Rnd 5: *K6, P1* around.
Repeat rnd 5 until piece measures 3.75 inches from the cast-on.

Next: Purl two rnds.

Begin decrease:
Rnd 1: *K5, K2tog* around.
Rnd 2 and all even rounds: Knit.
Rnd 3: *K4, K2tog* around.
Rnd 5: *K3, K2tog* around.
Rnd 7: *K2, K2tog* around.
Rnd 9: *K1, K2tog* around.
Rnd 11: *K2tog* around (10 sts remain)
Rnd 13: *K2tog* around (5 sts remain)

Here you can either cut yarn and thread through remaining sts, or work a 5-stitch i-cord for 5 rounds. When you're done with the i-cord, cut yarn and thread through the remaining sts. Pull tight to close. Using tapestry needle, weave in ends.


May 04, 2008

The 500 Festival Mini-Marathon 2008

This is the earliest-dated post on Runs for Cookies, but I didn't actually start writing on this blog until April 2011. I wrote in a different blog for MANY years (2000-2011), but that has since been archived. I copied this post (and a few others) from my previous blog, because of its relevance. 


Remember I signed up for that half-marathon in Indianapolis?  Well, that was Saturday. Stacie came with me, which I was excited about. My mom, 3 of her friends, my sister, and 4 of her friends went. We drove there on Friday. Stacie, my sister Jeanie, and I shared a room.

We went out to a pasta dinner (to carb-load for the race!). Then we went to Haggen Dazs for some ice cream. We went to bed early. I didn't sleep much because I was nervous about the race. I truly didn't think I'd finish it. I wasn't prepared for it at all.

Saturday--The race started at 7:30 AM, so we had to get up early. We got dressed and went down to our "corral". We were in the Z corral to start (The starting line was the A corral for fast people, and there were 50,000 people in this race. We were at the end because we estimated our time to be 4 hours, which is the max. You had to maintain an 18-minute mile or else you had to get on a bus to the finish line.)

The race started and it took us about 35 minutes to get to the starting line. We had a chip on our shoes that started our time when we got to the starting line and stopped our time when we got to the finish line. As soon as we got to the start, everyone in our group started going really fast (about 12.5 minute mile!)  Keep in mind the plan was to walk this half marathon.

Anyways, we ended up splitting up after a mile or so, and Stacie and I walked together. We jogged a little because it took pressure off of our hips and feet. It was actually a lot of fun for the first 6 miles or so. There were lots of bands set up along the way, and tons of people cheering everyone on. Once we got to the Indy 500 race track, which we had to walk around, we were sooo bored and tired of walking. The race track was the worst part of the whole walk. It was really boring and long. Once we finished that part though, we only had 4 miles left.

The last mile was the hardest. My feet were hurting BADLY. My legs hurt. My back hurt. My whole body was so sore. When we saw the finish line, we jogged the last tenth of a mile to the end. My sister watched us finish (she was ahead of us) and she was so proud and excited that I actually did it--she cried when she saw me reach the finish line. Then we watched as my mom and her friends crossed, which made me get tears in my eyes.

The whole atmosphere was awesome--everyone cheers you on and makes you feel good.
I was in SO MUCH PAIN afterward. I took a Motrin 800. Didn't really help. We sat around all day long to just relax. That night we went out to dinner. I was limping badly, could barely move. Took more Motrin and a sleeping pill so I could sleep.

Sunday (today)--Got up, had breakfast, and drove home. I'm super duper duper sore today. My legs ache like you wouldn't believe, and I think I may have a stress fracture in my left foot. I can barely walk because I have a really sharp, shooting pain in the bone of my foot. I'd like to go get in x-ray'ed if it's not better tomorrow.

Our friends Tom and Jessica came over with their kids for dinner. Jessica's a massage therapist and she stretched me out. It helped a lot with my legs, but did nothing for my foot.

I feel like I was hit by a truck. But I'm already thinking I may want to do this again next year... more prepared, of course!


February 13, 2008

Janice (a free knitting pattern for a plush cat)

This pattern is in memory of our cat, Janice, who was solid black. I made this stuffed cat for my 3-year old son. The face could look better, but I'm not very talented at that part yet :)


The cat is knitted from the top down, seamlessly, and then the ears are worked last.

Here is a printer-friendly version of the pattern!

Materials:
  • TLC Amore yarn in black (or whatever your color preference)... I would not substitute yarn here, unless you pick something with a lot of texture to it. There are a lot of increases and decreases, and this yarn hides ALL of that, including any flaws.
  • US size 5 dpns (or long circular for magic loop, which is what I used)
  • contrasting yarn for the face
  • stitch markers
  • stitch holders (I just used scrap yarn)
  • tapestry needle
  • polyester fiberfill (batting)

Gauge:
  • not important

Stitch Abbreviations:
  • CO: Cast on
  • K: Knit
  • P: Purl
  • Sts: Stitches
  • KFB: Knit front & back--Knit the stitch like you normally would, only don't slide it off the left needle. Now knit through the back loop and slide off.
  • PM: Place marker.
  • SM: Slip marker.
  • K2tog: Knit the next two stitches together.

Directions:

CO 6 sts, then knit one row as if you were doing an i-cord. Divide the sts to work in the round, marking beginning of round.

Rnd 1: KFB all sts
Rnd 2 (and all even rnds): Knit.
Rnd 3: (K1, KFB) around. 18 sts total.
Rnd 5: (K2, KFB) around. 24 sts.
Rnd 7: (K3, KFB) around. 30 sts.
Continue increasing 6 sts per round in this manner, until there are 54 sts on the needles.
Knit 4 rounds even.

Begin decrease...
Rnd 1: (K7, K2tog) around.
Rnd 2 (and all even rnds): Knit.
Rnd 3: (K6, K2tog) around.
Rnd 5: (K5, K2tog) around.
Decrease in this manner until you have 24 sts.

Neck & Shoulders...
Rnd 1: Knit.
Rnd 2: (K2, KFB) around (32 sts)
Rnd 3: (K3, KFB) around (40 sts)
Rnd 4: (K4, KFB) around (48 sts)
Rnd 5: K2, PM, K20, PM, K4, PM, K20, PM, K2
Rnd 6: K1, KFB, SM, K20, SM, KFB, K2, KFB, SM, K20, SM, KFB, K1
Rnd 7: K2, KFB, SM, K20, SM, KFB, K4, KFB, SM, K20, SM, KFB, K2
Rnd 8: K3, KFB, SM, K20, SM, KFB, K6, KFB, SM, K20, SM, KFB, K3

Rnd 9: K5, then move those sts to a st holder. K20, Sl next 10 sts to another holder, K20, place next 5 sts onto the first st holder. You should have 10 sts on each of the two st holders.
Rnd 10: Knit (40 sts)
Rnd 11: (K4, KFB) around (48 sts)
Knit 3 rounds even
Rnd 15: (K5, KFB) around (56 sts)
Knit 3 rounds even
Rnd 19: (K6, KFB) around
Knit 3 rounds even

Begin Decrease...
Rnd 1: (K6, K2tog) around
Knit 3 rows even.
Rnd 5: (K5, K2tog) around
Knit 3 rows even.
Rnd 9: (K4, K2tog) around
Knit 3 rows even.

Form tail...
Rnd 13: K3, K2tog, K3, PM, K4, PM, K1, K2tog, (K3, K2tog) to end.
Rnd 14: K7, SM, KFB, K2, KFB, SM, K to end.
Rnd 15: K7, sl 6 sts between markers onto st holder, K to end. (29 sts)
Rnd 16: Knit.

Form legs...
Rnd 1: K1, PM, K12, PM, K4, PM, K to last 3 sts, PM, K3
Rnd 2: KFB, SM, K12, SM, KFB, K2, KFB, SM, K9, SM, KFB, K2
Rnd 3: K2, SM, K12, SM, K3, KFB, K1, KFB, K9, SM, KFB, K1, KFB, K1
Rnd 4: K2, SM, K12, SM, K3, KFB, K2, KFB, K1, SM, K9, SM, KFB, K2, KFB, K to end.
Rnd 5: K2 and slip those two onto a st holder, SM, K12, Sl 10 sts between markers onto st holder, knit to last marker, slip last 8 sts onto the first st holder.


At this point, stop and fill with the batting (not too full, because you'll distort the shape).

Legs & Tail:
Slide the sts from the holder onto the needles, and pick up 2 sts (or more, to avoid leaving a hole). Work stockinette stitch in the round until desired length. Fill with batting (I left the tail empty), break yarn, and pull through remaining sts. Pull tight and using the tapestry needle, weave in the ends.

Ears (make 2):
CO 12 sts.
Row 1: Knit.
Row 2: Purl to last st, then turn.
Row 3: K1, then pass the unworked st from the right needle OVER the one you just knitted and off the needle (decrease made). Knit across to last 2 sts, K2tog.
Repeat rows 2-3 until there are 2 sts left. K2tog, BO.
Using the tapestry needle, place the ears into position and sew into place.

Face:
Like I said, I'm no expert with this part :) Just embroider or duplicate stitch a face on your kitty.


January 18, 2008

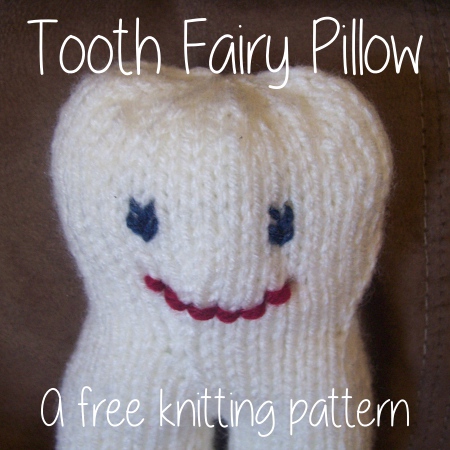
Tooth Fairy Pillow: A free knitting pattern

When I was a kid, my mom had sewn a tooth-shaped pillow out of white fur, with a little pocket to put our teeth while waiting for the tooth fairy to come. I now know that she did this so we didn't lose the tooth before she could swap it with a dollar bill. I decided to create a knitted version. Here is my pattern...


Here is a printer-friendly PDF copy!


Materials:
  • worsted weight yarn in white, red, and blue. Not sure how much of the white yarn I used, but I would estimate maybe 80 yards? The red and blue were just scraps.
  • US 5 double-pointed needles
  • 1 US 5 circular needle (for holding stitches--if you don't have one, you could thread a piece of yarn through the stitches to hold them)
  • crochet hook for provisional cast-on
  • yarn markers
  • tapestry needle
  • batting for stuffing the pillow
Gauge:
  • not important
Abbreviations:
  • PM- place marker
  • KLL- knit left loop: with your left needle, pick up the left loop of the stitch TWO ROWS below the last completed stitch, and knit it through back loop (an increase made)
  • WNKS- wrap next stitch: turn the work, then slip the first stitch on the right hand needle to the left hand needle. Send the working yarn back between the needles, then slip that unworked stitch back onto the right hand needle. Then bring the yarn forward to purl.
  • WNPS- wrap next purl stitch: turn the work, then slip the first stitch on the right hand needle to the left hand needle. Bring the working yarn forward between the needles, then slip that unworked stitch back onto the right hand needle. Then send the yarn to the back again.
  • K2tog- knit the next two stitches together.
  • KWS- knit wrapped stitch: insert your right needle under the "wrap" first, then the stitch that it is wrapped around. Knit them both together.
Directions: (you'll be casting-on just below the "crown" and working down. Then later, you'll work the crown)

Provisionally cast-on 40 sts, divide evenly on dpns, and join to work in the round. PM to mark beginning of each round.

Rnds 1-5: Knit.
Rnd 6: *K8, K2tog* Repeat from * around.
Rnd 7: Knit.
Rnd 8: *K7, K2tog* Repeat from * around.
Rnd 9: Knit.
Rnd 10: *K6, K2tog* Repeat from * around. (You should have 28 sts)
Rnd 11: Knit.
Rnd 12: *K7, KLL* Repeat from * around. (Don't forget to KLL after the very last stitch of the round--you'll have 32 sts now)
Rnd 13: Knit.
Rnd 14: *K8, KLL* Repeat from * around. (36 sts)
Rnd 15: Knit.
Rnd 16: *K9, KLL* Repeat from * around. (40 sts)
Rnds 17-19: Knit.

Rnd 20: K the first 20 sts with the circ needle (or use dpns and slip the 20 sts onto a stitch holder or slide a scrap piece of yarn through the sts) Let these hang around, you'll be working them later. K the last 20 with the dpns--you'll be working these sts now.

CO 2 sts, and join into the round (22 sts on the dpns now).
Rnds 1-2: Knit.
Rnd 3 (short rows): K18, WNKS. P14, WNPS. K9, WNKS. P7, WNPS. K7, KWS, K4, KWS, K3 (you should be at the end of the round now).
Rnd 4: Knit, KWS as needed.
Rnd 5-6: Knit.
Rnd 7: K to last 4 sts, *K2tog* twice. (you should have 20 sts)
Rnd 8: Knit.
Rnd 9: *K3, K2tog* across.
Rnds 10-11: Knit.
Rnd 12: *K2, K2tog* across.
Rnd 13: Knit.
Rnd 14: *K1, K2tog* across.
Rnd 15: Knit. Break yan, and thread remaining yarn through sts and pull tight.

Using the stitches from the circ needle (or holder) join yarn and knit around. CO 2 sts and join in the round. Repeat rounds 1-15 above. Sew the opening between the legs.

Working the "crown":
"Unzip" the provisional cast-on carefully, slipping each stitch onto a dpn. PM at the beginning of the round, and after the 20th stitch to mark the center. (I used 4 dpns, with 10 sts on each needle)

Rnd 1: Knit.
Rnd 2 (short rows): *K14, WNKS, P8, WNPS, K8, KWS*, K to middle PM. Repeat between *, then K to start of round (KWSts as needed).
Rnd 3: Knit around, KWSts as needed).
Rnds 4-5: Repeat rnds 2 and 3.

You may want to stop here and fill the pillow with the batting before going on. I used a pencil eraser to stuff it into the "legs".
Rnd 6: *K2, K2tog* around.
Rnd 7: Knit.
Rnd 8: *K1, K2tog* around.
Rnd 9: *K2tog* around. Break yarn, and draw through remaining sts. Make sure you have as much stuffing as you want, then pull tight and weave in ends.

Pocket:
CO 10 sts with red (or whatever color you want).
Rnd 1: Sl1, *P across*
Rnd 2: Sl1, *K across*
Repeat for 7 rows. BO. Sew the pocket onto the tooth pillow.

For the face, you can embroider eyes and a mouth (I just used scrap yarn for this).


(Copyright notice: This is an original pattern created by myself, and may not be distributed without my written consent. You may link to this pattern, and use the photos with a link back to the pattern, but you may not sell the pattern or republish the pattern in any way. Thank you!)


Featured Posts

Blog Archive